background image

ENGLISH

28

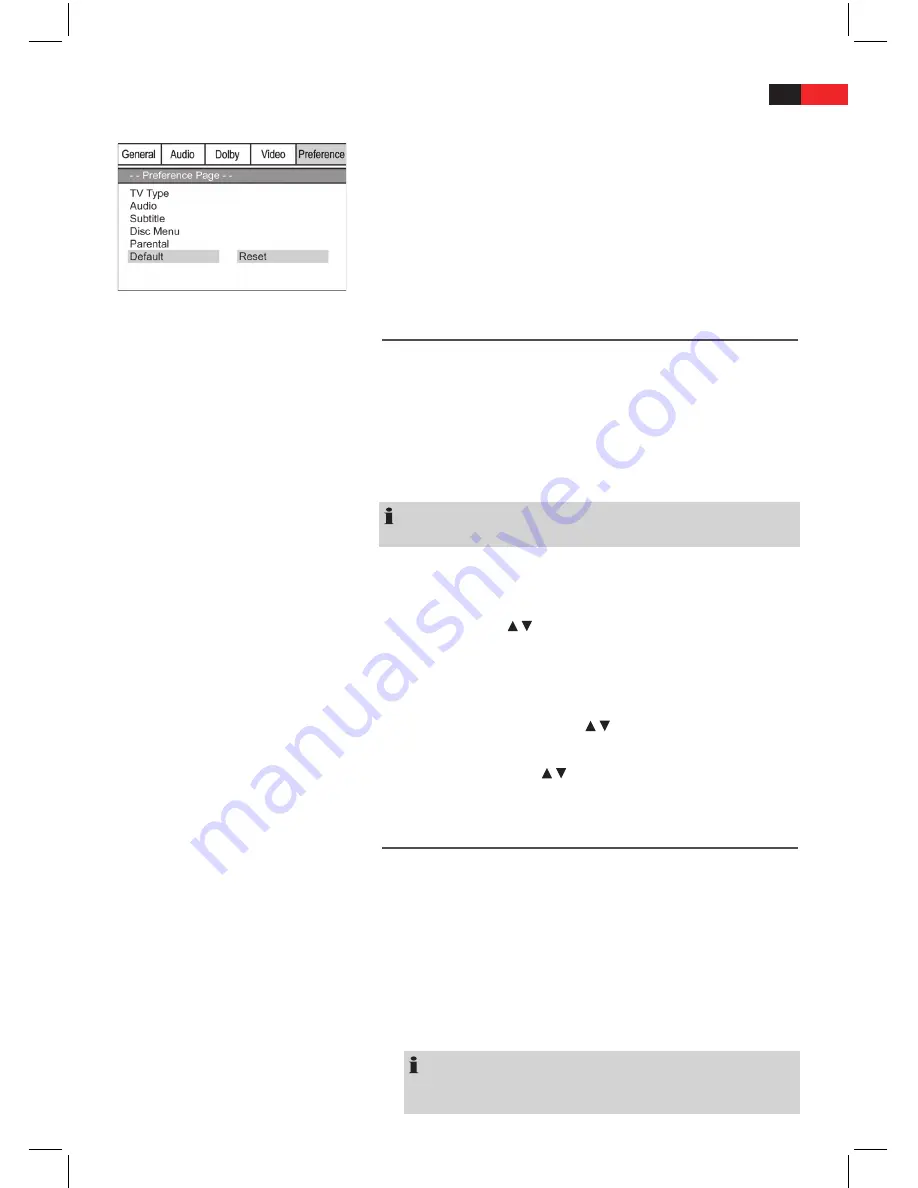
Default

Select the command “Default/ Reset” if you want to reset the player to 

the factory implemented default settings.
Any settings you have made will be lost.

Radio Station Set-up

This device has a built-in FM/AM radio receiver. There are 2 different ways 

to search for radio stations: automatic station finding and manual station 

finding.

1. 

Use the 

SOURCE

 (Fig. 3/13) button to select the “FM” mode.

2.

  Press the 

AUTO SCAN

 (Fig. 3/19) button. The device searches the cur-

rent frequency band for stations and stores them automatically. The 

stored radio stations will be deleted.


NOTE: 

It is not possible to change the order of the stations.

Manual Station Finding
1.

  Use the 

SOURCE

 (Fig. 3/13) button to select the “FM” mode.

2.  Press the 

TUNING

  /  buttons (Fig. 3/21) to search for a station. 

Press the corresponding button repeatedly until you have found the 

desired radio station.

3.  To store the radio station you have found press the 

MEMORY

 button 

(Fig. 3/20), a storage location flashes on the display (e.g. P01).

4.  Then use the 

MEMORY

 buttons  /  (Fig. 3/29) to select the desired 

storage location.

Press the 

MEMORY

 buttons  /  (Fig. 3/29) to select the stored radio sta-

tion.

AUX IN (R/L) Input Sockets

To connect analogue playback units, the unit has two different connec-

tion options: LINE IN on the front and AUX IN on the back of the unit. 

With these sockets you can also hear the sound from other playback 

devices such MP3 players, CD players etc through the loudspeakers.

1. 

Connect the external unit as follows:

•  With a 3.5 mm stereo TRRS connector to the LINE IN jack 


(Fig. 1/8).

•  With a cinch cable (2x RCA) to the AUX IN jacks on the back of 

the unit (Fig. 2/17).


NOTE:

If you have connected an external unit to both inputs, playback 

from the LINE IN jack is preferred.

Summary of Contents for Micro-103

Page 1: ...Instruction Manual Model Micro 103 Home A V Center...
Page 2: ...English Contents Overview of the components Page 2 Instruction Manual Page 3 Technical Data Page 5 Inhalt 3 1...

Page 3: ...2 2 Overview of the Components Abb Fig 1 Abb Fig 2 Abb Fig 3 16 17 18 19 20 21 22 24 27 26 25 23...

Page 4: ...SKIP SEARCH TUNING 13 Select function button SOURCE To select from DVD FM iPOD and AUX 14 Memory card slot 15 Headset jack 16 Loudspeaker connections 17 AUX IN Audio input 18 Reset RESET button Any m...

Page 5: ...uning in to searching for a radio station 22 PLAYLIST To select the playlists of a docked iPod 23 CHAPTER To select the chapter of a docked iPod if chapter is available 24 ALBUM To select the albums o...

Page 6: ...R RW K MP3 files from CD DVD Disc DVD R K RW CD R RW Regional 2 Europe Greenland South Africa Egypt and Middle East Japan Total Surround Sound 150 W PMPO Made for iPod and Made for iPhone mean that a...

Page 7: ...or your safety are especially marked You must follow these instructions to avoid accidents and damage to the machine WARNING Warns against dangers to your health and indicates potential risks of injur...

Page 8: ...n principle a risk of electric shock For this reason pay particular attention to the following Never touch the plug with wet hands K If you want to pull the plug out of the plug socket always pull dir...

Page 9: ...s assured This is K to avoid a build up of heat inside the appliance Make sure that the ventilation slots are not blocked Protect the appliance against the mechanical vibrations K Stand the appliance...

Page 10: ...its original packaging to prevent it from being damaged Keep the packaging for this purpose Dispose of unnecessary packaging material in accordance with the regulations ap plicable in your country NO...

Page 11: ...larity and Start with the negative pole 3 Attach and close the battery compartment cover NOTE The signals from the remote control are transmitted to the DVD Player by infrared light You should therefo...

Page 12: ...corresponding socket on your playback device Fig 2 21 Component Video Connection using a Component Video cable ensures a very high replay quality Component Video transmits only Video signals 1 Plug ea...

Page 13: ...much easier Fig 2 26 27 Stereo Connect both Audio cables for the right and the left speakers to your playback device or your amplifier 1 Plug the Audio jacks into the sockets on the back of the playe...

Page 14: ...rear of the device 2 Insert the audio plugs into the corresponding sockets of your output device Fig 1 8 Connect your output unit using a 3 5 mm stereo TRRS connector 1 Plug a 3 5 mm TRRS connector i...

Page 15: ...s marked with regional code 1 are intended for the USA and Canada DVDs with regional code 2 are for use in Europe NOTE With your DVD Player you can only play DVDs with regional code 2 There are both l...

Page 16: ...yer Playing media Using the remote control You transmit commands to the DVD Player via remote control It is thus important to point the end of the remote control towards the DVD Player NOTE If the dev...

Page 17: ...ttings of the DVD Player Interrupting the replay 1 Press the PAUSE button Fig 3 35 on the remote control The replay is interrupted the currently visible image is frozen 2 Press the PLAY button Fig 3 3...

Page 18: ...peated 2 Press the REPEAT button Fig 3 40 The message Chapter appears on the screen 3 Press the REPEAT button again until the message Title or All is displayed Repeating track on CD 1 Select the track...

Page 19: ...ton Fig 3 36 to restart the normal replay when the desired section is reached Enlarging a screen section You can change the screen section when viewing DVDs VCDs or images Press the ZOOM button Fig 3...

Page 20: ...art at the bottom of the screen to save the input 5 Press the SELECT button Fig 3 15 on the remote control to confirm this command Deleting a playlist CD DVD 1 Press the PROG button You will now see a...

Page 21: ...umerous devices to the DVD Player Examples of such devices are USB memory sticks or digital cameras This device has been developed in accordance with the latest technical developments in the USB field...

Page 22: ...asionally be problems when files are played back for example files are displayed but cannot be played back This is no malfunction of the player NOTE With the K button Fig 3 32 you can return from the...

Page 23: ...can select from various fade effects by repeatedly pressing the button PROG Fig 3 37 Changing the default settings A large number of default settings can be comfortably changed via the screen menu Pre...

Page 24: ...ge K DOLBY Digital Setup Page K VIDEO Video Setup Page K PREFERENCES Preference Page K NOTE Some of the menu settings are only available in stop mode depending on the DVD General Setup TV Display Here...

Page 25: ...shown on the screen OSD Language Here you can select the language of the on screen displays Screen saver The player is able to display a still image for any time on the screen This can cause damage to...

Page 26: ...his setting if your amplifier is a two channel stereo amplifier NOTE If there is no Audio output even though you connected the DVD Player to an amplifier you will most likely have chosen an incorrect...

Page 27: ...wish to use Choosing the right signal format depends on the type of connection and the playback device see also the operating manual of the replay unit YUV K Select this option if your playback devic...

Page 28: ...you have the child lock option activated a probably existing corre sponding information is read from the DVD and compared with the value pre set by you If a DVD is intended for an older age group tha...

Page 29: ...or a station Press the corresponding button repeatedly until you have found the desired radio station 3 To store the radio station you have found press the MEMORY button Fig 3 20 a storage location fl...

Page 30: ...isplayed This accessory was not developed for iPhone use It is possible that noise occurs and signal strength is reduced In this case press OK Music Videos Playback from iPod iPhone iPod iPhone not su...

Page 31: ...othing appears on the display No power supply WARNING Before troubleshooting switch the player off Put the mains plug in correctly if necessary check the socket is working with another appliance No im...

Page 32: ...control Remote control battery installation Titles are played in wrong order Playlist is used Delete the playlist Deleting a playlist DVD cannot be played DVD has not been finalized Use a finalized DV...

Page 33: ...Component YUV Normal LB S Video 16 9 RGB Angle Mark On Resolution Auto Off 480i OSD Lang 480p Screen Saver On 720p Off 1080i Last Memory On 1080p Off 576p 720 720p 50Hz 1080i 50Hz Audio 1080p 50Hz Au...

Page 34: ...Customer s service and other products You can contact our customers service through our web site www sel co il...

Reviews: