background image

User manual

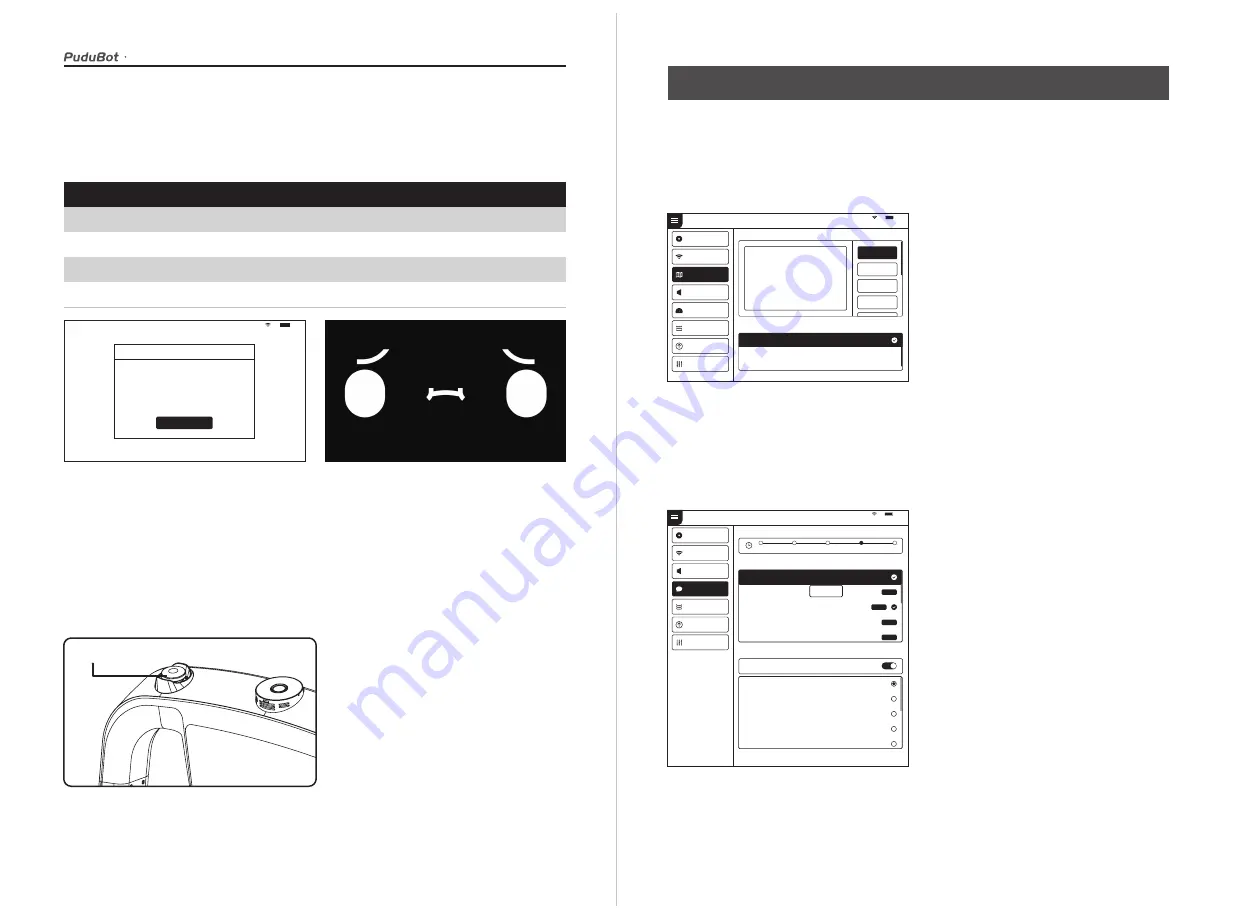
An abnormal state of the robot or an unexpected situation may cause damages to the 

surrounding environment, the user can press the emergency stop switch on the top of the 

robot to stop the robot.

Emergency handling

Service functions

In the “Map settings” function, you can select from multiple maps. In the robot one-to-one 

parking mode, select the current map to configure the parking position for the robot.

Map settings

The “Voice settings” function provides voice packet replacement and custom settings of 

cruise voice.

Voice settings

1. Check the available voice packets for 

update support and choose to download 

the voice packets.

2. After downloading, select the 

corresponding voice packet for replace-

ment.

3. Select “Default” to restore the default 

voice packet

4. Press and hold the voice packet to delete 

it.

STOP

In the following cases, the robot will stop working and give an alarm tone, the tablet 

interface will prompt the corresponding instructions, and the machine will need your 

assistance.

Alarm display

Alarm display

Solutions

Battery is too low

Loss of positioning

Please push the robot back for charging(Figure 1)

Push the robot directly below the visual mark (Figure 2)

Suspended

Please put the robot on the flat ground

The drive wheel,

the auxiliary wheel is stuck or entangled

Please clean the drive wheel, auxiliary wheel

(Figure 1)

(Figure 2)

I'm lost. Please push me under the positioning mark

Tips

Low battery, please charge

I got it

100%

Volume settings

91 %

Voice settings

Playback interval

Select voice package

Default voice package

Voice package_1

Voice package_2

Voice package_3

Voice package_4

Voice package_1

Voice package_2

Voice package_3

Voice package_4

Voice package_5

Delete

Update

Update

Download

Download

5s

10s

15s

20s

25s

Cruise voice user-defined settings

Cruise voice

Add to

Trial playback

Trial playback

Trial playback

Trial playback

Trial playback

Basic setup

WLAN

Tray settings

Version update

Debug

Set up

Dish-serving port_1

91 %

Basic setup

WLAN

Map settings

Volume settings

Speed settings

Tray settings

Version update

Debug

Select map

Map_1

Map_1

Map_1

Map_1

Select dish-serving port

Dish-serving port_1

Dish-serving port_1

Set up

Summary of Contents for PuduBot

Page 1: ...www pudutech com User manual V1 2 Copyright 2019 Pudu Technology Inc All Rights Reserved...

Page 2: ...manual are for reference only and are subject to change without notice Unless otherwise speci ed this manual is for guidance only and does not constitute a warranty of any kind Declaration CATALOG Saf...

Page 3: ...DO NOT push the robot backwards while the robot is powered on 7 The food shall NOT exceed the size of the tray otherwise the sensor may beblocked and the robot may not move properly 8 If the robot ent...

Page 4: ...and less than 1 2m may cause certain human machine congestion 6 The pure black such as skirting mirror surface such as wall or full transparency such as oor to ceiling glass items within 10cm from the...

Page 5: ...use a non genuine charger to charge the robot 5 Charge the main unit according to the power supply voltage indicated on the nameplate of charger 6 Make sure that the power supply voltage meets the vol...

Page 6: ...to indoor at environment smooth ground slope less than 5 degrees protrusions not higher than 1cm DO NOT use it in outdoor environments such as open balconies or on rugged oors such as stairs 8 DO NOT...

Page 7: ...e weight Machine size Power output Audio power Design life Working temperature Storage temperature Operating humidity Environmental pollution Operating altitude Working environment Enclosure Charging...

Page 8: ...Layer height between trays 271mm Top layer height 229mm Bottom layer height 324 5mm Layer height between trays 222 5mm op layer height 141 5mm Bottom layer height 247 5mm Tray size 500mmx432mm Bottom...

Page 9: ...orm the task and it needs to be charged before use The screen displays an indication that charging is in progress indicating that the machine is charging After charging is complete the screen displays...

Page 10: ...icense to be available if you need it please contact technical support personnel Mode selection In delivery mode the robot can be used for food delivery to multiple tables at the same time Place the f...

Page 11: ...very mode 1 At the food delivery location select the Delivery Mode 2 Place the food on the tray 3 Click on the tray where the food is located and select the destination table number The higher trays a...

Page 12: ...number of target destination 4 After the table number is entered click to start the delivery and the robot will start executing the task The robot starts playing the playlist set in B day mode 5 When...

Page 13: ...urning to the collection position or the dishwashing room from the table The speci c steps are as follows Used plate collection mode 1 While delivering food if there are plates to be collected you can...

Page 14: ...ial Mode 5 During the following process of used plate collection the waiter can select the next table for collection or returning to the collection position or dishwashing room according to the recycl...

Page 15: ...ed your assistance Alarm display Alarm display Solutions Battery is too low Loss of positioning Please push the robot back for charging Figure 1 Push the robot directly below the visual mark Figure 2...

Page 16: ...version Version upgrade Select Advanced settings to choose the mode of used plate collection You can also set the speed for food delivery mode and cruise mode which supports 1 0m s 1 1m s and 1 2m s A...

Page 17: ...and when there is location available the robot can automatically go to the parking location for replenishment When a robot is parking at non parking location with no task designated you can choose th...

Page 18: ...obot body maintenance During the transportation of the robot it is necessary to meet GB T 4857 23 2012 requirements for road transport of steel spring vibration damped trucks please use forklifts and...

Page 19: ...ne on o cial website for product maintenance Free Warranty Services 1 The purchased product is under normal use within the speci ed warranty period and anon human failure of performance occurs 2 There...

Page 20: ...t of the goods and nds that the product is damaged due to transportation 5 There is a clear discrepancy between the goods actually received and the description Under one of the following circumstances...

Page 21: ...to solve the problem the Company may assigns professional and technical personnel to provide on site services On site service If you have any question please call our service hotline 400 0826 660 Afte...

Reviews: