PSI PP 4050XP User Manual Download Page 31

7

8

Installing the Printer and the intelligent Paper Stacker

1-12

Installation of the Consumables 

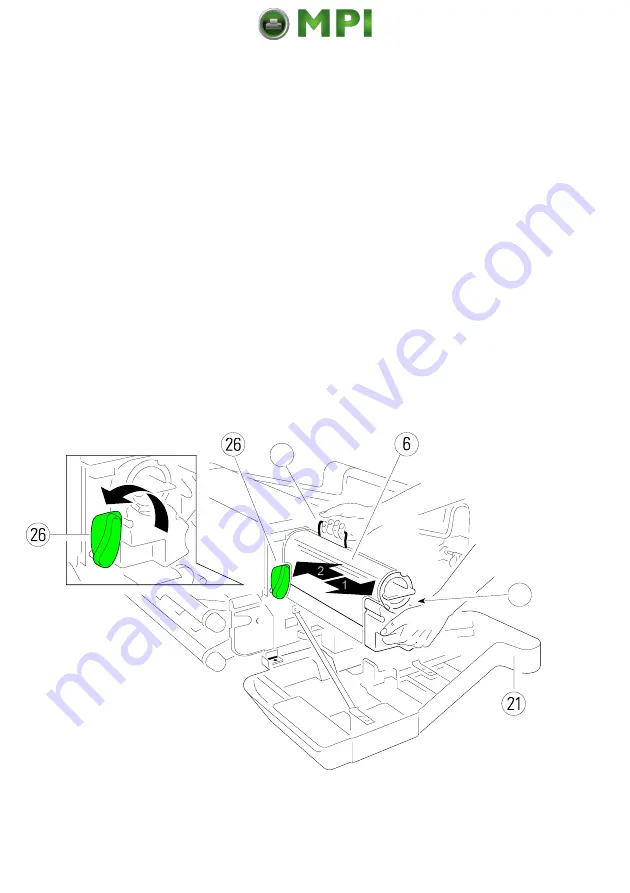
1.5.1 Loading the Developer Unit

$

Lift the lever (26) upwards to unlock the Developer Unit.

$

Pull the Developer Unit (6) about 

-

 out of the housing and grasp the grip (7)

with one hand and remove it.

$

Remove the plastic bag from the clutch on the rear side.

$

Remove plastic and paper safety strips (8) from the area of the toner output

of the Developer Unit (6).

Note:

Don´t destroy the small plastic lip above the toner output of the

Developer Unit (6).

$

Insert the Developer Unit (6) (step 2.) and secure it by pressing down the

lever (26).

Mantenimiento Periféricos Informáticos SL C/Canteras, 15 28860 Paracuellos de Jarama Tel: 00 34 917481604 WEB: https://mpi.com.es

Summary of Contents for PP 4050XP

Page 1: ...User s Manual PP4050 XP PP4060 PP4060 MICR Mantenimiento Perif ricos Inform ticos SL C Canteras 15 28860 Paracuellos de Jarama Tel 00 34 917481604 WEB https mpi com es...

Page 2: ...s or omissions be discovered or should any user wish to make suggestions for improving this handbook please feel encouraged to send us the relevant details The contents of this manual are subject to c...

Page 3: ...sconnected immediately in case of danger or for maintenance purposes Before installing the printer check the surrounding conditions in which the printer is intended to be used see next page Operating...

Page 4: ...nerates uses and can radiate radio frequency energy and if not installed and used in accordance with the instruction manual may cause harmful interference to radio communications Operation of this equ...

Page 5: ...ventilation Always ensure that these openings are not obstructed Also ensure that the cables of the printer do not interfere with the output paper path During the printing process ozone will be produ...

Page 6: ...hing the key at the front side of the table Keep your feet clear when the paper exit tray moves down Ensure that the cables at the rear of the printer do not interfere with the paper path within the s...

Page 7: ...e Printer onto the intelligent Paper Stacker iPS 1 6 1 4 3 Interconnect the Printer and iPS 1 8 1 4 4 Mount the Pendulum of the iPS 1 9 1 4 5 Remove the Transport Locks 1 11 1 5 Installation of the Co...

Page 8: ...ion of the Panel Display 2 2 2 1 3 Function Keys 2 5 2 2 Menu Mode 2 6 2 2 1 To Activate the Menu 2 6 2 2 2 To Confirm and Save Selection 2 8 2 2 3 Example to Change the Language at the Control Panel...

Page 9: ...4 3 PAPER 4 3 TWO UP MODE 4 4 TWO UP EXT SHIFT 4 6 TWO UP SEQUENCE 4 7 PAPER LENGTH 4 8 LENGTH FACTOR 4 8 IMAGE WIDTH 4 9 SOURCE 4 9 DESTINATION 4 9 ORIENTATION 4 10 LANDSCAPE MODE 4 11 ORIENT MODE 4...

Page 10: ...L COMMAND 4 19 4 2 4 GENERAL MENU 4 20 EMULATION 4 20 AUTO FORM FEED 4 20 AUTOMATIC CUT 4 20 JOB SEPARATION 4 21 TRACTOR CHANGE CUT 4 21 REPRINT LAST PAGE 4 22 4 3 Menu Mode BASIC SETTINGS 4 23 4 3 1...

Page 11: ...5 Maintenance 5 1 5 1 Installing the Parts of the Toner Kit 5 1 5 1 1 Refilling the Toner 5 2 5 1 2 Replacing the Waste Toner Bottle 5 4 5 1 3 Changing the Cleaner Felt 5 6 5 1 4 Replacing the Ozone...

Page 12: ...8 Paper Specification 8 1 8 1 Basic Theory of Operation 8 1 8 2 Storing Media 8 1 8 3 Environmental Considerations 8 2 8 4 Guidelines and Specification for Selected Fanfold Paper 8 2 8 4 1 General Gui...

Page 13: ...JL Sytax Rules A 7 A 2 1 2 PJL Environments A 8 A 2 1 3 List of supported PJL Commands A 9 A 2 1 4 List of supported PJL Variables and Values A 12 A 2 1 5 List of supported PJL Variables and Values fo...

Page 14: ...ar code module width A 32 Bar code ratio A 33 Start and Stop characters A 34 Error checking characters A 34 Unprinted areas A 34 A 5 3 Bar Code Programming Examples A 35 Code 39 A 35 2 of 5 industrial...

Page 15: ...r Stacker This chapter covers the information about the basic elements of the printer The next steps show how to power on the printer the handling of the tractor cassettes inserting fanfold paper and...

Page 16: ...cs suggests how to identify and correct simple problems 7 Technical Data All technical details or data about the printer can be found here 8 Paper Specification Guidelines Specification Paper and Labe...

Page 17: ...ribed in section 3 These command structures are valid for a PP 4050 PP4060 Laser Printer with PCL5 Emulation Appendix B Symbol Sets All supported Symbol Sets are listed Appendix C Miscellaneous Order...

Page 18: ...lowing conventions are used Bold Headlines and important information Note Contains special advice to facilitate handling Caution Contains important information to prevent damage of the equipment ENTER...

Page 19: ...ended range 56 5 to 86 F Transport and Storage 20 to 40 C max 95 of the printer 4 to 104 F at 40 C or 104 F Transport and Storage 20 to 40 C max 95 of the consumables 4 to 104 F at 40 C or 104 F Stora...

Page 20: ...exit points to a window If the top cover is opened to clear a paper jam or to perform maintenance actions sunbeams would directly fall onto the photoconductor drum and would permanently destroy its su...

Page 21: ...tire configuration to an empty space in case of maintenance activities Preconditions for Installation Floors and doors must be wide enough that the printer can pass them corners and angles must be lar...

Page 22: ...ntelligent Paper Stacker iPS 9 Pendulum 10 Paper Exit Tray 11 Shelf for Lower Tractor 12 Shelf for Upper Tractor 13 Castors Note The intelligent Paper Stacker 8 also called iPS 4050 is an option Note...

Page 23: ...immediately if any item is missing or damaged The iPS 4050 4060 package should contain the following iPS 4050 4060 basic unit 1 Pendulum 2 a box with the left and right Paper Guide 3 four Castors Not...

Page 24: ...tor Cassettes 1 x PC Cartridge 1 x Cleaner Felt 1 x Ozone Filter 1 x Toner Cartridge 1 x User s Manual 1 x Mains Cable 1 x Waste Toner Bottle 1 4 2 Put the Printer onto the inteligent Paper Stacker iP...

Page 25: ...Installing the Printer and the intelligent Paper Stacker 1 7 1 Mantenimiento Perif ricos Inform ticos SL C Canteras 15 28860 Paracuellos de Jarama Tel 00 34 917481604 WEB https mpi com es...

Page 26: ...Printer and iPS 4050 Make sure that the printer is powered off Plug in the interface connector 1 and fix it properly Connect the protective grounding cable 2 Mantenimiento Perif ricos Inform ticos SL...

Page 27: ...The pendulum is to be mounted vertically between the bars 1 Shift pendulum 2 into the left stacker bearing by compressing the spring while simultaneously inserting the bolt 3 of the pendulum into the...

Page 28: ...e Printer and the intelligent Paper Stacker 1 10 Open the extensions 1 of the paper tray Mantenimiento Perif ricos Inform ticos SL C Canteras 15 28860 Paracuellos de Jarama Tel 00 34 917481604 WEB htt...

Page 29: ...r sensors in both paper paths Remove the transport locks 2 3 4 and 5 which fix the levers Remove the orange stripe 6 including the bubble wrap which protects the rollers at the paper entrance of the F...

Page 30: ...overage or printing of vertical lines Operating mode like many start stop cycles 1 5 Consumables Lifetime The life time of the PC drum and Developer unit are determined by the number of rotations and...

Page 31: ...hand and remove it Remove the plastic bag from the clutch on the rear side Remove plastic and paper safety strips 8 from the area of the toner output of the Developer Unit 6 Note Don t destroy the sm...

Page 32: ...approximate 10 cm illustrated below with the attached plastic seal 3 pointing to the top Remove the stripe 4 from the cardboard roll 5 and fix it at the begin of the plastic seal tape 3 Turn the card...

Page 33: ...ge 1 Open the rear 22 cover Press the lever 23 to open the top cover 24 illustrated below Take the Waste Toner Bottle 2 and put it into the compartment Note Please make sure that the cap 2A is placed...

Page 34: ...arter Kit package 2 Insert the Cleaner Felt 3 Close the top cover 24 Note Depending on paper properties it may be necessary to change the Cleaner Felt more often than with every second Toner Cartridge...

Page 35: ...package 1 Insert the Ozone Filter 4 into the slot Close the rear 22 cover Note After printing 20 000 pages it is recommended that the Ozone Filter is replaced The box of the Toner Kit contains the Ozo...

Page 36: ...Photoconductor to room lighting or sunlight any longer than necessary Lift the lever 2 upwards to unlock the Developer Unit Carefully remove the drum from its foil container Insert the Photoconductor...

Page 37: ...rface cable coming from the computer or from the network to the printer s parallel 1 or 10 Base T port 2 Check in the CONFIG MENU the HOST CHANNEL For the parallel connection the setting PARALLEL ONLY...

Page 38: ...itched ON the printer performs an internal self test which checks the electronics fans and the motors for the paper transport mechanism The display 17 presents the message MEMORY TEST PLEASE WAIT Afte...

Page 39: ...t Paper Stacker align the printer with the front edge of the table Ensure that the cables at the paper exit do not block the paper path Simply slide the tractor cassettes forward into the respective g...

Page 40: ...f the tractor Check that the fold points outwards behind the first page default setting for SELECT FOLD POSITIVE If not tear off one page or change the setting for SELECT FOLD to NEGATIVE see chapter...

Page 41: ...justment of the paper The pins 19 of the tractor must be centered in the transport punches of the paper Close the other tractor cover 4 Turn the tractor until the top edge of the paper digs into the p...

Page 42: ...aper after paper jam See also chapter 1 9 Inserting Fanfold Paper on the previous page 1 10 1 Adjusting the Paper Exit Tray To stack the paper precisely the intelligent Paper Stacker needs to be adjus...

Page 43: ...panel which causes the paper exit tray 26 to move up and down Move the paper exit tray down and remove the paper Before the next print job is processed the paper exit tray is lifted automatically into...

Page 44: ...ay LCD 93 indicates the current status of the printer If any error occurs e g COVER OPEN the resulting error message will be displayed While configuring the printer menu settings and parameters appear...

Page 45: ...ue after ONLINE is the indication of the actual PROFILE When the printer is in the OFFLINE mode status information error messages or menu messages are displayed Example The display content after paper...

Page 46: ...O T T O M D A T A Example Display content after pressing 90 O F F L I N E 1 S E L E C T P R O F I L E C U T F O R M F O R M F E E D In this state it is possible to turn 91 to shift next following line...

Page 47: ...1 7 2 3 By turning 91 the display content change to the values available 1 up to 50 only three of them are displayed at a time Example After selecting the desired Profile Number for example 10 because...

Page 48: ...and Symbol Function 90 ONLINE changing to ONLINE mode after an error message starts data transfer leaving the Menu Mode 91 Quick set up wheel to activate a cut function after a print job is terminate...

Page 49: ...E to change the profile settings BASIC SETTINGS to control the printer power save menu access TEST MODE to make test prints and get information about the printer The menu has three levels Level 1 the...

Page 50: ...ons and parameters at a certain menu level Turn the quick set up wheel with the symbol to the left or right the button has a wrap around function i e after the last item the first item is repeated Aft...

Page 51: ...and press the same buttom to enter the lowest level At the last level to select confirm values the asterisk at the right indicates the actual selection PERF SKIP OFF ON By turning the quick set up wh...

Page 52: ...ROFILE CUT FORM FORM FEED Note The number in brackets behind ONLINE or OFFLINE indicates the selected Profile 3 Turn 91 until OFFLINE 1 TEST MODE RESET PRINTER SELECT PROFILE 4 Press 91 TEST MODE sele...

Page 53: ...orms about all settings of the actual Profile see Paragraph 3 2 Printout off Standard Configuration To cut the SELF TEST Page please execute following steps 9 Press 90 OFFLINE 1 SELECT PROFILE CUT FOR...

Page 54: ...USER TEMP are contained in one profile In total 50 PROFILEs are available and can be either programmed via the operator panel There are two items in the OFFLINE MENU which deal with profiles SELECT PR...

Page 55: ...E the Profile containing the information for the specific application requirements can be activated 3 1 2 Basic Printer Settings All parameters which characterise general printer features and function...

Page 56: ...the sign Below the menu section on the test page information is given about the hardware and software configuration of the printer and stacker is given FLASH memory size for printer firmware and fonts...

Page 57: ...e button TEST MENU PANEL TEST SELF TEST CONT SELF TEST 6 turn to the right TEST MENU SELF TEST CONT SELF TEST CONFIG PRINT 7 press the button TEST MENU SELF TEST The printer starts to print the self t...

Page 58: ...OUR 16 REPRINT LAST PAGE OFF HOST CHANNEL PARALLEL ONLY MINUTE 42 TRACTOR POOL ON SECOUND 0 RECALL FACTORY NO RESET DEVELOP INFO NO RESET OPC INFO NO RESET FUSER INFO NO TEST MENU INFO MENU PANEL TEST...

Page 59: ...EGISTRATION CURVE 1 CONFIG MENU POWER SAVE 15 MIN KEEP TEMP HIGH 1 0 MIN ALARM BELL ON LANGUAGE ENGLISH MENU ACCESS ALL HOST CHANNEL PARALLEL ONLY TRACTOR POOL ON RECALL FACTORY NO RESET DEVELOP INFO...

Page 60: ...GENERAL MENU EMULATION 1 3 Depending on selected FONT AUTO FORM FEED AUTOMATIC CUT 4 Not displayed if TWO UP MODE OFF JOB SEPARATION TRACTOR CHANGE CUT REPRINT LAST PAGE BASIC SETTINGS CONFIG MENU CON...

Page 61: ...NTER NO YES The following table show menu modes submenus and parameters Precondition is Access to all menu items is alloved MENU ACCESS ALL Otherwise restrictions are to observed SELECT PROFILE Entry...

Page 62: ...y for CUSTOM Range 3 up to 24 inch in steps of or inch 1 1 4 6 LENGTH FACTOR 1 Only for CUSTOM Range 1 20 logical pages IMAGE WIDTH 17 INCH Only for CUSTOM Range 0 5 up to 17 inch in steps of 0 05 inc...

Page 63: ...the first 2 pages by 0 5 mm 3 Displacement on the first 2 pages by 1 0 mm 4 Displacement on the first 2 pages by 1 5 mm 5 Displacement on the first 5 pages up to 0 5 mm 6 Displacement on the first 5 p...

Page 64: ...r Font No 1 38 are values 4 00 999 75 in steps of 0 25 PT Font No 45 56 are not scalable SYMBOL SET ROMAN 8 ISO L1 31 symbol sets are selectable LINE SPACING 6 LINES INCH Range 1 2 3 48 LPI TOP MARGIN...

Page 65: ...MENU Note The HEXDUMP MENU will be displayed if the EMULATION in the GENERAL MENU is set to HEXDUMP Hexdump Menu Value Parameter UEL COMMAND RECOGNIZE IGNORE Mantenimiento Perif ricos Inform ticos SL...

Page 66: ...rameter EMULATION PCL HEXDUMP AUTO FORM FEED OFF Range OFF or 1 120 sec AUTOMATIC CUT OFF Range OFF or 1 120 sec JOB SEPARATION OFF ON TRACTOR CHANGE CUT ON OFF REPRINT LAST PAGE OFF ON Mantenimiento...

Page 67: ...0 5 up to 60 minutes step 0 5 min ALWAYS ALARM BELL ON OFF LANGUAGE ENGLISH DEUTSCH FRANCAIS ESPANOL MENU ACCESS ALL PROFILES ONLY NONE HOST CHANNEL PARALLEL ONLY I O EXTENSION TRACTOR POOL ON OFF REC...

Page 68: ...U Entry Point TEST MODE TEST MENU Test Menu Function Action PANEL TEST Check up of the Operator Panel display SELF TEST Printout of the actual settings CONT SELF TEST More pages with the actual settin...

Page 69: ...ACKER VERSION Print out of the actual Stacker Firmware PANEL VERSION Print out of the actual Operator Panel Firmware revision DEVELOPER INFO Usage grade in of the total life cycle of the Developer OPC...

Page 70: ...sing the cut function will be activated The paper is moving depending on the selected paper length to the cut position After cutting it moves backwards to the print position FORM FEED After pressing t...

Page 71: ...eatures and functions grouped into different submenus like PAPER MENU PCL MENU and GENERAL MENU For details see chapter 4 2 BASIC SETTINGS In this menu mode it is possible to configure all the basic o...

Page 72: ...to a 12 inch form which leads to a larger bottom margin than top margin In case of LETTER the page contents are printed onto an 11 inch form Note If the paper size is changed from one format into anot...

Page 73: ...llowing values are valid PAPER physical page in physical page in PORTRAIT LANDSCAPE width length width length A4 210 mm 12 inch 12 inch 210 mm 8 5 inch fixed fixed 8 5 inch fixed fixed Letter 8 5 inch...

Page 74: ...inted side by side page 1 page 2 page 3 page 4 Note With the parameter TWO UP SEQUENCE the order of the pages can be changed see next pages IDENTICAL COPY means that the logical page is printed twice...

Page 75: ...ance between the two logical 1 pages in the TWO UP MODE The range of the values for TWO UP EXT SHIFT is 0 default up to 16 inch in steps of inch 1 100 imaginary centre line TWO UP EXT SHIFT page 1 pag...

Page 76: ...EQUENCE determines the sequence in which the pages will be 1 printed Possible selections are LEFT TO RIGHT page 1 page 2 page 3 page 4 RIGHT TO LEFT page 2 page 1 page 4 page 3 Mantenimiento Perif ric...

Page 77: ...ining last logical page is completed with a Form Feed command If the number of logical pages isn t a multiple of the LENGTH FACTOR the contents of the residual logical pages will remain in the printer...

Page 78: ...the printer at the paper exit on the right side If BOTTOM default is selected fanfold paper leaves the printer at the paper exit right side The cutter is not activated by default If print jobs shall...

Page 79: ...et to the corresponding default values The physical page length will not be changed If printing is performed in LANDSCAPE and the selected values for image width and line spacing don t lead to an inte...

Page 80: ...E LANDSCAPE to LANDSCAPE This makes continuous pages with landscape orientation readable like a book Selection of PCL COMPATIBLE is according to the landscape definition of PCL i e rotation by 180 cou...

Page 81: ...n the image width is not rotated Setting the Orientation Mode to AUTOMATIC rotates the print image if the form length is shorter than the image width This selection is required for applications which...

Page 82: ...e via interface by means of PCL or PJL commands ONLY PJL Only via PJL command default IGNORE Any command to change the paper format will be ignored the paper format can only be modified via the operat...

Page 83: ...inch 0 25 mm factory default value of both parameters is zero CUT SHIFT Vertical Positioning for Cutting Device This parameter is meant to shift the cut position The parameter covers a range of 50 50...

Page 84: ...3 Displacement on the first 2 pages by 1 0 mm Pattern 4 Displacement on the first 2 pages by 1 5 mm Pattern 5 Displacement on the first 5 pages up to 0 5 mm Pattern 6 Displacement on the first 5 pages...

Page 85: ...ZE For FONT NUMBER 1 to 38 character scaling is defined as point size Values can be selected from 4 00 to 999 75 PT in steps of 0 25 Default value is 12 00 PT Note FONT NUMBER 45 to 56 are not scalabl...

Page 86: ...dows 3 1 Latin 1 19U WIN L2 Windows 3 1 Latin 2 9E WIN L5 Windows 3 1 Latin 5 5T DESKTOP Desktop 7J PS TEXT PS text 10J VN INTL Ventura International 13J VN US Ventura US 14J MS PUBL Microsoft Publish...

Page 87: ...to 999 and MAXIMUM can be selected factory default is MAXIMUM Right Margin should only be set to a defined value if the application requires a text formatting by the printer Note Setting RIGHT MARGIN...

Page 88: ...es when the HEXDUMP mode has been activated Note The HEXDUMP MENU will only be displayed if EMULATION in the GENERAL MENU is set to HEXDUMP UEL COMMAND Universal Exit Language commands can be set to R...

Page 89: ...he page is fed manually Such a not completed page is automatically printed out after a selectable time period at the end of a print job Break in datastream The time period can be set from 1 to 120 sec...

Page 90: ...into the cut position and no automatic cutting is performed It is appropriate for batch output of continuous forms TRACTOR CHANGE CUT The automatic cut function after selecting a new SOURCE e g from L...

Page 91: ...es the recovery of the last pages Factory default is REPRINT LAST PAGE OFF After inserting a new form the printer automatically recovers the misprinted pages if the function REPRINT LAST PAGE is ON Pa...

Page 92: ...be left If there are no new messages to be displayed within the next 15 minutes the panel light is switched off as well This function is independent of the choosen POWER SAVE time KEEP TEMP HIGH Keep...

Page 93: ...an MENU ACCESS The menu CONFIG MENU has been extended by the new function MENU ACCESS defining the access rights to various submenus The access rights could defined being ALL PROFILE ONLY or NONE The...

Page 94: ...se of paper empty The empty tractor cassette can be reloaded and thus will be ready for the next automatic change if needed The pool function requires the same type of paper to be used in both tractor...

Page 95: ...r must reset the associated counter The associated counter can be reset by RESET DEVELOPER INFO RESET OPC INFO or RESET FUSER INFO Important Note 1 The lifetime of a consumable is determined by the ro...

Page 96: ...iguration settings of the actual Profile and diagonal character test see Paragraph 3 2 1 How to Start the SELF TEST CONT SELF TEST Continuous Selftest If this function is selected the printer continuo...

Page 97: ...I 10 Swiss742 SWC scalable I 11 Swiss742 SWC Bold scalable I 12 Swiss742 SWC Italic scalable I 13 Swiss742 SWC Bold Italic scalable I 14 Swiss742 Cn SWC Condensed scalable I 15 Swiss742 Cn SWC Condens...

Page 98: ...I 40 Courier SWC Bold Italic scalable I 41 Letter Gothic scalable I 42 Letter Gothic Bold scalable I 43 Letter Gothic Italic scalable I 44 Line Printer 16 67 8 50 I 45 Line Printer 16 67 8 50 I 46 Li...

Page 99: ...Stacker Software version PANEL VERSION The actual Panel Software version DEVELOPER INFO The actual usage grade in of the Developer of the total life time of the device OPC INFO The actual usage grade...

Page 100: ...Standard Toner MICR Toner 10 Toner Cartridges 1 10 Toner Cartridges MICR 1 5 Waste Toner Bottles 2 change it 5 Waste Toner Bottles 2 change it with every second Toner Cartridge with every second Tone...

Page 101: ...s fully unlocked Remove the toner cartridge Shake the new toner cartridge several times Insert a new toner cartridge approximate 10 cm illustrated below with the attached plastic seal 3 pointing to th...

Page 102: ...Maintenance 5 3 Mantenimiento Perif ricos Inform ticos SL C Canteras 15 28860 Paracuellos de Jarama Tel 00 34 917481604 WEB https mpi com es...

Page 103: ...compartment Close the filling hole with the cap 6 Take care that the cap fits tightly over the opening Take an empty Waste Toner Bottle 5 and put it into the compartment Please observe that the cap 6...

Page 104: ...s in the box of the Toner Kit Press first OFFLINE will be displayed Open the front 1 and rear 2 cover Press the lever 3 to open the top cover 4 illustrated below Now remove the Cleaner Felt 6 by press...

Page 105: ...the lug 5 and press the clamp 3 on both sides onto the Cleaner Platen 1 Insert the new Cleaner Felt 2 including the Cleaner Platen 1 Close the top rear and front cover Note Depending on paper propert...

Page 106: ...contains the Ozone Filter a black cube 5 Press first OFFLINE will be displayed Open rear 2 cover Remove the Ozone Filter 5 by using the small tab to hold the filter Insert the new Ozone Filter 5 into...

Page 107: ...the Transfer Charge Unit 3 5 2 1 Replacing the Developer Unit Press first OFFLINE will be displayed Open the front 4 cover Press the green lever 9 to the top to unlock the Developer Unit Pull the Dev...

Page 108: ...orange tape 8 is visible which is fixed to a foam block that closes the toner entrance into the developer Remove the foam block from the Developer Unit Activate the Toner Cartridge as described in pa...

Page 109: ...t 3 cover Loosen the screw 2 and remove the Transfer Charge Unit 1 Note Now there are no obstacles to remove the Ozone Filter see point 5 2 3 Insert a new Transfer Charge Unit 1 by using the iron band...

Page 110: ...Note The Transfer Charge Unit is a delicate equipment which needs to be handled with care Remove the Ozone Filter 6 by using the small tab at the side and insert the new Ozone Filter illustrated below...

Page 111: ...sed for the printer The Fuser Unit is part of the Fuser Kit which consists of a Fuser Unit 1 a Cleaner Felt incl Fuser Cleaner Platen 2 if not mounted already insert it into the Fuser Unit Note Take a...

Page 112: ...rip 9B with the other hand and pull it toward you off the printer housing Insert a new Fuser Unit 9 and push it into the printer until you hear a click Close the front 21 cover Note Take away the safe...

Page 113: ...st OFFLINE will be displayed Open the front 21 cover Press the lever 26 to the top to slide the Developer Unit away from the PC Cartridge Remove the connector 8A Press lever 8B down and pull the PC Ca...

Page 114: ...5 15 Note Please contact your delivery agent for the recycling program of PC Cartridges Mantenimiento Perif ricos Inform ticos SL C Canteras 15 28860 Paracuellos de Jarama Tel 00 34 917481604 WEB http...

Page 115: ...ess first OFFLINE will be displayed Remove the Tractor Cassettes Open the front 21 and rear cover 21 Press the green lever 23 to open the top cover 24 illustrated below Press the levers 25 to open the...

Page 116: ...Maintenance 5 17 Mantenimiento Perif ricos Inform ticos SL C Canteras 15 28860 Paracuellos de Jarama Tel 00 34 917481604 WEB https mpi com es...

Page 117: ...the screw 2 and remove the Transfer Charge Unit 1 Turn the Transfer Charger Unit upside down shake it and knock with your finger onto the rear of the metal care Insert the Transfer Charge Unit 1 by us...

Page 118: ...e The Transfer Charge Unit is a delicate equipment which needs to be handled with care Remove the Ozone Filter 6 by using the small tab at the side Clean the Ozone Filter 6 using a vacuum cleaner Inse...

Page 119: ...rear 2 cover Remove the Ozone Filter 5 by using the small tab to hold the filter Clean the Ozone Filter 5 using a vacuum cleaner Insert the Ozone Filter 5 into the slot Close the rear cover 2 Manteni...

Page 120: ...ut of the housing until the slot over the corona is free Now grasp the grip 8C with the other hand to hold the PC Cartridge Use the cotton bud to clean the corona wire carefully from one side to the o...

Page 121: ...put a sheet of paper between corona assembly and surface of the OPC and push the cotton bud in Isopropyl alcohol before cleaning Mantenimiento Perif ricos Inform ticos SL C Canteras 15 28860 Paracuell...

Page 122: ...oner dust put a pice of paper below the TP sensor into the printer Clean the TP sensor by blowing pressure air from a bottle between the OPC and the TP sensor Note The rest toner is falling down onto...

Page 123: ...After power ON the display signals the message Memory Test Please wait After successful completion two messages pop up on the display shortly after each other with n 1 to 10 number of the last choosen...

Page 124: ...f the following messages may appear on the display Display That means Measure 00 POWER SAVE After a period of time The next print job changes defined by the parameter the status power save without pri...

Page 125: ...ar to the Fuser unit and set paper to park 13 JAM NEAR CUTTER near to the cutter Stack the paper properly between transfer and figure below fuser area paper input even no paper inserted paper input se...

Page 126: ...ll be less but order a new Toner Kit continue printing until the printout is not dark enough 17 INSTALL UNIT n The printer is missing a unit n 4 No Transfer Charge Install the Tranfer Charge Unit is i...

Page 127: ...ion of EEPROM of the stacker the pendulum new paper The stacker is further must be inserted because operational but the the information about the paramter setting after the paper felt has been lost la...

Page 128: ...ERVICE MOTOR n Motor trouble n Power off and on if error 2 The fuser retract still there call service motor does not work correctly 4 The fuser motor does not work correctly 8 The transfer roller rele...

Page 129: ...Fuser fan stopped 64 PCU fan is stopped 70 SERVICE SOFTW n Software error n Power off and on if error 2 Error in the printer still there call service engine hardware detected 4 Reserved 8 NVRAM error...

Page 130: ...emove the PC 32 TP too dark unable Cartridge off the printer to continue printing and turn it 24 71 TPS ERROR 8 See above and order and or 16 TONER toner LOW 48 71 TPS ERROR 8 See above and order and...

Page 131: ...to light any longer than necessary background is not ok replace the OPC see Paragraph 5 4 Replacement of the PC Cartridge OPC 73 ATDC ERROR n ATDC Sensor is dirty open and close front cover n if erro...

Page 132: ...the Developer its end of life 83 EXCHANGE FUSER Fuser has reached its Replace the Fuser end of life 90 LD STACKER Vx xx Message during loading a new stacker firmware 91 UPD STACKER FW Message during l...

Page 133: ...4 two up Print Principle Electrophotographic LED array organic photo conductor two component toner developer heat and pressure roller system with adjustable fusing temperature Emulations PDL HP LaserJ...

Page 134: ...p mode 0 5 inch 8 5 inch Length printer 3 inch 24 inch Length iPS 7 inch 17 inch Paper Weight 64 g m to 155 g m 17 lb to 41 lb 2 2 Control Unit Processor Data Memory PowerPC 667 MHz DRAM 128MB Program...

Page 135: ...ironmental Operating 15 to 35 C 59 to 95 F Conditions 25 to 55 rel humidity Note For best performance store and use fanfold paper at 19 to 23 C 68 to 73 F and a relative humidity of 33 to 47 percent S...

Page 136: ...0 pages Fuser Unit up to 500 000 pages Storage of 20 to 40 C 4 to 104 F Consumables 95 rel humidity 40 C Note Storage of Toner Kit PC Cartridge and Developer Kit is possible for 18 month and for the F...

Page 137: ...trostatically and heated This is why paper properties such as electrical resistivity caliper finish and stiffness can affect the print quality and paper handling perfomance of the laser printer 8 2 St...

Page 138: ...ter s operating environment before unwrapping the paper allow it time to adjust to the temperature in the printer s operating environment The greater the temperature difference and the greater the amo...

Page 139: ...int wrinkling or inaccurate size All these characteristics can cause misfeeding jamming premature wear out of printer parts or unsatisfactory print quality Basis weight Basis weight also called gramma...

Page 140: ...ned at 23 C 68 F and 50 RH The left centre line of the transport holes must be parallel to the right centre line Tolerance of 0 15 mm 0 006 inch Mantenimiento Perif ricos Inform ticos SL C Canteras 15...

Page 141: ...on Note All measurements conditioned at 23 C 68 F and 50 RH No cut in crossing area No cut through the edges Mantenimiento Perif ricos Inform ticos SL C Canteras 15 28860 Paracuellos de Jarama Tel 00...

Page 142: ...ch PTS P 101 84 resistivity conditioned at 23 C and 50 RH 8 10 electrical volume 10 ohms square inch DIN 53 482 resistivity conditioned at 23 C and 50 RH 10 high temperature 0 4 DIN 54 354 stability r...

Page 143: ...ngforce minimum 0 1 Nmm DIN 53 121 humidity stretching for every 10 difference of DIN 53 130 humidity between 40 and 60 length maximum 0 04 cross maximum 0 2 smoothness by minimum 18s maximum 30s DIN...

Page 144: ...between humidity of paper and ambiance difference maximum 2 C between paper and room temperature batch incline 12 mm for a pile of paper 50 mm high distance between 6 00 mm 0 7 mm DIN EN ISO 2784 cent...

Page 145: ...2758 roughness by 200 to 500 ml mim DIN EN ISO 2494 Bendtsen bending force minimum 0 1 Nmm DIN 53 121 measure distance 10 mm bending angle 12 humidity for every 10 difference of DIN 53 130 stretching...

Page 146: ...force minimum 0 1 Nmm DIN 53 121 measure distance 10 mm bending angle 12 humidity for every 10 difference of DIN 53 130 stretching humidity between 40 and 60 length maximum 0 04 cross maximum 0 2 elec...

Page 147: ...in heat chamber at 110 C for to paper path 20 minutes removable 2 0 0 2 cN 10 mm FINAT FTM 3 stability high temperature 0 4 DIN 54 354 stability no dropping of glue particles Note Cutting through a s...

Page 148: ...oner Cartridge Waste Cleaner Ozone Filter Section 5 1 Toner Felt black cube Bottle 4 1 3 4 1 4 5 1 2 Date Page Counter yes no yes no yes no Mantenimiento Perif ricos Inform ticos SL C Canteras 15 2886...

Page 149: ...aner Ozone Filter Section 5 1 Toner Felt black cube Bottle 4 1 3 4 1 4 5 1 2 Date Page Counter yes no yes no yes no 9 2 Mantenimiento Perif ricos Inform ticos SL C Canteras 15 28860 Paracuellos de Jar...

Page 150: ...Logbook 9 3 9 2 PC Cartridge OPC PC Cartridge OPC Remarks Chapt 5 4 Date Page Counter Mantenimiento Perif ricos Inform ticos SL C Canteras 15 28860 Paracuellos de Jarama Tel 00 34 917481604 WEB https...

Page 151: ...ansfer Ozone Filter Chapt 5 2 1 Charger underneath Unit Transfer Charger Chapt 5 2 2 Unit Chapt 5 2 3 Date Page Counter yes no yes no Mantenimiento Perif ricos Inform ticos SL C Canteras 15 28860 Para...

Page 152: ...nance Logbook 9 5 9 4 Fuser Kit Fuser Unit Remarks Chapt 5 3 1 Date Page Counter Mantenimiento Perif ricos Inform ticos SL C Canteras 15 28860 Paracuellos de Jarama Tel 00 34 917481604 WEB https mpi c...

Page 153: ...enance Logbook 9 6 9 5 Inspection Report Date Name Error Status Service Activity Mantenimiento Perif ricos Inform ticos SL C Canteras 15 28860 Paracuellos de Jarama Tel 00 34 917481604 WEB https mpi c...

Page 154: ...Maintenance Logbook 9 7 9 6 Customer Remarks Mantenimiento Perif ricos Inform ticos SL C Canteras 15 28860 Paracuellos de Jarama Tel 00 34 917481604 WEB https mpi com es...

Page 155: ...Maintenance Logbook 9 8 Mantenimiento Perif ricos Inform ticos SL C Canteras 15 28860 Paracuellos de Jarama Tel 00 34 917481604 WEB https mpi com es...

Page 156: ...a restricted number of code pages and type faces see paragraph A 1 5 Support of Logical and Physical Pages see paragraph A 1 6 Support of Job Separation see paragraph A 1 7 Printer set up configurati...

Page 157: ...o select the application specific parameters a profile can be selected by means of a specific PJL command which has to be sent to the printer before sending the print data Example ESC 12345X PJL DEFAU...

Page 158: ...nter specific SAP R 3 device type These device type makes use of the special semigraphic line draw elements see chapter A 4 Support of Semigraphics for SAP R3 The SAP R 3 device type ZPSI4050 PRI incl...

Page 159: ...er with 12 inch length by setting LENGTHFACTOR 2 The following example shows the PJL commands for an application with image width 8 5 inch and a logical page length of 3 inch to be printed on a physic...

Page 160: ...program the automatic separation of two PCL jobs by setting the parameter JOBSEPARATION to ON and using the PJL JOB and PJL EOJ commands at the beginning and end of every PCL job ESC 12345X PJL DEFAUL...

Page 161: ...r control string Accepted values are 0 9999 If the parameter is in normal notation like 200 the programming in hex code is according to a ASCII table 200 32 30 30 in hex or SP Spaces may appear betwee...

Page 162: ...L commands provide the following major functions Printer language switching between jobs Job separation Printer configuration Status readback from the printer to the host At the beginning of every pri...

Page 163: ...gs are modified using the operator panel keys and or the PJL DEFAULT command When a PJL reset occurs the User Default Environment settings are loaded into the PCL Current Environment The PCL commands...

Page 164: ...d in pairs Do not use one without the other PJL ENTER LANGUAGE Supported personality options are personality PCL HEXDUMP PJL RESET The RESET command resets the PJL Current Environment variables to the...

Page 165: ...erator panel PJL OPMSG text of Display the message in the 1 line of the message printer s operator panel st The message length is at max 16 characters The printer gets off line After prompting of this...

Page 166: ...ds to the host computer PJL USTATUS Allows the printer to send unsolicited status variable value messages Supported variables and values are DEVICE ON send after status change DEVICE VERBOSE same as O...

Page 167: ...TWOUPEXTENT 0 1 2 1600 TWOUPSEQUENCE LEFTRIGHT RIGHTLEFT PAGELENGTH 3 3 1 6 24 in steps of 1 6 or 1 4 inch Note value 3 1 6 programming is 3 SP 1 6 LENGTHFACTOR 1 2 3 20 IMAGEWIDTH 0 5 0 55 17 in ste...

Page 168: ...EXDUMP AUTOFORMFEED OFF 1 2 120 AUTOFORMCUT OFF 1 2 120 TRACTORPOOL ON OFF JOBSEPARATION ON OFF TRACTORCHANGECUT ON OFF REPRINTLASTPAGE ON OFF Note All parameter which can be programmed with PJL Varia...

Page 169: ...PTEMPHIGH ALWAYS 0 5 1 60 in steps of 0 5 sec ALARMBELL ON OFF LANG ENGLISH GERMAN FRENCH SPANISH MENUACCESS ALL PROFILESONLY NONE Note These variables can not be used by the PJL COMMAND SET ACTIVEKEY...

Page 170: ...WINL2 WINL5 DESKTOP PSTEXT VNINTL VNUS MSPUBL MATH8 PSMATH VNMATH PIFONT LEGAL ISO4 ISO6 ISO11 ISO15 ISO17 ISO21 ISO60 ISO69 WIN30 LINESPACING 1 2 3 48 TOPMARGIN 0 1 2 999 LEFTMARGIN 0 1 2 999 RIGHTM...

Page 171: ...rces as macros fonts and patterns ESC O X Number of Copies Number of printed copies for each page ESC O U Left Offset Registration Position of the logical page across the width of the physical page ES...

Page 172: ...Private Command 4 Paper Feeding from the Lower Designation of the location for paper feeding or printing of the current page Parameters 0 Print the current page 1 Paper Feeding from the Upper Tractor...

Page 173: ...ber of printing lines per page Setting of the bottom margin ESC O L Perforation Skip 0 Disable 1 Enable ESC k H Horizontal Motion Index Width of the columns where x 1 120 inch ESC O C Vertical Motion...

Page 174: ...on in PCL Units ESC a H Horizontal Position in Decipoints ESC a R Vertical Position in Rows ESC p Y Vertical Position in PCL Units ESC a V Vertical Position in Decipoints ESC Half Line Feed ESC k G Li...

Page 175: ...CR LF LF CR LF FF CR FF ESC f S Push Pop Cursor Position 0 Push Store 0 Pop Recall ESC s C End Of Line Wrap 0 Enable 1 Disable CR hex 0D Carriage Return SP hex 20 Space BS hex 08 Backspace HT hex 09 H...

Page 176: ...mary Number of character per inch ESC s V Height primary Character height in point ESC s S Style primary 0 Upright 1 Italic ESC s B Stroke Weight primary 0 Medium 3 Bold ESC s T Typeface primary Code...

Page 177: ...Defined Symbol Set ID Code ESC f W data User Defined Symbol Set Data ESC c S User Defined Symbol Set Control ESC s W data Soft Font Descriptor ESC c E Soft Font Character Code ESC s W data Soft Font...

Page 178: ...D specified 4 Enable macro for automatic overlay last ID specified 5 Disable automatic overlay 6 Delete all macros 7 Delete all temporary macros 8 Delete macro last ID specified 9 Make macro temporary...

Page 179: ...b W data Transfer Raster Graphic Data ESC B or ESC C End of Raster Graphic ESC c A Horizontal Rectangle Size PCL Units ESC c H Horizontal Rectangle Size Decipoint ESC c B Vertical Rectangle Size PCL U...

Page 180: ...Type ESC s U Set Status Readback Location Unit ESC s I Set Status Readback Entity ESC s 1 M Free Space ESC r F Flush all pages ESC s X Echo Note For detailled informations see HP PCL 5 Technical Refe...

Page 181: ...tions Position in Character Position in ISO 8859 1 PC 8 PC 8 9 0 C 5 9 1 C 4 9 2 B 3 9 3 D A 9 4 B F 9 5 C 0 9 6 D 0 9 7 C 3 9 8 B 4 9 9 C 2 9 A C 1 The symbols are selected from the symbol set table...

Page 182: ...grmming detail see PCL Typeface List or by PCL command with the following parameters symbol set 0Y pitch 8 17 typeface 0 line printer or symbol set 0Y pitch 4 71 typeface 0 line printer The printer of...

Page 183: ...ault values see table on page A 29 of these parameters are activated with the first selection of a bar code type Programming a new parameter modifies only the value of the actually selected bar code t...

Page 184: ...C p P1 X relative horizontal position P1 to the left ESC p P1 X relative horizontal position P1 to the right ESC p P1 Y absolute vertical position to P1 ESC p P1 Y relative vertical position P1 down E...

Page 185: ...SC2 P1 126 EAN 13 SC6 P1 129 EAN 13 SC9 P1 142 UPC A SC2 P1 146 UPC A SC6 P1 149 UPC A SC9 P1 162 UPC E SC2 P1 166 UPC E SC6 P1 169 UPC E SC9 P1 180 Codabar P1 181 MSI P1 188 Code 93 P1 200 Postnet P...

Page 186: ...fies the bar code data field Two command formats are supported The first format is conforming to earlier PCL3 commands and does not report the number of data bytes in front of the data field ESC z dat...

Page 187: ...e maximum bar width The programmer has to ensure that the actual selected font is adequate to be printed in combination with the bar code Bar code module width Horizontal scaling of the bar code is se...

Page 188: ...EAN 8 SC 6 6 yes fixed no 109 EAN 8 SC 9 8 yes fixed no 122 EAN 13 SC 2 4 yes fixed no 126 EAN 13 SC 6 6 yes fixed no 129 EAN 13 SC 9 8 yes fixed no 142 UPC A SC 2 4 yes fixed no 146 UPC A SC 6 6 yes...

Page 189: ...b c d A B C D t n e A B C D Note Following combinations start stop are specified for Codabar but not checked by the printer a t b n c d e A A B B C C D D Error checking characters Error checking chara...

Page 190: ...2A 7A 3C 43 4F 44 45 33 39 3E 5A Print sample Example for 2 of 5 industrial type 2 of 5 industrial ESC z 1 V Height 0 6 inch ESC z 180 H mod width 10 PCL units ESC z 10 S text OFF ESC z 0 Q data 1 2...

Page 191: ...30 59 1B 26 61 39 30 50 1B 2A 7A 34 51 1B 2A 7A 3C 31 32 33 34 3E 5A Print sample Example for EAN 8 SC2 type EAN 8 SC2 ESC z 1 0 2 V orientation 270 ESC a 2 7 0 P text OCR B below ESC z 2 Q data 4 0...

Page 192: ...z 4 Q data 4 0 1 2 3 4 5 5 1 2 ESC z 1 0 Z 4 0 1 2 3 4 5 5 1 2 The HEXDUMP datastream for this example is 1B 2A 7A 31 30 36 56 1B 26 61 32 37 30 50 1B 2A 7A 34 51 1B 2A 7A 31 30 5A 34 30 31 32 33 34 3...

Page 193: ...3 4 5 5 8 6 1 0 4 ESC z 1 3 Z 4 0 1 2 3 4 5 5 8 6 1 0 4 The HEXDUMP datastream for this example is 1B 2A 7A 31 30 39 56 1B 2A 7A 31 51 1B 2A 7A 31 33 5A 34 30 31 32 33 34 35 35 38 36 31 30 34 Print s...

Page 194: ...A 31 33 5A 34 31 32 33 34 35 36 37 38 39 30 31 38 Print sample Example for Codabar type Codabar ESC z 1 8 0 V ratio 3 0 ESC z 3 0 O text OCR B below ESC z 2 Q data a 0 1 2 3 4 5 6 7 8 9 t ESC z 1 2 Z...

Page 195: ...below ESC z 4 Q data C o d e 1 2 8 ESC z C o d e 1 2 8 Z The HEXDUMP datastream for this example is 1B 28 73 31 70 32 30 76 31 73 30 62 34 31 31 36 54 1B 2A 7A 32 31 30 56 1B 26 61 39 30 50 1B 2A 7A 3...

Page 196: ...is 1B 2A 7A 32 30 30 56 1B 2A 7A 3C 31 32 33 34 35 36 37 38 39 3E 5A Print sample Mark Pollmann 101 Main St Anytown US Example for RMS4SCC KIX type KIX ESC z 2 2 0 V data 9 7 2 5 K E 5 6 x 4 3 ESC z...

Page 197: ...40 44x44 48x48 52x52 64x64 72x72 8x18 8x32 12x24 12x36 16x36 and 16x48 Type module width height and width may be omitted for the next barcode if the value does not change If the barcode is a square th...

Page 198: ...B 1 Appendix B Symbol Sets Roman 8 Display ROMAN 8 ID Number 8U Mantenimiento Perif ricos Inform ticos SL C Canteras 15 28860 Paracuellos de Jarama Tel 00 34 917481604 WEB https mpi com es...

Page 199: ...Appendix B Symbol Sets B 2 ISO 8859 1 Latin 1 Display ISO L1 ID Number 0N Mantenimiento Perif ricos Inform ticos SL C Canteras 15 28860 Paracuellos de Jarama Tel 00 34 917481604 WEB https mpi com es...

Page 200: ...Appendix B Symbol Sets B 3 ISO 8859 2 Latin 2 Display ISO L2 ID Number 2N Mantenimiento Perif ricos Inform ticos SL C Canteras 15 28860 Paracuellos de Jarama Tel 00 34 917481604 WEB https mpi com es...

Page 201: ...Appendix B Symbol Sets B 4 ISO 8859 9 Latin 5 Display ISO L5 ID Number 5N Mantenimiento Perif ricos Inform ticos SL C Canteras 15 28860 Paracuellos de Jarama Tel 00 34 917481604 WEB https mpi com es...

Page 202: ...bol Sets B 5 ISO 8859 15 Latin 9 Display ISO L9 ID Number 9N Note sign in position A4 hex Mantenimiento Perif ricos Inform ticos SL C Canteras 15 28860 Paracuellos de Jarama Tel 00 34 917481604 WEB ht...

Page 203: ...Appendix B Symbol Sets B 6 PC 8 Code Page 437 Display PC 8 ID Number 10U Mantenimiento Perif ricos Inform ticos SL C Canteras 15 28860 Paracuellos de Jarama Tel 00 34 917481604 WEB https mpi com es...

Page 204: ...pendix B Symbol Sets B 7 PC 8 Danish Norwegian Display PC 8 DN ID Number 11U Mantenimiento Perif ricos Inform ticos SL C Canteras 15 28860 Paracuellos de Jarama Tel 00 34 917481604 WEB https mpi com e...

Page 205: ...Appendix B Symbol Sets B 8 PC 850 Multilingual Display PC 850 ID Number 12U Mantenimiento Perif ricos Inform ticos SL C Canteras 15 28860 Paracuellos de Jarama Tel 00 34 917481604 WEB https mpi com es...

Page 206: ...Appendix B Symbol Sets B 9 PC 852 Latin 2 Display PC 852 ID Number 17U Mantenimiento Perif ricos Inform ticos SL C Canteras 15 28860 Paracuellos de Jarama Tel 00 34 917481604 WEB https mpi com es...

Page 207: ...ol Sets B 10 PC 858 Multilingual Display PC 858 ID Number 13U Note sign in position D5 hex Mantenimiento Perif ricos Inform ticos SL C Canteras 15 28860 Paracuellos de Jarama Tel 00 34 917481604 WEB h...

Page 208: ...Appendix B Symbol Sets B 11 PC Turkish Display PC 8 TK ID Number 9T Mantenimiento Perif ricos Inform ticos SL C Canteras 15 28860 Paracuellos de Jarama Tel 00 34 917481604 WEB https mpi com es...

Page 209: ...ppendix B Symbol Sets B 12 Windows 3 1 Latin 1 Display WIN L1 ID Number 19U Mantenimiento Perif ricos Inform ticos SL C Canteras 15 28860 Paracuellos de Jarama Tel 00 34 917481604 WEB https mpi com es...

Page 210: ...Appendix B Symbol Sets B 13 Windows 3 1 Latin 2 Display WIN L2 ID Number 9E Mantenimiento Perif ricos Inform ticos SL C Canteras 15 28860 Paracuellos de Jarama Tel 00 34 917481604 WEB https mpi com es...

Page 211: ...Appendix B Symbol Sets B 14 Windows 3 1 Latin 5 Display WIN L5 ID Number 5T Mantenimiento Perif ricos Inform ticos SL C Canteras 15 28860 Paracuellos de Jarama Tel 00 34 917481604 WEB https mpi com es...

Page 212: ...Appendix B Symbol Sets B 15 Desktop Display DESKTOP ID Number 7J Mantenimiento Perif ricos Inform ticos SL C Canteras 15 28860 Paracuellos de Jarama Tel 00 34 917481604 WEB https mpi com es...

Page 213: ...Appendix B Symbol Sets B 16 PS text Display PS TEXT ID Number 10J Mantenimiento Perif ricos Inform ticos SL C Canteras 15 28860 Paracuellos de Jarama Tel 00 34 917481604 WEB https mpi com es...

Page 214: ...pendix B Symbol Sets B 17 Ventura International Display VN INTL ID Number 13J Mantenimiento Perif ricos Inform ticos SL C Canteras 15 28860 Paracuellos de Jarama Tel 00 34 917481604 WEB https mpi com...

Page 215: ...Appendix B Symbol Sets B 18 Ventura US Display VN US ID Number 14J Mantenimiento Perif ricos Inform ticos SL C Canteras 15 28860 Paracuellos de Jarama Tel 00 34 917481604 WEB https mpi com es...

Page 216: ...ppendix B Symbol Sets B 19 Microsoft Publishing Display MS PUBL ID Number 6J Mantenimiento Perif ricos Inform ticos SL C Canteras 15 28860 Paracuellos de Jarama Tel 00 34 917481604 WEB https mpi com e...

Page 217: ...Appendix B Symbol Sets B 20 Math 8 Display MATH 8 ID Number 8M Mantenimiento Perif ricos Inform ticos SL C Canteras 15 28860 Paracuellos de Jarama Tel 00 34 917481604 WEB https mpi com es...

Page 218: ...Appendix B Symbol Sets B 21 PS Math Display PS MATH ID Number 5M Mantenimiento Perif ricos Inform ticos SL C Canteras 15 28860 Paracuellos de Jarama Tel 00 34 917481604 WEB https mpi com es...

Page 219: ...Appendix B Symbol Sets B 22 Ventura Math Display VN MATH ID Number 6M Mantenimiento Perif ricos Inform ticos SL C Canteras 15 28860 Paracuellos de Jarama Tel 00 34 917481604 WEB https mpi com es...

Page 220: ...Appendix B Symbol Sets B 23 Pi Font Display PI FONT ID Number 15U Mantenimiento Perif ricos Inform ticos SL C Canteras 15 28860 Paracuellos de Jarama Tel 00 34 917481604 WEB https mpi com es...

Page 221: ...Appendix B Symbol Sets B 24 Legal Display LEGAL ID Number 1U Mantenimiento Perif ricos Inform ticos SL C Canteras 15 28860 Paracuellos de Jarama Tel 00 34 917481604 WEB https mpi com es...

Page 222: ...Appendix B Symbol Sets B 25 ISO United Kingdom Display ISO 4 ID Number 1E Mantenimiento Perif ricos Inform ticos SL C Canteras 15 28860 Paracuellos de Jarama Tel 00 34 917481604 WEB https mpi com es...

Page 223: ...Appendix B Symbol Sets B 26 ISO US ASCII Display ISO 6 ID Number 0U Mantenimiento Perif ricos Inform ticos SL C Canteras 15 28860 Paracuellos de Jarama Tel 00 34 917481604 WEB https mpi com es...

Page 224: ...Appendix B Symbol Sets B 27 ISO Swedish Display ISO 11 ID Number 0S Mantenimiento Perif ricos Inform ticos SL C Canteras 15 28860 Paracuellos de Jarama Tel 00 34 917481604 WEB https mpi com es...

Page 225: ...Appendix B Symbol Sets B 28 ISO Italian Display ISO 15 ID Number 0I Mantenimiento Perif ricos Inform ticos SL C Canteras 15 28860 Paracuellos de Jarama Tel 00 34 917481604 WEB https mpi com es...

Page 226: ...Appendix B Symbol Sets B 29 ISO Spanish Display ISO 17 ID Number 2S Mantenimiento Perif ricos Inform ticos SL C Canteras 15 28860 Paracuellos de Jarama Tel 00 34 917481604 WEB https mpi com es...

Page 227: ...Appendix B Symbol Sets B 30 ISO German Display ISO 21 ID Number 1G Mantenimiento Perif ricos Inform ticos SL C Canteras 15 28860 Paracuellos de Jarama Tel 00 34 917481604 WEB https mpi com es...

Page 228: ...Appendix B Symbol Sets B 31 ISO Norwegian Display ISO 60 ID Number 0D Mantenimiento Perif ricos Inform ticos SL C Canteras 15 28860 Paracuellos de Jarama Tel 00 34 917481604 WEB https mpi com es...

Page 229: ...Appendix B Symbol Sets B 32 ISO French Display ISO 69 ID Number 1F Mantenimiento Perif ricos Inform ticos SL C Canteras 15 28860 Paracuellos de Jarama Tel 00 34 917481604 WEB https mpi com es...

Page 230: ...ppendix B Symbol Sets B 33 Windows 3 0 Latin 1 Display WIN 3 0 ID Number 9U Mantenimiento Perif ricos Inform ticos SL C Canteras 15 28860 Paracuellos de Jarama Tel 00 34 917481604 WEB https mpi com es...

Page 231: ...Sets B 34 Windows 3 0 Baltic Display WIN BALTIC ID Number 19L Note sign in position 80 hex Mantenimiento Perif ricos Inform ticos SL C Canteras 15 28860 Paracuellos de Jarama Tel 00 34 917481604 WEB...

Page 232: ...Display none ID Number 19M Note sign in position F0 hex This Symbol Set is only addressable via a PCL Command Mantenimiento Perif ricos Inform ticos SL C Canteras 15 28860 Paracuellos de Jarama Tel 00...

Page 233: ...Display none ID Number 579L Note sign in position 7F hex This Symbol Set is only addressable via a PCL Command Mantenimiento Perif ricos Inform ticos SL C Canteras 15 28860 Paracuellos de Jarama Tel...

Page 234: ...Appendix B Symbol Sets B 37 MICR CMC7 Display none ID Number 14Y Mantenimiento Perif ricos Inform ticos SL C Canteras 15 28860 Paracuellos de Jarama Tel 00 34 917481604 WEB https mpi com es...

Page 235: ...Appendix B Symbol Sets B 38 MICR E13B Display none ID Number 10O Mantenimiento Perif ricos Inform ticos SL C Canteras 15 28860 Paracuellos de Jarama Tel 00 34 917481604 WEB https mpi com es...

Page 236: ...rtridge PP 4050 4060 NIS Developer Kit PP 4060 Developer Kit PP 4060 MICR Fuser Kit PP 4060 230V Fuser Kit PP 4060 120V 8709 002 45701 8709 002 45821 8709 002 45101 8709 002 45111 8709 002 46201 8709...

Reviews: