Prozone ProC232J Installation Manual Download Page 9

Setting Equipment Options

Access the Installer menu and select the menu below. Press Y to 
set equipment options.  The options will be different based on the 
type of equipment selected.  Selecting the correct stages is 
important for proper staging control.

Press Yes to select equipment type or No 
to select thermostat options.

Press Yes to select gas/electric 
equipment or No to continue to 
conventional heat pump.

Press Yes to select conventional heat 
pump or press No to continue to dual fuel 
heat pump.

Press Up or Down to change the 
number of stages.  Press NEXT to 
continue.

Press Up or Down to change the 
number of stages.  Press NEXT to 
continue.

Press Up or Down to change the 
number of stages.  Press NEXT to 
continue.

Press Up or Down to change the 
number of auxiliary heating stages.  
Press NEXT to continue.

Press No to display the options– Gas 
or Elec. Press NEXT to continue.

Press Up or Down to change the 
heating temperature limit. Press 
NEXT to continue.

Press Up or Down to change the 
heating temperature limit. Press 
NEXT to continue.

Press Up or Down to change the 
cooling temperature limit. Press 
NEXT to continue.

Press Up or Down to change the 
cooling temperature limit. Press 
NEXT to continue.

Press Up or Down to change the 
number of zones being used. Press 
NEXT to continue.

Press Up or Down to change the 
number of zones being used. Press 
NEXT to continue.

When the leaving air temperature 
exceeds the limits, the equipment will 
down stage and, if necessary, turn 
the heating or cooling source off 
while operating the fan.
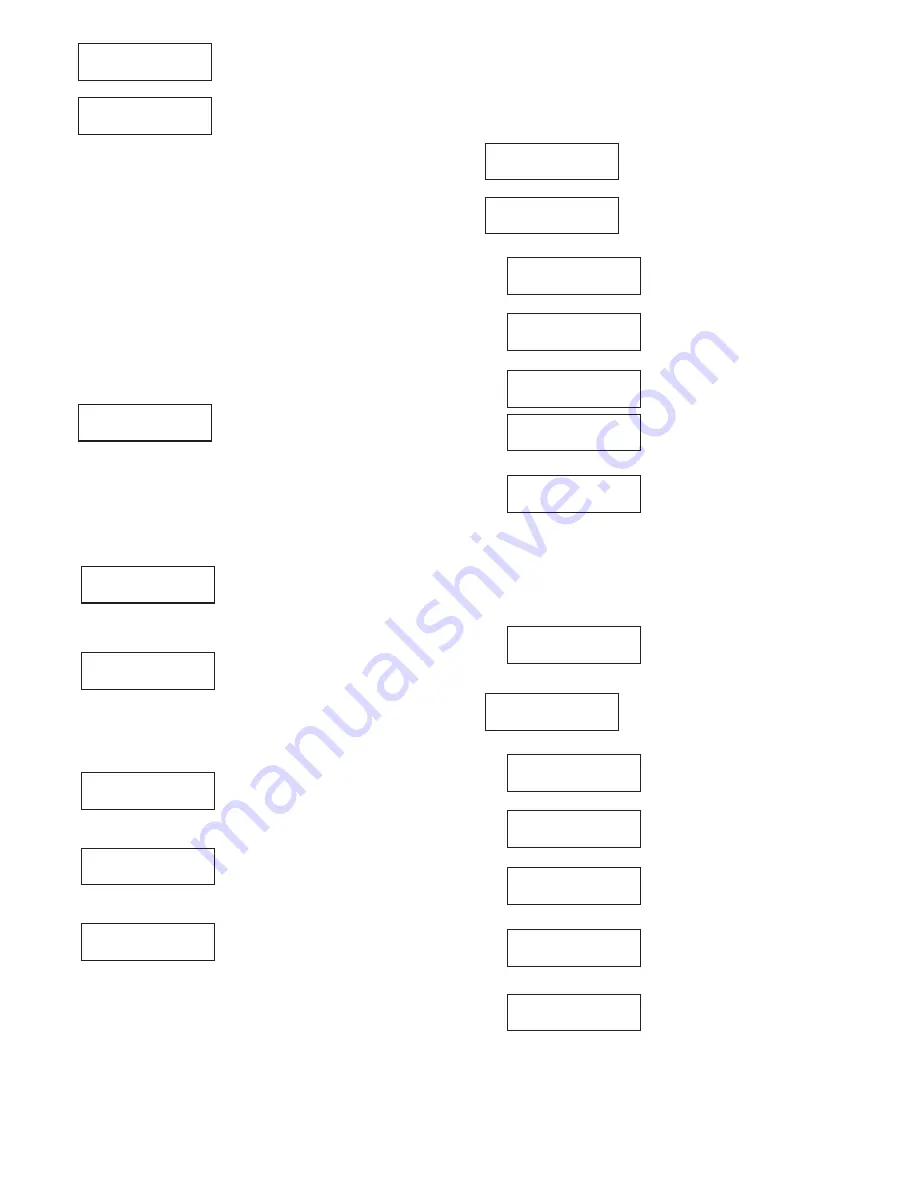
Select Equipment
Options      Y/N

Equipment Type
GasElec      Y/N

Equipment Type
ConvHP       Y/N

Compressor     1
Stages  U/D/NEXT

Compressor     1
Stages  U/D/NEXT

Heating        1
Stages  U/D/NEXT

Aux Heating    1
Stages  U/D/NEXT

Fan Mode     Gas
          N/NEXT

Htg Temp Lmt 160
        U/D/NEXT

Htg Temp Lmt 160
        U/D/NEXT

Clg Temp Lmt  45
        U/D/NEXT

Clg Temp Lmt  45
        U/D/NEXT

Total Zones   3
Used    U/D/NEXT

Total Zones   3
Used    U/D/NEXT

9

Display Data And
Selections   Y/N

Monitor HVAC
Performance  Y/N

Restore Defaults
             Y/N

Save Options Now
             Y/N

Save Selections
As Clone     Y/N

Change Advanced
Options      Y/N

Fresh Air    Off
      Y-On/N-Off

Press Yes to display all the option 
settings, sensor data, call status, 
error messages and much more.  
Press No to continue.

Press Yes to display the leaving air 
temperature, duct pressure and the 
position of the non-calling zone 
dampers when used for bypass.  The 
data is automatically updated every 5 
seconds.  Press No to continue.

Press Yes to restore the panel to the 
factory settings.  Press No to 
continue.

Press Yes to save the options and 
settings selected.  Press No to 
return to the main menu.

Press Yes to save the options and 
settings as a Clone.  The Clone can 
be identified with a 16-character 
name for future use.  Press No to 
return to the main menu.

Press Yes to select advanced 
options such as purge, opposite 
system service, heat or cooling 
priority, automatic emergency heat 
control, moderate weather staging 
inhibit, fresh air control and others. 
Press No to continue.

Press Yes to select fresh air control to 
meet the new requirements of Title24 
and ASHRAE 62.2 without the use of 
a dedicated fresh air controller.  Press 
No to continue.

The PDMi3 can be used to calcualte 
the minimum CFM of fresh air and the 
number of minutes of fresh air intake 
per hour.  Or the minutes of fresh air 
each hour can be entered.

The outdoor temperature can also be 
used to limit fresh air operation if the 
outdoor temperature exceeds the high 
or low limit set.

Change Fresh Air
            Y/N

Press Yes to select fresh air control. 
Press No to continue.

See page 12 for more information.

See page 13 for more information.

Summary of Contents for ProC232J

Page 1: ...umps Selected using the PDMi3 plug in programming display module See table below See table below See table below HVAC PANEL ZONE DAMPERS 1 1 2 2 3 Fresh Air 3 THERMOSTATS Quick View Zoning Panel ProZo...

Page 2: ...the plenum or freezing the indoor coil Color coded terminals for heat cool or heat pump thermostat Thermostat type selected using the PDMi3 Use 24VAC powered or battery powered thermostats VAC termina...

Page 3: ...stall the 24VAC transformer according to local electrical codes and connect the 24VAC output to the terminals on the panel using 2 conductor 18 gage thermostat wire as shown below 1 2 3 4 HVAC PANEL Z...

Page 4: ...heat pump thermostat should be used in Zone1 when heat pump equipment is selected Wiring of a heat pump zone thermostat is shown below Thermostat R C OB W2 E Y1 G Zoning Panel Terminal Function 24VAC...

Page 5: ...the red and white thermostat wires to the thermistor wires no polarity using the wirenuts 3 Push the wirenuts and wire into the cover and secure the cover with the screw 1 Connect the red and white th...

Page 6: ...respond to the Zone1 thermostat When the occupant leaves the home they can set the switch to Vacant and only set the Zone1 thermostat Installing the Duct Pressure Sensor Drill a 3 8 inch diameter hol...

Page 7: ...es or navigate Press the CANCEL to cancel settings and return to the main menu The panel is ready to operate and control the equipment selected The PDMi3 can be used to customize the panel clone it fr...

Page 8: ...s Yes to set the number of stages of heating and cooling the fan operation the supply air temperature limits outdoor changeover temperature for dual fuel heat pumps and number of zones being used Pres...

Page 9: ...T Aux Heating 1 Stages U D NEXT Fan Mode Gas N NEXT Htg Temp Lmt 160 U D NEXT Htg Temp Lmt 160 U D NEXT Clg Temp Lmt 45 U D NEXT Clg Temp Lmt 45 U D NEXT Total Zones 3 Used U D NEXT Total Zones 3 Used...

Page 10: ...heat cool thermostat for that zone Press No to see other thermostats that can be used in that zone Press Up or Down to change the number of auxiliary heating stages Press NEXT to continue If a heat pu...

Page 11: ...Y N Bypass Ext Baro Y N Bypass ZoneDmprs Y N Zone1 Htg 50 BP Pos U D NEXT Zone1 Clg 50 BP Pos U D NEXT Zone2 Htg 50 BP Pos U D NEXT Zone2 Clg 50 BP Pos U D NEXT Zone3 Htg 50 BP Pos U D NEXT Zone3 Clg...

Page 12: ...N Fresh Air Off Y On N Off If the contractor has calculated the CFM for fresh air and sized the damper to operate for a number of minutes each hour the minutes can be directly entered The PDMi3 allows...

Page 13: ...Down to set the weighted zones when low speed fan is activated In the example if the weighted demand is less than 2 0 DSBK is activated Press Next to continue to next menu selection Press Yes to selec...

Page 14: ...ooling stage Press Yes to start a test of the heating system to insure discharge temperature is correct Press Next to start a test stage2 heating to insure discharge temperature is correct or return t...

Page 15: ...select the letter or number Press NEXT to go to the next letter in the name Press SAVE to save the clone name Monitor HVAC Performance Y N LAT 122 Prs 0 55 BP Pos 35 NEXT Press Yes to display the leav...

Page 16: ...una Hills CA 92653 949 916 0945 Fax 949 458 8502 www ProZone US com Limited 5 Year Warranty The 5 year warranty is limited to the repair or replacement of defective product due to parts failure or def...

Reviews: