background image

Setting Up Your Projector    

1-13

Workstations

13C3 Video Connections (except Silicon Graphics workstations)

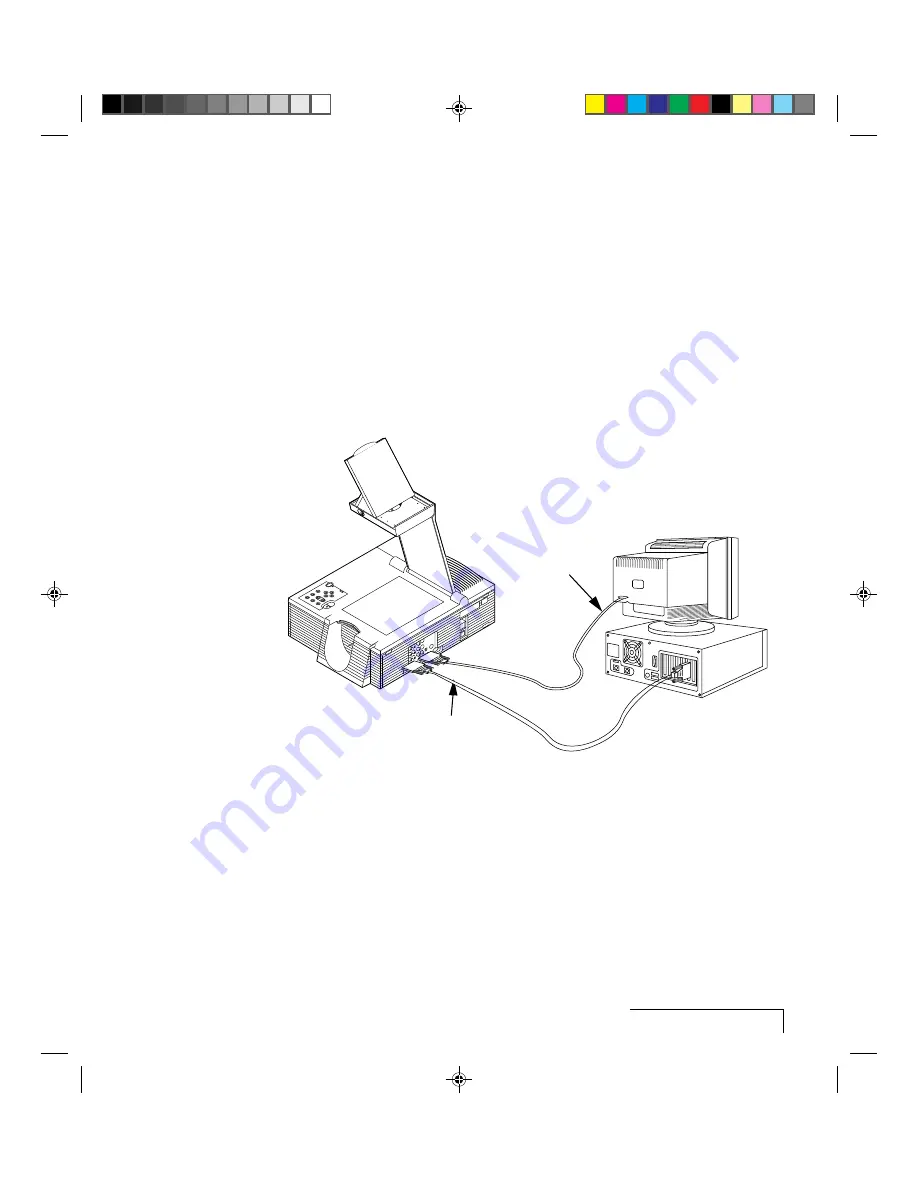
If your workstation has a 13C3 connector at the computer video port:

1

Disconnect your computer-to-monitor cable at the computer end.

2

Connect the free end of the monitor cable to the projector’s COMPUTER
OUT connector.

3

Use the Proxima 13C3 to LCD Connector Cable (C801-6) between the
projector and the computer. Connect the end marked “LCD” to the
projector’s COMPUTER IN connector, and the end marked “COMPUTER”
to the computer’s video output connector.

Proxima Cable

Monitor Cable

Figure 1-17, Workstation video out connection to projector

Summary of Contents for Desktop Projector 9100

Page 1: ...USER S GUIDE Multimedia LCD Projector Not actual front cover ...

Page 2: ...rchantability or fitness for a particular purpose To the extent not prohibited by law all statutory warranties are hereby waived and excluded from this Warranty Proxima expressly disclaims all warranties not stated in this Limited Warranty FCC STATEMENT Warning This is a Class A product In a domestic environment this product may cause radio interference in which case the user may be required to ta...

Page 3: ... connecting your computer to your monitor The Desktop Projector 9100 is a high resolution multimedia LCD projector that offers a high quality extremely bright image It is compatible with a wide range of computers and resolutions from 640 x 480 personal computers to 1280 x 1024 workstations Projected Image File Edit View Projected Ima ge File Edit View Figure i 1 The Proxima Desktop Projector 9100 ...

Page 4: ...lay System is a hybrid next generation product that brings the functionality of computers and projectors much closer together The MediaExpress system eliminates the need to connect a computer to the projector Just save your presentation from whatever application you re using to a special kind of file called a PDF file copy the file on a disk then place the disk in the MediaExpress disk drive and s...

Page 5: ...D Cable and Adapter C943 6 and C947 12 DEC 3C3 to LCD Cable and Adapter C948 6 and C947 10 MAC C470 6 and PC C936 6 Serial Cables included with remote 2 AAA Alkaline Batteries User s Guide Product Registration Card European C1001 10 U K C1004 10 and Italian C1003 10 power cords Composite Video Audio Cable C497 6 S Video Cable C466 6 Computer Audio Cable C498 6 Mini jack to RCA Cable Adapter C5105 ...

Page 6: ... lists these steps in greater detail Take a moment to familiarize yourself with the parts of the projector 2 1 2 4 5 6 7 3 8 9 Figure i 3 The Desktop Projector 9100 NUMBER ITEM 1 control panel 2 arm release lever 3 flip mirror release lever 4 flip mirror 5 projection arm 6 power switch 7 connector panel 8 projection lens 9 projection window ...

Page 7: ...r so that the side with the handle is facing the projection screen 3 Locate the arm release lever see the next figure Slide it gently in the direction of the arrow Figure i 4 Pressing the lever to release the arm 4 The arm pops up Gently lift the arm It raises automatically until it is fully extended Do not force the arm further ...

Page 8: ...e the flip mirror release lever on the top of the arm see Figure i 5 Push it in the direction of the arrow while pulling up on the lift tab This releases the flip mirror Figure i 5 Pressing the lever to release the flip mirror ...

Page 9: ...grees You can adjust the angle later to raise or lower the projected image Figure i 6 Flipping the mirror to a 45 degree angle CAUTION Never push on or force the mirror Always use care when opening the mirror assembly Avoid touching the surface of the mirror with your fingers ...

Page 10: ...r existing monitor cable to connect the projector s COMPUTER OUT port to your monitor M A C I I C P U Monitor Adapter if needed Monitor Cable To COMPUTER IN Port Proxima Cable Figure i 7 Connecting the projector to your computer In some cases a Proxima adapter is required to connect your computer and monitor to the projector The adapters you ll need are included with your projector See Chapter 1 S...

Page 11: ...ac AUDIO IN ports or the sound card on projector of a PC External speakers Mini jack to RCA cable adapter AUDIO OUT 1 2 Mini jack cable C5105 and mini jack cable ports on included with speakers included with speakers projector Stereo system RCA stereo cable comes with AUDIO OUT 1 2 Left right AUDIO IN stereo ports on ports on amplifier projector Microphone Microphone cable supplied with MIC port o...

Page 12: ...es Toggles between Draw and Move modes in the LightBoard tool and also controls the mouse pointer In MediaExpress menus controls the mouse pointer 2 Prog 1 Performs the function you define in the Preferences menu remote only 3 Source Cycles through the various input sources including video computer and MediaExpress mode 4 Lamp On the remote press this key once to clear to a black screen on off The...

Page 13: ... the current slide in a MediaExpress remote only presentation Pause opens See it Show it in Cyclops F X 11 Replace Flashes for 90 seconds after turning off the lamp Lamp control Illuminates when the recommended lamp life is exhausted panel only 12 Overtemp Illuminates if the projector is too hot or if the fans malfunction indicator indicating that the lamp was automatically turned off If you contr...

Page 14: ...e projector 1 Place the projector on a solid flat surface 2 Position the projector so that the side with the handle is facing the projection screen The connector panel will be facing away from the projection screen see Figure 1 1 Figure 1 1 Positioning the projector in front of the projection screen ...

Page 15: ...n screen Parallel to the floor Top View Side View Projection Screen OVERTEMP VOLUME SOURCE FIT TO VIEW POWER CLEAR SETUP MENU REPL LAMP Figure 1 2 Top view and side view of the projector 4 Locate the arm release lever beside the control panel on the top of the projector see Figure 1 3 Slide it gently in the direction of the arrow Figure 1 3 Pressing the lever to release the arm ...

Page 16: ...cally until it is fully extended Do not force the arm further Figure 1 4 The arm pops up 6 Locate the flip mirror release lever on the top of the arm Press it in the direction of the arrow while pulling up on the lift tab This releases the mirror Figure 1 5 The flip mirror release lever ...

Page 17: ... your fingers Closing the projector To close the projector reverse the opening procedures 1 Tilt the mirror down into the arm until it latches 2 Gently swing the arm down until it clicks into place The latch should click when the arm is completely stowed Moving the projector You should securely close the projector and disconnect all cables before moving it The projector has a recessed carrying han...

Page 18: ...V IEW POWER CLEAR SETUP MENU REPL LAMP Figure 1 7 Accessing the recessed handle If you must move the projector while it is open grasp it securely at the sides by the lower part of the housing to support its weight Figure 1 8 Moving the projector while it is open ...

Page 19: ...ug the other end of the power cord into a properly grounded electrical outlet 3 Move the POWER switch to the ON position 4 Press the key to turn on the lamp The lamp will ignite slowly 5 If you haven t already done so connect the projector to your computer and external monitor if you re using one 6 Turn on your computer and external monitor if you re using one You should see a projected image of y...

Page 20: ...camera laserdisc player C497 6 television or a VCR NTSC PAL SECAM source to bring video from these sources into the projector S Video 1 Connects the projector to an S Video cable C466 6 S VIdeo 2 S Video source to bring video into the projector COMPUTER Left and right ports connect to Computer audio cable C498 6 AUDIO IN the computer brings audio into the projector AUDIO OUT Connects to external s...

Page 21: ...xima cable s that matches your existing computer to monitor connection You normally need only one Proxima cable This cable is used to connect the projector to your computer s video output connector Use the existing computer to monitor cable if you also want to connect your monitor You can connect the computer to projector cable with the projector and computer power on Available cables include 13C3...

Page 22: ...onitor Some display cards rely on sense line information from the monitor to configure themselves for the correct display resolution The absence of sense line information causes some display cards to output a default video signal and actually prevents some video cards from outputting video at all If you connect the projector to a computer without a monitor power up your system and check to see if ...

Page 23: ...e marked LCD to the projector s COMPUTER IN connector and the end marked COMPUTER to the computer s video output connector Proxima Cable PROJECTOR PC Figure 1 13 PC video out connection to projector Macintosh computers Connecting a Macintosh monitor requires the Proxima VGA MAC C804 adapter and the existing monitor cable Use the Proxima adapter only 1 Disconnect your computer to monitor cable at t...

Page 24: ...P9100 sense lines to achieve the desired display resolution See Appendix C Sense Lines for more information 4 Use the Proxima MAC to LCD connector cable C802 6 between the projector and the computer Connect the end marked LCD to the projector s COMPUTER IN connector and the end marked COMPUTER to the computer s video output connector MAC MAC Monitor LCD DP9100 VGA OUT Port Proxima Mac to LCD Adapt...

Page 25: ...ur notebook or to the video cable adapter supplied with your notebook 2 Connect the end of the Proxima video cable marked LCD to the COMPUTER IN connector on the projector Proxima Cable PROJECTOR NOTEBOOK Figure 1 16 Notebook connections Note Some notebooks require that you press a combination of keys or use a control panel to set the projector as an external monitor Refer to your notebook manual ...

Page 26: ...t the computer end 2 Connect the free end of the monitor cable to the projector s COMPUTER OUT connector 3 Use the Proxima 13C3 to LCD Connector Cable C801 6 between the projector and the computer Connect the end marked LCD to the projector s COMPUTER IN connector and the end marked COMPUTER to the computer s video output connector Proxima Cable Monitor Cable Figure 1 17 Workstation video out conn...

Page 27: ...TER OUT connector Note SGI workstation users who do not connect an external monitor will need to set DP9100 sense lines to achieve the desired display resolution Refer to Appendix C Sense Lines for more information 4 Use the Proxima SGI 13C3 to LCD connector cable C943 6 between the projector and the computer Connect the end marked LCD to the projector s COMPUTER IN connector and the end marked CO...

Page 28: ...OMPUTER to the workstation s video output connector BNC Video Connections If your workstation does not have a 13C3 video port connector at the computer video port but has a BNC connector at the monitor you will need the optional Proxima BNC cables 1 Note which BNC connectors are currently used with the monitor The R G and B connectors are always used but the way the H and V connectors are used dep...

Page 29: ...ptional laser pointer Instructions for setting up your Cyclops system are included with your Cyclops kit Connecting the MediaExpress system The MediaExpress Image Display System is a hybrid next generation product that brings the functionality of computers and projectors much closer together The MediaExpress system eliminates the need to connect a computer to the projector Just save your presentat...

Page 30: ...the corresponding group If you connect video to group one and audio to group two you won t hear the audio Although both COMPUTER AUDIO IN and AUDIO IN may be connected simultaneously only one is active If computer video is selected COMPUTER AUDIO IN is active If NTSC PAL SECAM S Video are selected AUDIO 1 IN is active Connecting video from a VCR The Desktop Projector 9100 can project video from NT...

Page 31: ...cal round four pin connectors on either end 2 Connect the other end of the cable to the projector s S VIDEO 1 port Connecting audio from the computer Use the COMPUTER AUDIO IN port to connect audio from a computer 1 Insert the mini jack end of the computer audio cable C498 6 into the AUDIO OUT connector of a Macintosh or the sound card of a PC 2 Insert the RCA jacks at the other end of the compute...

Page 32: ... external speakers use the optional Proxima Powered Loudspeaker System A55 or a similar system References in the following procedure are to Figure 1 24 1 Insert the two RCA plugs on the Mini jack to RCA cable adapter C5105 into the projector s AUDIO OUT ports 2 Connect the other end of the Mini jack to RCA cable adapter C5105 to the speaker cable included with your speakers 3 Connect speaker A to ...

Page 33: ...the Composite Video Audio cable C497 6 insert the white and red RCA plugs into the projector s left and right AUDIO OUT ports 2 Insert the white and red RCA plugs at the other end of the cable into the external amplifier s left and right AUDIO IN ports Stereo Receiver Figure 1 25 Connecting an external stereo system ...

Page 34: ...Figure 1 26 Allow sufficient air flow CAUTION The lamp chamber gets very hot during operation especially the ceramic sockets at each end of the lamp Be very careful when opening the lamp chamber or changing the lamp To allow that area to cool down press the key to turn off the lamp and let the fan cool the projector for at least five minutes before you touch any of those components See Chapter 5 M...

Page 35: ... help ensure that the projector cools properly Turning the lamp off does not turn off the projector To turn the power off move the power switch on the back of the projector to the OFF position After you turn off the lamp you can immediately turn it back on within five seconds If you wait longer than five seconds you must then wait 90 seconds before turning it back on This is a built in feature tha...

Page 36: ...ojector ADJUSTING THE IMAGE Raising or lowering the image To raise or lower the projected image tilt the mirror on top of the arm up to move the image higher or down to move the image lower Focusing the image To focus the image rotate the ring just below the projection lens beneath the mirror until the image is sharp and clear Figure 1 29 Rotating the focus ring ...

Page 37: ...lted sideways To correct keystoning make sure that the projector is at a right angle to the projection screen in the horizontal plane see Figure 1 30 To project images high enough for the entire audience to view the DP9100 has a built in 4 5 degree correction for keystoning Image size The size of the projected image depends on the distance between the projector lens and the projection screen This ...

Page 38: ...as adjusting or muting the volume and proceeding from one slide to the next just press a button on the Cyclops remote control or the control panel This chapter describes keys on the Cyclops remote control and control panel and their associated functions It also describes how to use the various projector and menu settings USING THE CYCLOPS REMOTE CONTROL AND CONTROL PANEL VOLUME PROXIMA MUTE MENU S...

Page 39: ...s dialog boxes the Prog 2 key selects the highlighted item Reverse Forward Pause In a MediaExpress presentation these keys reverse or advance to the next slide The Pause key suspends the timer for a slide during a MediaExpress presentation It also opens See it Show it in Cyclops F X MouseDisk When you press the center of the MouseDisk it acts like a mouse click When you press the edges of the Mous...

Page 40: ...ion the image in computer or video mode When the MediaExpress menus are displayed these keys navigate those menus and dialog boxes Fit To View MediaExpress The Fit To View key enables you to fit a projected image on the screen while your system displays at a higher resolution Press this key to intelligently scale images larger than 1024 x 768 or to enlarge 640 x 480 images Press this key a second ...

Page 41: ...uter connected To switch between sources just press the Source key The Source key cycles through the various sources that are currently connected to your projector USING THE MENUS Before starting your presentation you ll want to fine tune the image to get the sharpest clearest image possible The handful of settings you ll use the most are very easy to access Just press the Setup key and make your ...

Page 42: ...ave their settings separately see Advanced Features Reverting to the factory defaults If you want to revert to the original factory settings for a specific computer source choose Image Factory Defaults Reset To reset the projector itself press the Clear key then press each of the four arrow keys on the projector s control panel once The power LED indicator will blink twice to indicate the projecto...

Page 43: ...g the projector s menus and choosing Sync from the Image menu Correcting vertical banding If the projected image has vertical black lines or bands adjust the Dot Clock setting on the Image menu to eliminate them Adjust the slider so that the bands get wider Continue to adjust the slider until the bands disappear This setting is only available when the source is your computer Adjusting the color ti...

Page 44: ... display the volume indicator choose Preferences Onscreen Display To suppress this visual indicator set Onscreen to Hide Adjusting the volume To adjust the volume of the internal speakers and any external speakers you ve connected press the plus or minus Volume key on the remote or control panel You can also make your adjustments through the Audio menu Muting the audio To mute the audio press the ...

Page 45: ...Audio Mode from the Audio menu then choose the appropriate setting ADJUSTING REMOTE MOUSE TRACKING Use this setting to adjust how fast the pointer moves To increase or decrease the remote mouse tracking choose Mouse Tracking from the Tools menu and move the slider in the appropriate direction PRESENTATION FEATURES Once you ve adjusted the image and audio settings you re ready to start your present...

Page 46: ...four buttons Figure 2 2 The Draw toolbar BUTTON FUNCTION Click this button to select the Drawing tool Click this button to select the Eraser You can erase any of your annotations Click the Clear All button to erase all previous annotations Click this button to select a new color This button shows the currently selected color Note If you re using the optional Cyclops interactive pointer system you ...

Page 47: ... release Use the edges of the MouseDisk to draw on the screen When you are in draw mode the cursor will be black When you are in move mode the cursor will be white To draw with the optional Cyclops interactive pointer system click and hold the wand button while you move the cursor around the screen Release the button to end the drawing You can move the Draw toolbar to another spot on the projected...

Page 48: ...e middle of your presentation You can clear to either a white or black background Press the Clear key once quickly to clear to a white background Press and hold it for at least two seconds to clear to a black background Press Clear again once quickly to return the projected image Note The panel area on the DP9100 is 6 by 8 which is slightly smaller than the panel area of most overhead projectors t...

Page 49: ...erences Choose the key you want to program Prog 1 or Prog 2 and assign the feature or setting you want to access Note If you want to set assign one of the Cyclops F X effects to one of the programmable keys you must select Host in the Preferences menu Saving a user profile Different presenters have different styles The DP9100 offers a way for two presenters to save their settings and recall them e...

Page 50: ...input sources and a display only screen of current VSync HSync Lines and Sense measurements Image Settings for brightness sync tint saturation contrast color dot clock and interlace assignment Audio Settings for volume mute balance bass treble fade microphone volume and mono stereo mode Projector Settings for front rear projection and the lamp hours counter Preferences Settings for colors language...

Page 51: ...ols Audio Preferences Figure 3 2 The Tools menu USE THIS TO DO THIS OPTION LightBoard Mode Sets the background for LightBoard drawing Overlay transparent WhiteBoard white background BlackBoard black background LightBoard Turns the LightBoard tool on and off Break Timer Starts the timer or turns it off Break Timer Value Sets the break timer interval from 1 60 minutes Mouse Tracking Sets the speed o...

Page 52: ...t Center Menus Input Source Tools Advanced Image Projector Cyclops Audio Preferences Figure 3 3 The Cyclops menu USE THIS TO DO THIS OPTION Calibrate Starts the Cyclops calibration procedure Button Sets the Cyclops wand or laser pointer to emulate a left right or center mouse button or none ...

Page 53: ...dvanced Image Projector Input Source Audio Preferences MediaExpress Figure 3 4 The Input source menu USE THIS TO DO THIS OPTION Source Select Select the input source Computer Video 1 S Video 1 Video 2 S Video 2 MediaExpress optional Source Mode Select from a list of video or computer standards NTSC PAL SECAM Computer compatibility Input View projector readings for the selected input source Measure...

Page 54: ...vels Red Adjusts the red level Green Adjusts the green level Blue Adjusts the blue level Factory Default Resets the source mode to the initial factory settings Interlace Sets the interlace even odd frame assignment Even sets frame 0 as even Odd sets frame 0 as odd Not available in MediaExpress mode Bright Contrast Sync DotClk Menus Cyclops Tools Advanced Input Source Projector Image Audio Preferen...

Page 55: ... Cyclops Tools Advanced Input Source Projector Image Audio Preferences Saturation Tint Figure 3 6 The Image menu USE THIS TO DO THIS OPTION Contrast Adjusts the video contrast Bright Adjusts the video brightness Tint Adjusts the video tint Saturation Adjusts the video color saturation ...

Page 56: ...sts the left right audio balance Bass Adjusts the bass Treble Adjusts the treble Fade Adjusts front rear audio balance Mic Volume Adjusts the volume of the microphone Audio Mode Switches between Stereo and Mono mode Balance Bass Volume Menus Cyclops Tools Advanced Input Source Projector Audio Image Preferences Fade Mic Volume Treble Audio Mode Mono Stereo Mute Mute Normal ...

Page 57: ...s Advanced Input Source Audio Projector Image Preferences Figure 3 8 The Projector menu USE THIS TO DO THIS OPTION Projection Switches between front and rear projection Lamp Hours Resets the lamp hours counter Use this option after you change the lamp Lamp Hours Displays the number of hours elapsed on the lamp hours counter ...

Page 58: ...n the remote control Choose from the following options described elsewhere in this guide Fit to View LightBoard Reverse Clear Freeze Colors WhiteBoard BlackBoard Host Title screen Prog 2 Sets an operation for the Prog 2 key on the remote control same choices as Prog 1 key Language Deutsch Francais English Español Italiano Prog Key1 LightBoard Fit to View Reverse Freeze Clear Menus Cyclops Tools Ad...

Page 59: ...t Vertical Adjust the vertical position of the image on the screen Pos Position VCO gain Sets the VCO gain parameter of the PLL Sense 3 2 Set the level of the four sense pins 1 and 0 High does not drive this pin Low drives the pin low See Appendix C Sense Lines for more information User User A User B Defaults Sense 3 Low High Horiz Pos Menus Cyclops Tools Preferences Input Source Audio Advanced Im...

Page 60: ...You cannot use Cyclops F X with the MediaExpress system To use Cyclops F X follow these steps details are covered throughout this chapter 1 Use the serial cable appropriate for your system PCs C936 6 or Macs C470 6 to connect the serial port on your computer to the CYCLOPS port on the projector C Cyclops Figure 4 1 Cyclops port on the projector 2 Install the Cyclops F X software 3 Start Cyclops F ...

Page 61: ...e click the Cyclops F X Installer icon in the disk window Drag the Cyclops F X icon onto the hard disk icon 3 Follow the instructions that appear on your screen STARTING CYCLOPS F X Once you re finished with the installation do one of the following In Windows 3 x or Windows 95 double click the Cyclops F X icon to start the program For Macintosh users the software will automatically load each time ...

Page 62: ...provides options that allow you to customize your remote and software Note If you open a menu or if you re using the LightBoard tool Cyclops F X will be suspended ASSIGNMENTS AREA The Assignments area displays the custom remote keys and their current assignments To modify the custom remote keys 1 Highlight the effect you want to assign 2 Double click the box next to the custom remote key in the As...

Page 63: ...dback CUSTOMIZING EFFECTS Most effects have options that you can tailor to both the presentation and your own presentation style For example you can customize the Spotlight effect to specify the shape and size of the spotlight You can also change the name of each effect for example you can change the name from Spotlight to Headlight You can assign each effect to a key on the keyboard or a button o...

Page 64: ...Cyclops interactive pointer system with Cyclops F X To set up the software click Setup Remote in the Assignments area of the mains screen Choose Cyclops Wand or Laser Pointer The following screen appears Figure 4 3 Cyclops interactive pointer screen Click the Show Navigation Bar checkbox to enable the navigation bar This will provide you with a quick way to scroll through your slide show with the ...

Page 65: ...reen Use this screen to assign different options to the navigation bar To assign a new function to the navigation bar click the Next or Previous areas and assign a function using the list boxes to the right You can also use this screen to define where the navigation bar will appear on your display The default is Lower Left ...

Page 66: ...e preparing for the message on the next slide To use See it Show it 1 Click Edit Navigation Keys in the Assignments area of the Cyclops F X main screen The following screen appears Figure 4 5 Edit Navigation Keys screen 2 Select a countdown time for the Forward or Reverse keys or both When you select a countdown time See it Show it is automatically enabled 3 To disable See it Show it select None f...

Page 67: ...t Freeze Key screen To use Freeze 1 Press Pause on your Cyclops remote 2 Use any of the remote keys to control your computer 3 Press Pause again when you re ready to return to your presentation Once you freeze your screen all of the other keys on your remote are available to control your computer This means you can edit your current presentation display slides from another presentation or even ope...

Page 68: ... expires To set a transparent background uncheck Color and Picture To display a picture check Picture click File then select the desired BMP file Center Cursor centers the mouse pointer on the screen This helps prevent losing the cursor Custom Cursor changes the appearance of the mouse pointer to one of 30 images Only the standard arrow pointer changes The other standard icons such as the hourglas...

Page 69: ... a button You can play the sound repeatedly or just once Note You must have a sound card to use this effect Spotlight dims all of the image except for the area around the mouse pointer You specify the shape and size of the spotlight circular square or bar Once you ve started Spotlight press the MouseDisk to change its size Another setting makes the Spotlight visible against a black background Stam...

Page 70: ...r During Zoom checkbox left click to change the zoom factor Note Most effects have an option that lets you rename the command itself MENU COMMANDS File menu The File menu offers the following commands for working with profiles of effects MENU ITEM FUNCTION Reset to defaults Resets the F X options to the factory defaults Open Opens a previously saved profile of settings Save Saves recent changes to...

Page 71: ...M port settings MENU ITEM FUNCTION Setup Remote Allows you to display the assignments area for the Cyclops remote control or the optional Cyclops wand or laser pointer Cursor Options Changes the look and feel of the cursor Also includes an option that allows you to apply one of the Cyclops F X custom cursor options to Windows Connect Allows you to edit the COM port settings for your computer ...

Page 72: ...eat this process until no smudges or particles can be seen DO NOT LOOK DIRECTLY INTO THE LENS WHEN THE LAMP IS ON Caution Do not use acetone to clean the lens It may remove paint from areas around the lens or mirror and leave a residue on the glass CLEANING THE PROJECTION WINDOW The projection window is the surface through which the LCD image is projected To maintain a clear sharp image you should...

Page 73: ...ely ten percent Isopropyl alcohol and water and gently wipe it over the surface of the projection window 3 Take another clean piece of lens tissue and repeat the process wiping it over the projection window in the opposite direction 4 Repeat if necessary Caution Do NOT use lens cleaning fluid to clean the projection window It may damage the to the surface ...

Page 74: ...o cool the lamp chamber 2 After the lamp has cooled sufficiently turn off the projector and unplug the power cord As a safety feature the lamp chamber can t be opened until the power cord has been removed 3 Slide the AC lock button in the direction of the arrow This button will not move unless the power cord has been disconnected from the projector 4 While sliding the AC lock button remove the lef...

Page 75: ... the lamp from the right socket and then slide it out from the left Installing the new lamp Caution Make sure to wear gloves or use a soft cloth to handle the new lamp Never touch the lamp with your bare hands as this can significantly shorten the life of the lamp If you do touch a portion of the lamp with your bare hands wipe it off with a soft cloth moistened with denatured alcohol To install a ...

Page 76: ...ely seated 5 Close the lamp chamber door and tighten the captive screw CLEANING CHANGING AIR FILTERS To make sure that your DP9100 operates safely and efficiently you should change or replace the filters after every 250 hours of operation It is best to change or clean all of the projector s filters at once To clean the filters wash them in a solution of warm soapy water There are three air filters...

Page 77: ...op retaining screws 3 Unsnap the top left cover by lifting it up and pulling it out see Figure 5 6 Figure 5 6 Lifting the top left cover out The filter is located on the inside of the top left cover see Figure 5 7 Figure 5 7 The top cover filter ...

Page 78: ...ght filters Before you can access the right filters you must remove the left side door and top left cover See steps 1 through 3 above for more information To access the right filters 1 With the projection arm down and locked turn the projector on its side with the handle facing up 2 Locate the screws on the bottom side of the right panel Loosen the three screws Figure 5 8 The three bottom screws 3...

Page 79: ...d to the left of the projector until it releases OVERTEMP VOLUME SOURCE FIT TO VIEW POWER CLEAR SETUP MENU REPL LAMP Figure 5 9 The three top cover screws 5 While still holding the cover remove the ribbon cable on the underside of the control panel Place the cover on a soft cloth Caution Never touch the LCD panel located underneath the top cover projection lens Use caution when changing the filter...

Page 80: ...aining screw to access the rear filter Pull the front filter out Figure 5 11 The two right side filters To replace the covers reverse steps one through five taking care to align the top and side covers Make sure to reattach the ribbon cable before you replace the top cover The ribbon cable is keyed so it will only reattach on one side Also make sure that the arm release lever is in the release pos...

Page 81: ...ou align the batteries in the proper direction 3 Slide the cover back onto the battery compartment snapping it into place TEMPERATURE EXTREMES Your projector should not be stored in excess of 140 F 50 C The maximum operating temperature is 80 F 27 C If the projector has been exposed to extremely cold temperatures you should allow it to warm up to room temperature before you begin your presentation...

Page 82: ...er to projector 4 Power switch AC cord plugged in both ends outlet on 5 External video port not 5 Activate the external video activated port on your notebook Cycle the power on your notebook with your projector connected and turned on No image on 1 Loose cable 1 Connect cable computer screen 2 Wrong video cable 2 Use correct video cable 3 BNC cable not connected 3 Make sure cable is correctly corr...

Page 83: ...mages The black area is not used Image appears to Incorrect interlace signal Select the opposite interlace have lines selected signal even odd swapped One or more colors SYNC BRIGHTNESS or Adjust SYNC BRIGHTNESS shimmer on CONTRAST is out of or CONTRAST settings screen adjustment No video image 1 Video source s 1 Check video source s projected composite or S Video for power and proper operation 2 ...

Page 84: ...Discolored image Lamp is not seated properly 1 Adjust lamp to ensure it is firmly seated in the clamps 2 Ensure thumbscrew is very tight DP9100 PARAMETER ADJUSTMENTS If the auto selected computer source parameters are incorrect for your application or the computer system you are using is not one of the many stored in the DP9100 refer to the compatibility list beginning on page 6 9 it may be possib...

Page 85: ...ess to make the image clear Adjusting Sync Adjust the Sync control to shift the dot clock s phase to match the phase of incoming video signal An incorrect Sync setting causes sparkles and horizontal streaks randomly across the screen Adjusting the Dot Clock The Dot Clock control adjusts the projector s dot clock frequency to match the incoming video signal s frequency An incorrect dot clock adjust...

Page 86: ...k locks to the incoming horizontal sync signal Incorrect VCO Gain is indicated by lines shooting through the display or severely compressed or shifted displays ADJUSTING YOUR DISPLAY Horizontal Double Image Figure 6 2 Adjusting the horizontal position Adjusting the Horiz Pos control will usually correct this problem Use the arrow keys on the control panel the Setup key or the following procedure 1...

Page 87: ...n the other 5 Press the right arrow key to select the Vert Pos Vertical Position slide bar 6 Press the down arrow key until the image displays properly If this adjustment does not correct the problem reset the Hor Pos control to the default If neither parameter corrects the problem you must find the correct Dot Clock value to prevent image distortion Make changes to this parameter SLOWLY to avoid ...

Page 88: ...re the selection has the correct resolution and the closest V sync and H sync values Faint Vertical Lines of Distortion 1 Use the Cyclops remote control to adjust the sync first If the lines of distortion move uniformly across the screen as you adjust the sync there is a Dot Clock problem 2 Adjust the Dot Clock SLOWLY so that the shading gets further and further apart until it is gone Considerable...

Page 89: ...ceed to Step 2 Many severe looking distortions can be corrected using sync Note There are separate sync values for Normal and Fit to View modes Sync adjustments made in one are not applied to the other Make adjustments in both 2 If sync does not correct the problem adjust the Dot Clock Make changes to this parameter slowly to avoid skipping over the desired value Considerable trial and error may b...

Page 90: ...lines of data displayed This is due to additional vertical lines that are sent by the video system for video processing timing purposes 5 In the Source Mode menu select the source mode closest to the values recorded in the step above 6 Make adjustments as necessary to fine tune your display 7 Close the menus to save these settings COMPATIBILITY LIST The following pages list the workstation compute...

Page 91: ... 1 x 0 8 2 1 5 1 1 1 6 3 3 6 0 6 2 1 S W E I G S e m e r t x E Z X L X 2 o g i d n I y d n I 4 2 0 1 x 0 8 2 1 5 3 7 0 1 9 3 6 0 6 3 1 S W E h p a r g r e t n I 1 9 G 5 D T 4 D T 2 D T 4 2 0 1 x 0 8 2 1 6 0 1 8 3 6 4 6 C A M e l p p A C P r e w o P 4 2 0 1 x 0 8 2 1 5 3 1 0 8 5 7 C A M e l p p A 0 6 9 x 0 8 2 1 3 6 5 7 5 7 4 1 S W E e l o p d a T k o o b C R A P S 0 0 9 x 2 5 1 1 5 5 0 1 8 1 7 6 7...

Page 92: ... 4 T 8 6 7 x 4 2 0 1 5 4 4 5 3 3 4 A 4 1 5 8 M B I A 4 1 5 8 8 6 7 x 4 2 0 1 6 3 4 5 4 3 5 3 4 p o t p a L a b i h s o T T D C 0 5 1 2 8 6 7 x 4 2 0 1 4 4 4 5 3 3 4 C A M e l p p A 8 6 7 x 4 2 0 1 0 8 0 6 5 7 A G V S e l p p A C A M 0 0 6 x 0 0 8 1 5 4 1 8 4 2 7 A S E V c i r e n e G 0 0 6 x 0 0 8 0 4 9 7 3 0 6 p o t p a L e l o p d a T X G 3 k o o b C R A P S 0 0 6 x 0 0 8 3 6 3 6 3 5 7 5 A S E V...

Page 93: ...or is determined to be defective you will be issued a Return Material Authorization Number After you have received this number send the projector all cables a copy of your sales receipt and a description of the problem freight prepaid to Proxima Clearly note the Return Material Authorization Number on the outside of the shipping box Note A carton without a Return Material Authorization Number on t...

Page 94: ...eakers Inputs 1 Computer Video 2 Composite Video NTSC PAL SECAM 2 S Video 1 Computer Stereo Audio 2 Composite Video Stereo Audio 1 Microphone Cyclops Interactive Pointer System Outputs Stereo Audio 2 RCAs 2 Monitor Power Source 90 265 VAC 50 60 Hertz Dimensions Closed 13 8 H x 19 8 W x 7 3 D 35 x 50 2 x 18 5 cm Open 13 8 H x 19 8 W x 25 1 D 35 x 50 2 x 63 75 cm Weight 31 6 lbs 14 3 kg Projection D...

Page 95: ...C1003 10 Power Cord IEC UK C1004 10 VGA to LCD cable C800 6 Mac to LCD adapter C804 0 Mac to LCD cable C802 6 Mac ADB cable C470 6 13C3 to LCD cable C801 6 SGI to LCD adapter C947 12 SGI 13C3 to LCD cable C943 6 DEC 3C3 to LCD adapter C947 10 DEC 3C3 to LCD cable C948 6 S Video cable C466 6 Computer Audio cable C498 6 Serial cable C936 6 Composite audio video cable C497 6 Mini jack to RCA cable ad...

Page 96: ...SSORIES PART PART NUMBER MediaExpress Image Display System ME90H Cyclops Interactive Pointer System A2079 Cyclops Laser Pointer A90 Powered Loudspeaker System A55 Desktop Projector Rolling Hard Case A297 BNC Cable Kit A37 ...

Page 97: ...nformation is only required when you are using a system without a monitor and the video card defaults to an incompatible resolution Sense line information can be found in the technical documentation that came with your computer CONFIGURING THE DESKTOP PROJECTOR 9100 1 Determine the default resolution for your video system 2 Gather sense line information from your computer documentation or from you...

Page 98: ...ur system needs a Macintosh terminator Try the Macintosh Sync Adapter 02 20 UNV available from Griffen Communications Corp 1451 Elm Hill Pike Park Elm Bldg Suite 100 Nashville TN 37210 615 399 0990 fax 615 399 7060 IDENTIFYING SENSE LINE SETTINGS To determine the current sense line setting 1 Connect the projector to the computer and the monitor 2 Make sure all hardware is turned on and that the co...

Page 99: ... g i H h g i H X Z z H 6 7 8 6 7 x 4 2 0 1 h g i H w o L w o L w o L z H 6 6 0 0 9 x 2 5 1 1 h g i H w o L h g i H h g i H z H 6 7 0 0 9 x 2 5 1 1 h g i H h g i H h g i H w o L z H 6 7 4 2 0 1 x 0 8 2 1 h g i H w o L h g i H w o L C R A P S n u S r e g a y o V z H 6 7 8 6 7 x 4 2 0 1 h g i H w o L w o L w o L z H 6 7 0 0 9 x 2 5 1 1 h g i H h g i H h g i H w o L s c i h p a r G n o c i l i S 3 o g...

Page 100: ...s setting 2 5 C Cables Included 1 8 Optional 1 8 Cleaning changing air filters 5 5 right filters 5 7 top filter 5 5 Clear key i 11 2 3 Closing the projector 1 4 Compatibility List 6 9 composite audio video cable 1 18 COMPUTER AUDIO IN 1 7 COMPUTER IN 1 8 COMPUTER OUT 1 8 Connecting a microphone 1 18 Connecting a monitor 1 8 Connecting an external stereo system 1 20 Connecting external speakers 1 1...

Page 101: ...age size 1 24 distance from screen 1 24 Dot Clock adjustment 6 4 DP9100 maintenance 5 1 power consumption 1 6 precautions 1 21 Draw toolbar 2 9 F fade 2 8 fade and balance 2 8 filters 5 5 Fit To View feature 2 11 Fit To View key i 11 2 3 flip mirror i 6 cleaning 5 1 release lever 1 3 focus 1 23 Forward key i 11 2 2 Freeze 4 8 FROM COMPUTER 1 9 H H Sync values 6 3 half normal height 6 6 Hor Pos adj...

Page 102: ...io 3 7 changing the language 2 5 Cyclops 3 3 Image 3 5 3 6 Input Source 3 4 Main 3 1 Preferences 3 9 Projector 3 8 reverting to factory defaults 2 5 saving your settings 2 5 Tools 3 2 using 2 4 MIC 1 8 monitor connection 1 8 MouseDisk i 10 2 2 Moving the projector 1 4 while open 1 5 Mute i 11 Mute key 2 2 2 7 N Notebook connections 1 12 setting the projector as an external monitor 1 12 O Opening t...

Page 103: ...xternal monitor 1 14 SGI to LCD adapter 1 14 Source key i 10 2 2 source mode selecting 6 3 Specifications A 1 Sync adjustment 6 4 Sync setting 2 6 T Technical Support 6 12 temperature extremes 5 10 13C3 connections SGI 1 14 standard 1 13 13C3 to LCD Connector Cable 1 13 Tools menu 3 2 Break Timer 3 2 Break Timer Value 3 2 LightBoard 3 2 LightBoard Mode 3 2 Mouse Tracking 3 2 Troubleshooting 6 1 ch...

Reviews: