


10
Fixing the tailplane / Bevestigen van de staart /
Montierung des Leitwerk / Installation de l'empennage
Fig. 34
Fig. 35
Installing the motor / Plaatsen van de motor /
Montierung des Motor / Installation du moteur
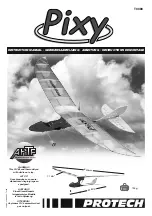
Drill a hole in the fuselage to pass
the wires of the speedcontroller.
Solder the wires to the motor. Drill
2 holes, 1 above and 1 under-
neath the place to fi x the motor,
to pass a cable tie. Fix the engine
to the fuselage with doublesided
tape. Check the rotation of the
propeller as it could hit the fu-
selage, adjust the position of the
motor when necessary.
Pull the cable tie fi rmly to block
the motor on the fuselage.
Fig. 29-30-31-32
Boor een gaatje in de romp om
de draden van de regelaar door
te voeren. Soldeer de draden van
de regelaar aan de motor. Boor 2
gaatjes, 1 boven en 1 onder de
plaats waar de motor bevestigd
wordt, voor het doorvoeren van
de Colson band. Kleef de motor
met dubbelzijdige kleefband
op de romp. Zorg ervoor dat
de propeller de romp niet raakt
anders moet je deze een beetje
verplaatsen. Trek de Colson band
aan zodat de motor op zijn plaats
blijft.
Fig. 29-30-31-32
Bohren Sie ein Loch im Rumpf
für dem Transit des Kabels
vom Fahrtregler. Löten Sie die
Kabel an den Motor. Bohren Sie
2 Löcher, 1 oben und 1 unten
wo der Motor kommt, für den
Transit des Schlauchbinders.
Kleben Sie den Motor mit
doppelseitiges Klebeband auf
dem Rumpf. Uberprüfen Sie ob
der Propeller die Rumpf nicht
anreißt. Versetzen Sie den Motor
wenn notwendig.
Den Motor fixieren mit den
Schlauchbinder.
Fig. 29-30-31-32
Percez un trou sur le côté du
fuselage pour le passage des
fi ls du variateur. Soudez les fi ls
du variateur au moteur. Percez
2 trous, un en haut et un en bas
du logement du moteur pour le
passage du collier de serrage.
Installez l'adhésif double face
sur le fuselage et collez le
moteur. Veillez à ce que l'hélice
ne touche pas le fuselage, dans
le cas contraire, remontez un peu
le moteur.
Serrez raisonablement le collier
autour du moteur.
Fig. 29-30-31-32
Fig. 29
Fig. 30
Fig. 31
Fig. 32
Fig. 33
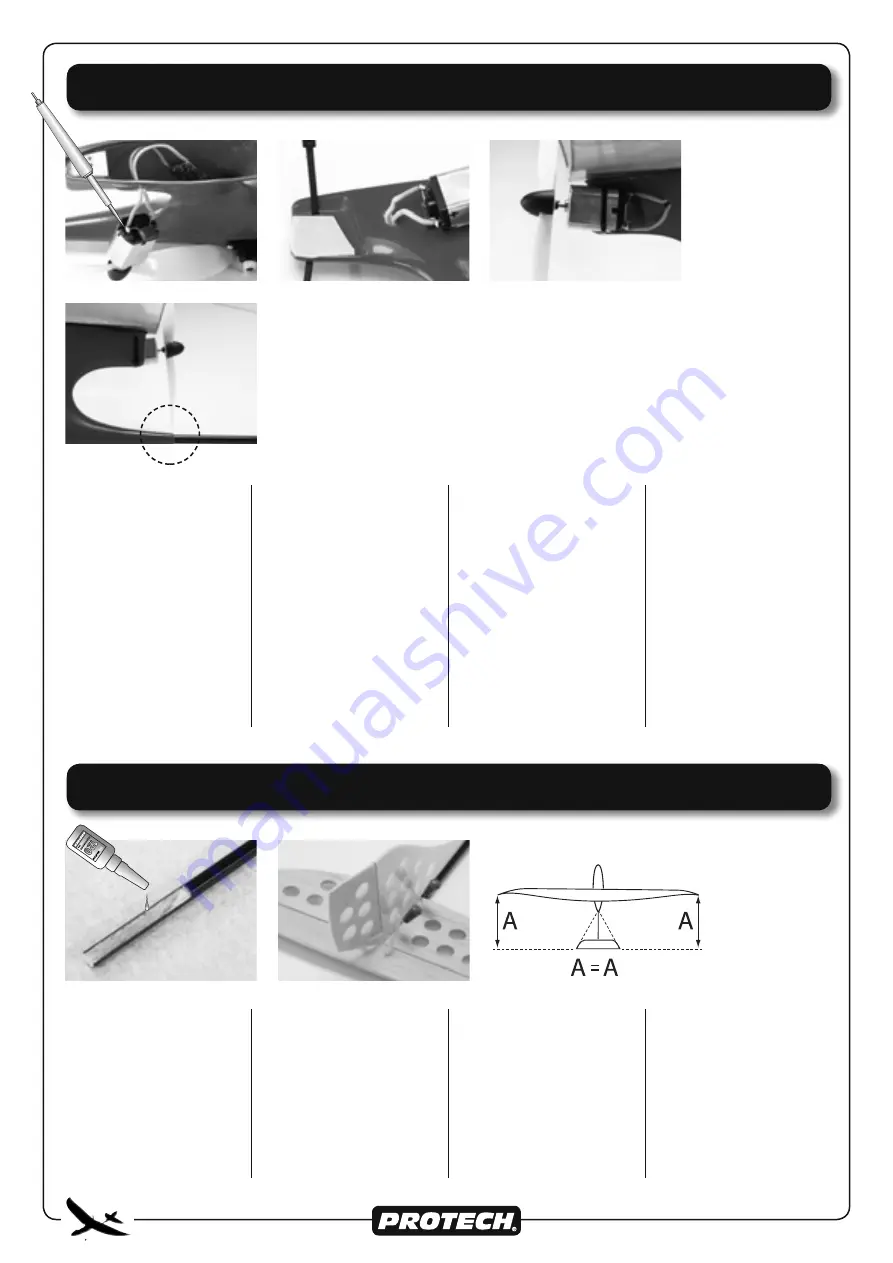
Glue the tailplane to the fuse-
lage with cyanoacrylate. Check
the alignment with the fuselage
and the wing. Keep the tailplane
well in position until the glue has
hardened.
Don't forget to remove the cover-
ing in the contactzone between
fuselage and tailplane.
Fig. 33-34-35
Kleef de staart op de romp met
een beetje cyano lijm. Kontroleer
de uitlijning t.o.v. de romp en de
vleugel. Zorg ervoor dat u tijdens
het drogen van de lijm de staart
goed in positie houdt.
Vergeet niet om de bespanning
in de contactzone tussen romp
en staart weg te snijden.
Fig. 33-34-35
Verkleben Sie das Leitwerk auf
den Rumpf mit Cyano Klebstoff.
Kontrolieren Sie die Ausgleichung
mit Rumpf und Flügel. Während
das trocknen des Klebstoffes
mussen Sie das Leitwerk gut in
Position behalten. Vergiß nicht
die Bespannung von Leitwerk
zu entfernen dort wo es verklebt
geworden ist.
Fig. 33-34-35
Appliquez de la colle cyano sur
le fuselage, installez et contrôlez
l'alignement de l'empennage
par rapport au fuselage et l'aile.
Maintenez en place durant
le séchage. (ne pas oublier
de découper l'entoilage de
l'empennage à l'endroit de
contact avec le fuselage).
Fig. 33-34-35
B=B
B
B