4
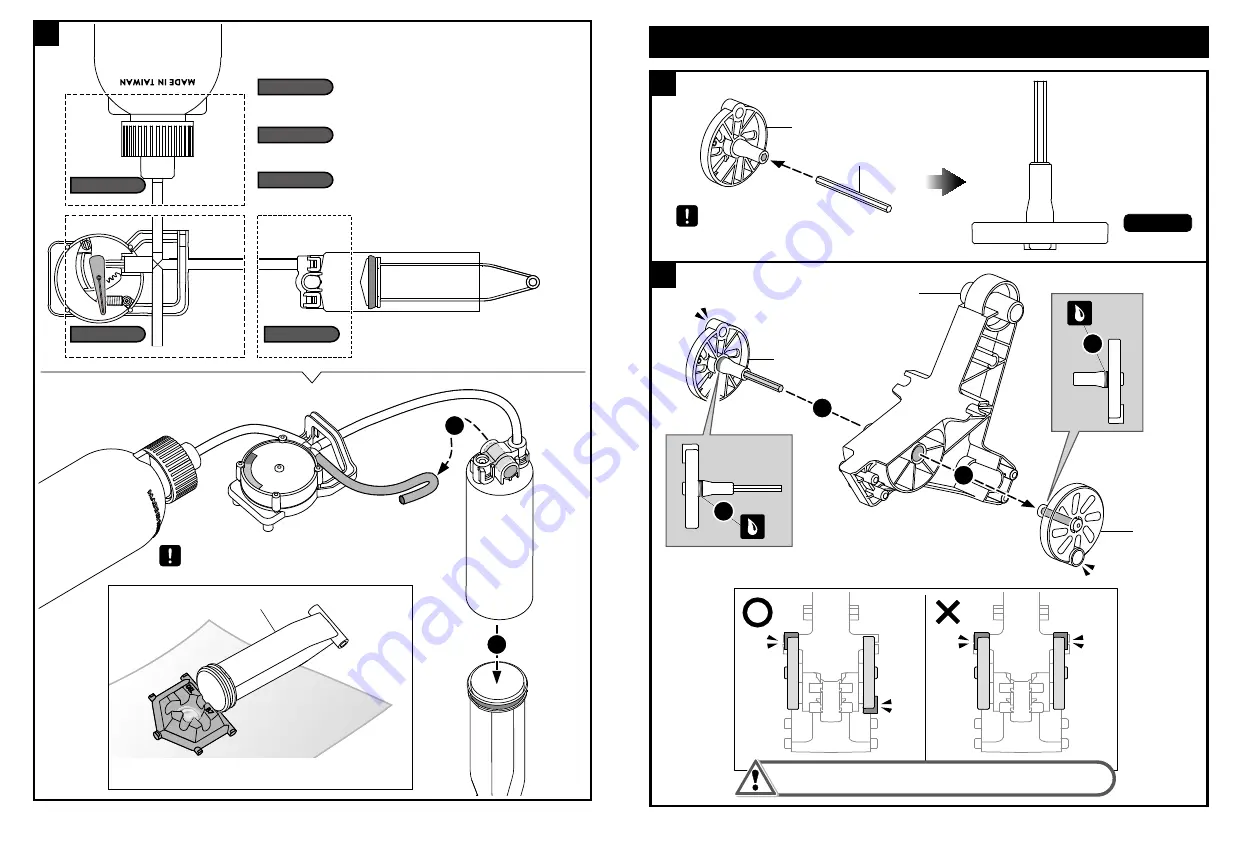
請確認以下位置是否有漏氣產生,若有請重新安裝。
回到第
8
頁,按照步驟5重新安裝。
回到第
10
頁,按照步驟
7~13
重新安裝。
回到第
12
頁,按照步驟
1~6
重新安裝
測試完成後請將折彎的空氣管及
D4
從
A3
移除
將
D4
放在
B7
旁邊以避免其他零件沾附到油
1
號位置
2
1
D4
16
1
號位置
2
號位置
2
號位置
3
號位置
3
號位置
Check following positions if air leakage was occurred,
and re-install as below:
Position 1:
Position 1:
Position 2:
Position 3:
Position 2:
Position 3:
Put D4 aside B7 to avoid oil spilling with others.
Be sure to remove air tube & D4 from A3
after testing is finished.
Back to page8 , and re-install step 5 again.
Back to page10, and re-install steps 7~13 again.
Back to page12, and re-install steps 1~6 again.
D2
C6
D5
D5
P6
17
1
2
比例
1:1
1
2
2
1
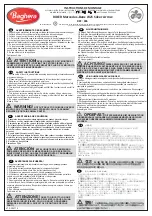
如右圖所示,
請將
P6
六角軸插入
D5
至底(比例
1:1
)
請確認
D2
及
D5
是相反位置。
Scale 1:1
車 體 組 裝
Vehicle Body Module Assembly
Insert P6 hex shaft to the bottom as
indicated in the right fig. ( scale 1:1 )
Make sure parts D2/D5 are at opposite positions.
Summary of Contents for GE-631
Page 1: ...Manual Assembly Instruction 組裝說明手冊 GE 631 空氣動力引擎車 Air Engine Car Kit ...
Page 17: ...30 23 24 1 31 25 4 3 2 1 ...
Page 18: ...D6 C4 32 26 27 2 3 2 4 5 1 1 6 1 P19 P19 02 02 比例 1 1 P1x5 33 28 29 Top View 上視圖 Scale 1 1 ...
Page 22: ...1cm B11 40 P18x5 42 43 41 恭喜完成 P19 P19 06 07 44 Finished ...


