background image

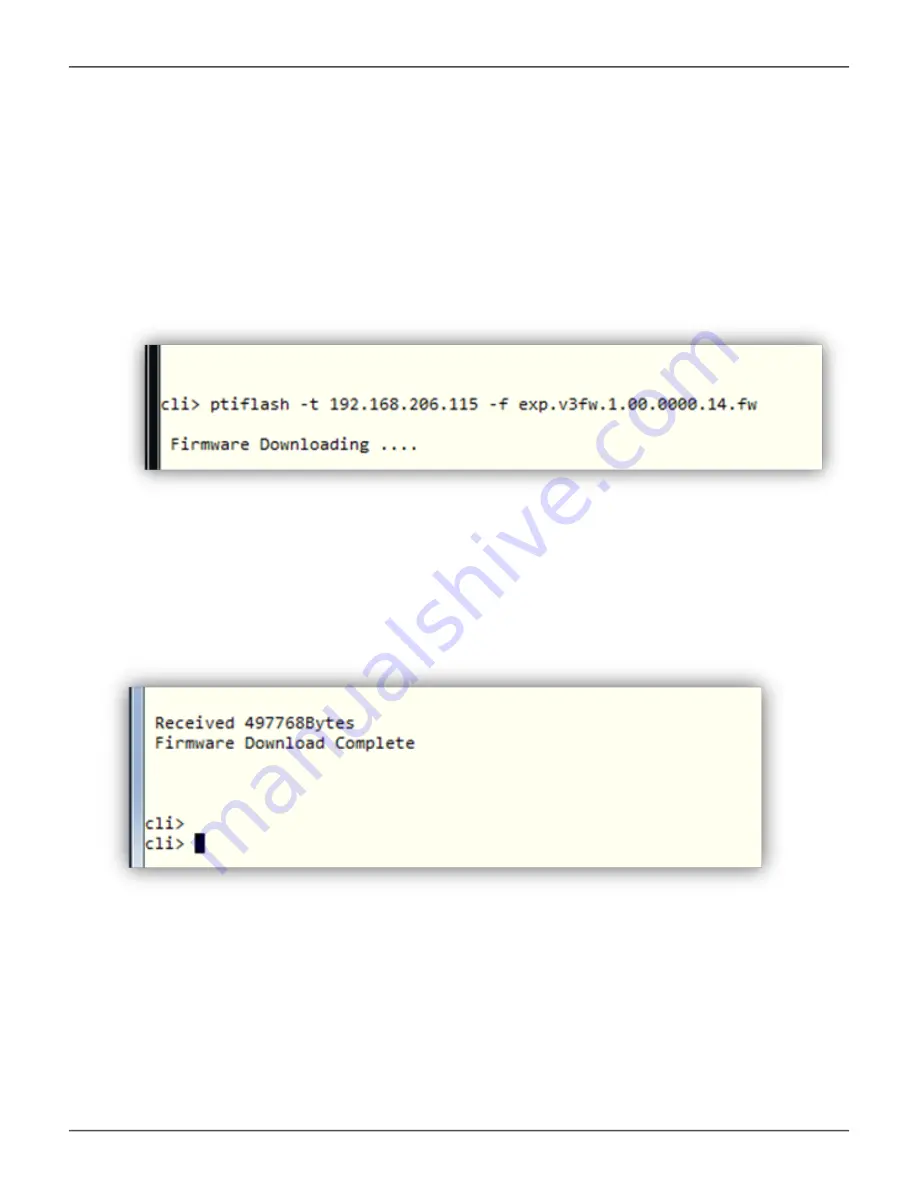
6.  Enter CLI command 


ptiflash -t <TFTP server IP> -f <Firmware Filename> 


 to start firmware update process. 

Note

: Please replace <TFTP server IP> and <Firmware Filename> with appropriate 

value


7.  After firmware download is completed, please reboot the system for new firmware to take effect.

71

12G SAS JBOD 

User Guide

Summary of Contents for VTrak J5000 Series

Page 1: ...VTrak J5000 Series 12G SAS JBOD enclosure Product Manual Version 1 3 2018 PROMISE Technology Inc All Rights Reserved ...

Page 2: ...ke adequate measures Warning The electronic components within the enclosure are sensitive to damage from Electro Static Discharge ESD Observe appropriate precautions at all times when handling the enclosure or its subassemblies Warning Turn off the power and disconnect the power cord before servicing this device Promise Technology VTrak J5000 Series ...

Page 3: ...how to avoid them Caution A Caution informs you of possible equipment damage or loss of data and how to avoid them Important An Important message calls attention to an essential step or point required to complete a task including things often missed Note A Note provides helpful information such as hints or alternative ways of doing a task 12G SAS JBOD User Guide ...

Page 4: ...5000 Series JBOD storage enclosure The manual is organized into chapters as follows Introduction on page 1 Hardware Installation on page 10 Managing the J5000 Series on page 41 Maintenance on page 60 Zone Configuration on page 71 Contact PROMISE on page 90 Promise Technology VTrak J5000 Series ...

Page 5: ...Mounting the VTrak E5300f E5320f 16 Installing Physical Drives 19 Drive Slot Numbering 20 Installing Your Drives 22 3 5 inch Hard Disk Drives 22 2 5 inch Hard Disk Drives 24 Management and Data Connections 26 Serial Cable Connections 27 Serial Connection Settings 27 Pinout references 28 RJ 11 Serial Port pinout 28 Management port RJ 45 pinout 28 DB 9 pinout for RJ 11 to DB 9 serial cable 29 DAS Co...

Page 6: ...Up 38 Controller LED behavior 40 Managing the J5000 Series 41 Making a Serial Connection 42 Logging Into the CLI 42 JBOD Utility CLI 43 Management via SSH Connection 44 CLI Conventions 44 CLI Commands 45 enclosure 47 event 51 link 52 cable 53 net 54 route 55 factorydefaults 56 uptime 56 ptiflash 57 ssh_account 58 vpdr 59 version 60 help 60 ...

Page 7: ...power supply 64 Replacing a controller module 65 Removing the old I O module 65 Installing a new controller 65 Remove controller 66 System Firmware Update 67 Updating Firmware through Serial Port RS232 67 Updating Firmware over IP Network TFTP 70 Zone Configuration 72 Zone Configuration Options 73 Zoning Configuration 0 No Zoning 75 Zoning Configuration 1 78 Zoning Configuration 2 82 Zoning Config...

Page 8: ...S four per controller connections The VTrak J5000 controller enables high speed data rates via mini SAS SFF 8644 cable connections for direct attached servers or for mass storage expansion The main sections in this chapter include the following Features on page 2 VTrak J5000 Series Models on page 2 Specifications on page 3 Front Panel Hardware on page 5 Rear Panel Hardware on page 7 1 12G SAS JBOD...

Page 9: ...x8 wide ports or one x16 wide port per I O module Redundant hot swappable Field Replaceable Units FRUs including controller and Power Supply Units PSU SES 2 compliant enclosure management Compatible with leading SAS SATA drives HBAs and RAID controllers VTrak J5000 Series Models Model Controller Units Interface Number of Drives Power Supplies J5800 2 SFF 8644 SAS 24 2 J5600 2 SFF 8644 SAS 16 2 J53...

Page 10: ...tistic counters SES EM SES Enclosure Management ANSI T10 SES 2 Compliant SCSI SES command set over virtual SSP device System Management Management Interfaces LED status indicator support for drives FRU and enclosure environmentals In band SES enclosure management alerts user to out of spec operation thermal condition voltage condition or component failures protecting data and hardware Full subsyst...

Page 11: ...70 C Humidity Operational 20 to 80 Non Condensing Non Operational 5 to 95 Non Condensing Acoustic Noise Levels Less than 60 dB when ambient temperatures is below 25 C with HDD installed Shock Operating Half sine wave 5 gn 11 ms X Y Z axes 6 surfaces 3 times each surface Half sine wave 30 gn 11 ms X Y Z axes 6 surfaces 3 times each surface with HDD installed Vibration Operating Condition 1 Sine wav...

Page 12: ...ated on the front of each drive carrier the LED indicators for system monitoring See the illustrations of the front view of each model below VTrak J5320 front view SSD drive carriers Drive carrier LEDs Enclosure Power and Status LEDs VTrak J5300 front view Drive carrier LEDs Enclosure Power and Status LEDs HDD drive carriers 5 12G SAS JBOD User Guide ...

Page 13: ...front view Drive carrier LEDs Enclosure Power and Status LEDs HDD drive carriers VTrak J5600 front view Drive carrier LEDs Enclosure Power and Status LEDs HDD drive carriers 6 VTrak J5000 Series Promise Technology ...

Page 14: ...Please take a moment to note how the eight SAS ports are identified in the connection instructions that follow SAS ports are numbered 1 to 4 left to right for each controller module the controller modules are also numbered left to right The SAS port furthest left is identified as Controller 1 Port 1 The SAS port furthest right is identified as Controller 2 Port 4 See Ports for in band and out of b...

Page 15: ...rt PSU 2 ON Off switch PSU 1 ON Off switch Controller 1 Controller 2 VTrak J5300 and VTrak J5320 rear view PSU ON Off switch PSU 1 ON Off switch PSU 2 power insert PSU1 power insert Controller 1 Controller 2 8 VTrak J5000 Series Promise Technology ...

Page 16: ...ce This warranty a applies only to products which are new and in cartons on the date of purchase b is not transferable c is valid only when accompanied by a copy of the original purchase invoice d is not valid on spare parts This warranty shall not apply to defects resulting from a improper or inadequate maintenance or unauthorized modification s performed by the end user b operation outside the e...

Page 17: ...re Setup include the following Unpacking on page 11 Mounting the VTrak enclosure in a rack on page 12 Installing Physical Drives on page 19 Management and Data Connections on page 26 Connect the Power on page 33 Power on system on page 34 Depending on the details of your order the VTrak J5000 enclosure might be shipped with hard drives installed or it might require that you install hard drives The...

Page 18: ...ick Start Guide Two 1 5m 4 9 ft Power cords Adjustable rack mounting rail assembly Two SFF 8644 SAS cables Two RJ11 to DB9 adapter cables Warning The electronic components within the VTrak enclosure are sensitive to damage from Electro Static Discharge ESD Observe appropriate precautions at all times when handling the VTrak or its subassemblies 11 12G SAS JBOD User Guide ...

Page 19: ...ed at each end of the rail Do not load the rails unless they are installed with screws as instructed The rails available for the PROMISE VTrak unit are designed to safely support that PROMISE VTrak unit when properly installed Additional loading on the rails is at the customer s risk PROMISE Technology Inc cannot guarantee that the mounting rails will support your PROMISE VTrak unit unless you ins...

Page 20: ...slides inside the front rail The rails are composed of two sliding sections and do not require adjusting screws The front left and front right mounting rail ends are labeled Be sure the front rail support is on the bottom facing inward Mounting the VTrak J5600 VTrak J5800 All rail ends front and rear attach at the outside of the rack posts The guide pins at the rail ends align with the holes in th...

Page 21: ...closure Placing the VTrak enclosure onto the rack rails 3 Place the VTrak onto the rails At least two persons are required to safely lift the system Lift the VTrak itself Do not lift the system by its brackets Cautions Two persons are needed to safely place the unit onto the rails DO NOT lift the unit by the handles 14 VTrak J5000 Series Promise Technology ...

Page 22: ...to the rack posts 4 Secure the enclosure to the rack Use the included screws and flange nuts to lock the unit in to place in the rack Use the attaching screws and flange nuts that came with the VTrak enclosure Secure to rack 15 12G SAS JBOD User Guide ...

Page 23: ...r rack system Consult the documentation for your rack if you are unsure which holes to use Note that three holes are required on each front post the uppermost of the three to be used for the flange nuts to anchor the enclosure to the rack posts Mounting the VTrak E5300f E5320f To install the 2U VTrak enclosure into a rack with the supplied mounting rails Notice that each end of the sliding rails h...

Page 24: ...lected square holes on the rack post b Press the spring lock on the other end of the rail and insert the studs into the selected mounting hole on the rack post If necessary extend the rail to reach the post c Use the rail screws to anchor the rack rail to the post d Make sure the rack rail is aligned secure stable and in the correct place e Perform steps a through c above for the other rail f Make...

Page 25: ...secure it to the rack posts 3 Secure the enclosure to the rack Use the included screws and flange nuts to lock the unit in to place in the rack Use the attaching screws and flange nuts that came with the mounting hardware 18 VTrak J5000 Series Promise Technology ...

Page 26: ... VTrak J5300 2 5 inch disk drives for VTrak J5320 For a list of supported physical drives download the latest compatibility list from the PROMISE support website Cautions The VTrak J5000 supports disk drive hot swapping To avoid hand contact with an electrical hazard do not remove more than one drive carrier a time 19 12G SAS JBOD User Guide ...

Page 27: ...lot Numbering You can install any suitable disk drive into any slot in the enclosure Install all of the drive carriers into the VTrak J5000 enclosure to ensure proper airflow even if you do not populate all the carriers with physical drives 20 VTrak J5000 Series Promise Technology ...

Page 28: ...Drive slot numbering on VTrak J5300 Drive slot numbering on VTrak J5320 21 12G SAS JBOD User Guide ...

Page 29: ...you insert the drive carrier into the enclosure To avoid hand contact with an electrical hazard remove only one drive carrier a time 1 Press the drive carrier release button The handle springs open 2 Grasp the handle and gently pull the empty drive carrier out of the enclosure 3 Carefully lay the drive into the carrier with the power and data connectors facing away from the carrier handle 22 VTrak...

Page 30: ...s attach the drive to the carrier with four screws 4 Position the drive in the carrier so the mounting holes line up 5 Insert the screws through the proper holes in the carrier and into the drive or adapter Install four screws per drive Snug each screw Be careful not to over tighten 6 With the drive carrier handle in open position gently slide the drive carrier into the enclosure 23 12G SAS JBOD U...

Page 31: ...ame as the 3 5 carriers except they are positioned vertically rather than horizontally Cautions Swing open the drive carrier handle before you insert the drive carrier into the enclosure To avoid hand contact with an electrical hazard remove only one drive carrier a time 1 Press the drive carrier release button The handle springs open 2 Grasp the handle and gently pull the empty drive carrier out ...

Page 32: ...Insert the screws through the proper holes in the carrier and into the drive or adapter Install four screws per drive Snug each screw Be careful not to over tighten 6 With the drive carrier handle in open position gently slide the drive carrier into the enclosure The drive carrier should be oriented so the the top of the 2 5 HDD is on the right and the bottom of the HDD is on the left The LED indi...

Page 33: ...e Utility User Guide available for download from PROMISE Management can also be done through the Serial connection using terminal emulation software and through the Management port over an IP network using an SSH connection and terminal interface This section describes the different cable connections for Direct Attached Storage DAS to a single server as well as cascading DAS and redundant cascadin...

Page 34: ... Press Enter once to launch the CLI When connected and ready the CLI screen displays Promise xU SAS xx SBB BP v1 00 0000 xx cli The cli prompt on your screen indicates that you have a connection and the CLI is ready to accept commands Serial Cable Connections Serial communication enables the Command Line Interface CLI on your PC to monitor and control the VTrak J5000 The VTrak J5000 package includ...

Page 35: ...Pinout references RJ 11 Serial Port pinout Management port RJ 45 pinout 1 TP0 2 TP0 3 TP1 4 TP2 5 TP2 6 TP1 7 TP3 8 TP3 28 VTrak J5000 Series Promise Technology ...

Page 36: ...DB 9 pinout for RJ 11 to DB 9 serial cable 29 12G SAS JBOD User Guide ...

Page 37: ...upplied with the VTrak to connect the SAS HBA card in the Host PC to SAS Port 1 in Controller 1 DAS Connection Note that Direct Attached Storage DAS hardware setup requires that the host system PC or server have an SFF 8644 SAS HBA card installed 30 VTrak J5000 Series Promise Technology ...

Page 38: ...ontroller 1 of the uppermost Vtrak unit in the rack Unit 1 2 Connect SAS Port 3 port on Controller 1 of VTrak Unit 1 to SAS Port 1 on Controller 1 of VTrak Unit 2 3 Connect the remaining VTrak J5000 enclosures in the same manner Note SFF 8644 ports are full duplex IN and OUT SAS So you do not need to follow this cabling description exactly it is only used as an example 31 12G SAS JBOD User Guide ...

Page 39: ...inue to make cascading connections to Controller 1 in the same manner for any remaining VTrak units 4 Connect the HBA card in Server 2 to SAS Port 1 on Controller 2 of Vtrak Unit 1 5 Connect SAS Port 2 port on Controller 2 of VTrak Unit 1 to SAS Port 1 on Controller 2 of VTrak Unit 2 6 Continue to make cascading connections to Controller 2 in the same manner for any remaining VTrak units Note SFF ...

Page 40: ...ON OFF switch Connect the Power To power on the VTrak J5000 follow these steps for each JBOD enclosure 1 Use the power cords included with the shipment to connect the power insert for all power supplies on all units 2 Plug in the power cables on all power cords to a suitable grounded power source The JBODs are ready to power on 33 12G SAS JBOD User Guide ...

Page 41: ...power supplies used for the VTrak J5300 include a power switch on each power supply To power on the VTrak J5300 1 Toggle the power switch to the ON position for each power supply 2 Check the AC and DC LED indicators on each power supply to make sure they light green Note that the center LED on the power supply is for locating the PSU PROMISE RAID head only 34 VTrak J5000 Series Promise Technology ...

Page 42: ...or when the power supply is switched off Fault This indicates the overall health status of the power supply When the power supply is functioning normally and no problems are detected it will be off If a problem with the power supply is detected it light amber Note that this LED blinks once when the power supply is switched on then remains off unless there is a problem AC This indicates that input ...

Page 43: ...en the power is switched on the LEDs on the right handle light up Power and Global Enclosure Status LEDs display green continuously I O Module Activity LED flashes green when there is controller activity System Heartbeat LED blinks green at two second intervals for dual I O Module systems or at four second intervals for single I O Module systems 36 VTrak J5000 Series Promise Technology ...

Page 44: ...tem OFF No SAS cables are connected System power off Steady Green System power on System heathy One or more SAS cable is connected Blinking Green Activity Blink every 4 seconds if a single controller is installed Blink every 2 seconds if two controllers are installed Amber Fan power supply temperature or voltage over warning threshold Only one power supply detected Red Fan power supply temperature...

Page 45: ...front LEDs on VTrak J5320 Drive Status one LED per carrier Activity one LED per carrier Drive Status LED Behavior After Boot Up Note Drive carrier LED behavior is controlled by the host HBA RAID head the behavior is same for all VTrak J5000 models 38 VTrak J5000 Series Promise Technology ...

Page 46: ...lar on off pattern Flashing means intermittent and irregular on off pattern Drive Status and Activity LED behavior State Power Activity Drive Status Off No drive in carrier Drive ready for removal No drive in carrier Steady Blue Drive in carrier Flashing Blue Activity on drive Steady Green Drive in carrier Blinking Locator feature Amber Drive is rebuilding drive is off line Red Drive error of fail...

Page 47: ... lights red there is a problem with the controller Management port LEDs display green or flash depending on your network connection LEDs are located below the port the left LED lights green when connected flashes green when active remains off if not connected The right LED indicates connection speed green is 100 Mbps amber is 1000 Mbps SAS port link LEDs light green when connected flash green when...

Page 48: ...hapter include the following Making a Serial Connection on page 42 Management via SSH Connection on page 44 CLI Conventions on page 44 Logging Into the CLI on page 42 JBOD Utility CLI on page 43 System Firmware Update on page 66 41 12G SAS JBOD User Guide ...

Page 49: ...its per second 115200 Data bits 8 Parity None Stop bits 1 Flow control none 2 Start your PC s terminal VT100 or ANSI emulation program 3 Press Enter once to launch the CLI Making a Serial Connection Before you begin be sure the RJ11 to DB9 serial data cable is connected between the Host PC and the VTrak enclosure and that both machines are booted and running Serial ports on the controllers 42 VTra...

Page 50: ...ty is used to perform the following functions Scan JBOD enclosures and display status information Update firmware on JBOD enclosures Enter Inband mode and to check internal hardware status Set zone configuration To read information about using the JBOD Utility including the graphical user interface GUI please read the VTrak JBOD Utility Manual which contains instructions specific to using Windows ...

Page 51: ...ault user name and password see below You can change the password after successfully connecting to the management interface Use the ssh_account command to change the password SSH default login settings User name administrator Password password CLI Conventions Commands and options are case sensitive Not all extended keys are supported However you can use the BACKSPACE and the left and right arrow k...

Page 52: ...nux shell scripting format of command option argument This section gives detail explanation of each command and accompanying options If you need context sensitive help type one of the following commands command h command help command 45 12G SAS JBOD User Guide ...

Page 53: ...addresses route Displays addresses of components through a downstream expansion connection cable Specifies the length of cable for optimal signal quality net Get and Set IP network factorydefaults Restores factory default settings ptiflash System firmware update command ssh_account Use to change SSH password vpdr Displays vital product data on field replaceable units version System version informa...

Page 54: ... Restart the system option 3 Restart the primary controller option 4 Shutdown the system t enable Enable or disable thermal management enable 0 Disable thermal management enable 1 Enable thermal management z zoning config Set zoning configuration for physical drives zoning config 0 No zoning zoning config 1 Zone configuration 1 zoning config 2 Zone configuration 2 zoning config 3 Zone configuratio...

Page 55: ...J5320 allow values 1 6 b shutdown period Shutdown the PSU and reboot after N minutes shutdown period 1 4320 wol enable Enable or disable wake on lan function enable 0 Disable wake on lan function enable 1 Enable wake on lan function i action Allow the user to locate a component by flashing LEDs action e Locate an enclosure by flashing LEDs action c Locate an IOM by flashing LED wos Enable or disab...

Page 56: ... 2 Restart the system option 3 Restart the primary controller option 4 Shutdown the system cli enclosure m s enable enable 0 disable disk staggered spin up enable 1 enable disk staggered spin up cli enclosure m wos disable disable 0 enable wake on SAS function disable 1 disable wake on SAS function 49 12G SAS JBOD User Guide ...

Page 57: ...61 degree C if the sensor is located outside the IO Module cli enclosure m w sensor id threshold sensor id 1 10 Any one thermal sensor ID between 1 to 10 threshold 61 65 Warning thermal threshold between 61 to 65 degree C if the sensor is located on IO Module threshold 47 51 Warning thermal threshold between 47 to 51 degree C if the sensor is located outside the IO Module cli enclosure m f min_fan...

Page 58: ...Display event information in RAM RAM is the default no need to specify l nvram Display event information in NVRAM c Clear event log in RAM c nvram Clear event log in NVRAM Detailed Usage cli event l nvram Display NVRAM event details cli event c nvram Clear NVRAM event information 51 12G SAS JBOD User Guide ...

Page 59: ...s including Link Status Link Statistics Clearing Statistics Expander SAS Addresses Attached SAS Addresses Options a Link related action Sub option list Display PHY statistics default clear Clear all PHY statistics Detailed Usage cli link a list Display PHY Port link status cli link a clear Clear all PHY error count 52 VTrak J5000 Series Promise Technology ...

Page 60: ...ta list Display cable information default c enable Enable or disable cable management function enable 0 Disable cable management function enable 1 Enable cable management function Detailed Usage cli cable a list Display PHY Port link status cli cable a data CN ID Display EEPROM data in SFF 8644 Cable CN ID 1 4 SFF 8644 connector number of the controller cli cable m c enable Enable Disable cable ma...

Page 61: ... Options l List network related information default m Modify network port settings p Ping target a List arp table Sub options d 1 Enable DHCP client i IP address IP Address s subnet mask Subnet mask g gateway IP address Default Gateway w Timeout in milliseconds to wait for each reply default is 4000ms 54 VTrak J5000 Series Promise Technology ...

Page 62: ... e g 192 168 1 1 Subnet Mask Subnet mask in dotted decimal notation format e g 255 255 255 0 Gateway Default gateway in dotted decimal notation format e g 192 168 1 254 cli net p i IP address w timeout Ping the target and wait each reply for the specified time cli net a List the arp table route Syntax route Summary The route command displays routing table information Detailed Usage cli route Displ...

Page 63: ... enclosure Detailed Usage cli factorydefaults Restore system settings to factory default uptime Syntax uptime Summary The uptime command informs you of the elapsed period of time since the the system firmware was loaded Detailed Usage cli uptime Display system uptime in day hour minute and second 56 VTrak J5000 Series Promise Technology ...

Page 64: ...ough Serial Port RS232 on page 66 cli ptiflash t TFTP Server IP f file_name Update firmware through TFTP Server TFTP Server IP TFTP Server IP address in dotted decimal notation format e g 192 168 1 1 file_name Name of the firmware image file located in TFTP Server See Updating Firmware over IP Network TFTP on page 69 for instructions on how to update firmware using TFTP Important Do not restart th...

Page 65: ...Check status of loading stored username password p Change user password Detailed Usage cli ssh_account h Show help information cli ssh_account s Check status of loading stored username password cli ssh_account p Change user password 58 VTrak J5000 Series Promise Technology ...

Page 66: ... dump 0 Translate raw data to human readable format dump 1 Display raw data default Detailed Usage cli vpdr id Display Vital Product Data of given FRU id 1 IOM VPD id 2 PSU 1 VPD id 3 Fan Module 1 VPD id 4 PSU 2 VPD id 5 Fan Module 2 VPD id 6 Back plane VPD cli vpdr 1 1 Display Vital Product Data of IOM with raw data cli vpdr 1 0 Display Vital Product Data of IOM with human readable format 59 12G ...

Page 67: ...version Syntax version Detailed Usage cli version Display system firmware and PSU versions help Syntax help Detailed Usage cli help cli Display CLI help 60 VTrak J5000 Series Promise Technology ...

Page 68: ...61 Maintenance This chapter covers the following topics Replacing a power supply on page 62 Replacing a controller module on page 65 12G SAS JBOD User Guide ...

Page 69: ...ply To remove the power supply Verify that the power supply AC LED is amber or red Proceed with the following steps if the power supply needs replacement 1 Switch off the power to the power supply you plan to replace 2 Unplug the power cord 3 Use thumbs and forefingers to squeeze the latch release tabs on the two levers used to remove the power supply Do not grab the controller lever by mistake 4 ...

Page 70: ...n to firmly seat the power supply into the enclosure Both levers will latch to the enclosure so that the levers cannot be pulled out unless you release the latch 3 Plug in the power cord 4 Switch on the power supply Verify that the DC and AC LEDs are green This completes the power supply replacement procedure Pull both levers backward and outward the module should slide out easily 12G SAS JBOD Use...

Page 71: ...ew on the left side of the power supply 4 Pull the power supply out of the enclosure Installing the new power supply To install the power supply Carefully slide the power supply into the enclosure 1 Install and tighten the retaining screw on the left side of the power supply 2 Plug in the power cord 3 Switch on the power supply Verify that the new power supply LED is green This completes the power...

Page 72: ...l Support Only a qualified technician should perform this procedure You must shut down the VTrak J5000 enclosure before you can perform this procedure Removing the old I O module To replace the I O module Shut down the VTrak J5000 enclosure Turn OFF the power supply switch switches 1 Disconnect the SAS serial and power cables 2 Follow the steps in Remove controller on page 66 to remove the old mod...

Page 73: ...he old controller module 1 Squeeze controller handle release between thumb and finger 2 Pull handle out then slide controller unit straight out of the controller Release lever on controller Pull out lever on controller VTrak J5000 Series Promise Technology ...

Page 74: ...ty is available with TeraTerm and HyperTerminal Follow these steps to update firmware via XModem 1 Connect the Insert the RJ11 end of the cable into the appropriate socket of J5000 subsystem Connect the BD9 end of the cable into your management host computer 2 Open the Terminal simulator software HyperTerminal or TeraTerm Note All reference screenshots of this document are taken using TeraTerm 3 O...

Page 75: ...ill see cli is prompted Enter the command ptiflash x in console CLI will enter into firmware update mode 5 Open XModem Send by navigating File Transfer XMODEM Send or equivalent in other software 68 VTrak J5000 Series Promise Technology ...

Page 76: ...are image file in opened window and click Open 7 Firmware update begins Wait until the download is completed 8 Once download is completed reboot the system for new firmware to take effect 69 12G SAS JBOD User Guide ...

Page 77: ... follow these steps 1 Install TFTP server software on the host system to provide TFTP service Use an open source utility like TFTPD32 in Windows platform to provide TFTP service 2 Make sure the TFTP server is connected to the same Ethernet switch or switching fabric as the JBOD 3 Make sure that IP address of the TFTP server and the J5000 are in the same subnet 4 Save the firmware file at the base ...

Page 78: ...rmware Filename to start firmware update process Note Please replace TFTP server IP and Firmware Filename with appropriate value 7 After firmware download is completed please reboot the system for new firmware to take effect 71 12G SAS JBOD User Guide ...

Page 79: ...ta hosts to access a specified group of hard disk drives via Serial attached SCSI SAS Zone configuration hard disk drive access control is used for the traffic segregation resource flexibility improved security and topology control functionality By default SAS access configuration is disabled which means all hosts can access all disks Note End users can change the Zone Configuration using the zone...

Page 80: ...e Configuration Options The VTrak J5000 offers four zone configuration options including no zoning These options are described in the sections that follow Please take note of the drive slot numbering for the different hardware versions 2U 3U and 4U of the VTrak J5000 series 12G SAS JBOD User Guide ...

Page 81: ...VTrak J5300 2U 12 drive drive slot numbering VTrak J5320 2U 24 drive drive slot numbering 74 VTrak J5000 Series Promise Technology ...

Page 82: ...ontrol from the Expander As depicted in diagram below VTrak J5800 Zoning Configuration 0 The VTrak J5800 uses two controllers There are four SFF 8644 uplinks per controller for a total of eight uplinks Up to 24 hard disk drives populate the enclosure The drive identification number is depicted in the illustration below VTrak J5800 Zoning Configuration 0 No Zoning 12G SAS JBOD User Guide ...

Page 83: ... identification number is depicted in the illustration below VTrak J5300 Zoning Configuration 0 The VTrak J5300 uses two controllers There are four SFF 8644 uplinks per controller for a total of eight uplinks Up to 12 hard disk drives populate the enclosure The drive identification number is depicted in the illustration below VTrak J5600 Zoning Configuration 0 No Zoning VTrak J5000 Series Promise ...

Page 84: ...r SFF 8644 uplinks per controller for a total of eight uplinks Up to 24 SSD drives populate the enclosure The drive identification number is depicted in the illustration below VTrak J5300 Zoning Configuration 0 No Zoning VTrak J5320 Zoning Configuration 0 No Zoning 12G SAS JBOD User Guide ...

Page 85: ...nclosure VTrak J5800 Zoning Configuration 1 Zoning configuration allocates Disk Group 1 to Controller 1 and Disk Group 2 to Controller 2 Controller 1 cannot access any disk drive within Disk Group 2 and vise versa Disk Groups Disk Drive Slots Disk Group 1 3 4 7 8 11 12 15 16 19 20 23 and 24 Disk Group 2 1 2 5 6 9 10 13 14 17 18 21 and 22 VTrak J5800 Zoning Configuration 1 Two zones VTrak J5000 Ser...

Page 86: ...troller 1 and Disk Group 2 to Controller 2 Controller 1 cannot access any disk drive within Disk Group 2 and vise versa Disk Groups Disk Drive Slots Disk Group 1 3 4 7 8 11 12 15 and 16 Disk Group 2 1 2 5 6 9 10 13 and 14 VTrak J5600 Zoning Configuration 1 Two zones 12G SAS JBOD User Guide ...

Page 87: ...roller 1 and Disk Group 2 to Controller 2 Controller 1 cannot access any disk drive within Disk Group 2 and vise versa Disk Groups Disk Drive Slots Disk Group 1 3 4 7 8 11 and 12 Disk Group 2 1 2 5 6 9 and 10 VTrak J5300 Zoning Configuration 1 Two zones VTrak J5000 Series Promise Technology ...

Page 88: ...d Disk Group 2 to Controller 2 Controller 1 cannot access any disk drive within Disk Group 2 and vise versa Disk Groups Disk Drive Slots Disk Group 1 13 14 15 16 17 18 19 20 21 22 23 and 24 Disk Group 2 1 2 3 4 5 6 7 8 9 10 11 and 12 VTrak J5320 Zoning Configuration 1 Two zones 12G SAS JBOD User Guide ...

Page 89: ... Configuration 2 on VTrak J5800 features two disk groups of 12 drives Access is divided between uplinks on both controllers Disk Groups Disk Drive Slots Disk Group 1 3 4 7 8 11 12 15 16 19 20 23 and 24 Disk Group 2 1 2 5 6 9 10 13 14 17 18 21 and 22 SAS ports 1 and 2 of both Controllers can access Disk Group 1 SAS ports 3 and 4 of both Controllers can access Disk Group 2 VTrak J5800 Zoning Configu...

Page 90: ... uplinks on both controllers Disk Groups Disk Drive Slots Disk Group 1 3 4 7 8 11 12 15 and 16 Disk Group 2 1 2 5 6 9 10 13 and 14 SAS ports 1 and 2 of both Controllers can access Disk Group 1 SAS ports 3 and 4 of both Controllers can access Disk Group 2 VTrak J5600 Zoning Configuration 2 Two zones divided access 12G SAS JBOD User Guide ...

Page 91: ... both controllers Disk Groups Disk Drive Slots Disk Group 1 3 4 7 8 11 and 12 Disk Group 2 1 2 5 6 9 and 10 SAS ports 1 and 2 of both Controllers can access Disk Group 1 SAS ports 3 and 4 of both Controllers can access Disk Group 2 VTrak J5300 Zoning Configuration 2 Two zones access divided between controllers VTrak J5000 Series Promise Technology ...

Page 92: ...rollers Disk Groups Disk Drive Slots Disk Group 1 13 14 15 16 17 18 19 20 21 22 23 and 24 Disk Group 2 1 2 3 4 5 6 7 8 9 10 11 and 12 SAS ports 1 and 2 of both Controllers can access Disk Group 1 SAS ports 3 and 4 of both Controllers can access Disk Group 2 VTrak J5320 Zoning Configuration 2 Two zones access divided between controllers 12G SAS JBOD User Guide ...

Page 93: ...on 3 on VTrak 5800 features four disk groups of 6 drives Access is divided between uplinks on both controllers Disk Groups Disk Drive Slots Disk Group 1 4 8 12 16 20 and 24 Disk Group 2 3 7 11 15 19 and 23 Disk Group 3 2 6 10 14 18 and 22 Disk Group 4 1 5 9 13 17 and 21 SAS ports 1 of both Controllers can access Disk Group 1 SAS ports 2 of both Controllers can access Disk Group 2 SAS ports 3 both ...

Page 94: ...87 VTrak J5800 Zoning Configuration 3 Four zones divided access 12G SAS JBOD User Guide ...

Page 95: ...and 15 Disk Group 3 2 6 10 and 14 Disk Group 4 1 5 9 and 13 SAS ports 1 of both Controllers can access Disk Group 1 SAS ports 2 of both Controllers can access Disk Group 2 SAS ports 3 both Controllers can access Disk Group 3 SAS ports 4 of both Controllers can access Disk Group 4 Access to the drives outside the given combination is restricted VTrak J5600 Zoning Configuration 3 Four zones divided ...

Page 96: ... 2 3 7 and 11 Disk Group 3 2 6 and 10 Disk Group 4 1 5 and 9 SAS ports 1 of both Controllers can access Disk Group 1 SAS ports 2 of both Controllers can access Disk Group 2 SAS ports 3 both Controllers can access Disk Group 3 SAS ports 4 of both Controllers can access Disk Group 4 Access to the drives outside the given combination is restricted VTrak J5300 Zoning Configuration 3 Four zones divided...

Page 97: ...6 17 and 18 Disk Group 3 7 8 9 10 11 and 12 Disk Group 4 1 2 3 4 5 and 6 SAS port 1 of both Controllers can access Disk Group 1 SAS ports 2 of both Controllers can access Disk Group 2 SAS ports 3 both Controllers can access Disk Group 3 SAS ports 4 of both Controllers can access Disk Group 4 Access to the drives outside the given combination is restricted VTrak J5320 Zoning Configuration 3 Four zo...

Page 98: ... 235 2600 E mail sales eu promise com PROMISE Italy Rome Italy Tel 39 06 3671 2626 E mail sales it eu promise com PROMISE United Kingdom Wokingham United Kingdom Tel 44 870 112 59 77 E mail sales eu promise com PROMISE Taiwan Hsinchu Taiwan Tel 886 3 578 2395 E mail sales tw promise com PROMISE China Beijing Taiwan Tel 8610 8857 8085 8095 E mail sales tw promise com PROMISE Japan Tokyo Japan Tel 8...

Page 99: ...ckTrak HyperCache HyperCache R HyperCache W DeltaScan GreenRAID Pegasus and SANLink are registered or pending trademarks of PROMISE Technology Inc in the U S and other countries All other trademarks are the property of their respective owners Information regarding products services and offerings may be superseded by subsequent documents and are subject to change without notice ...

Reviews: