background image

45

Managing the PegasusPro

PegasusPro Product Manual 


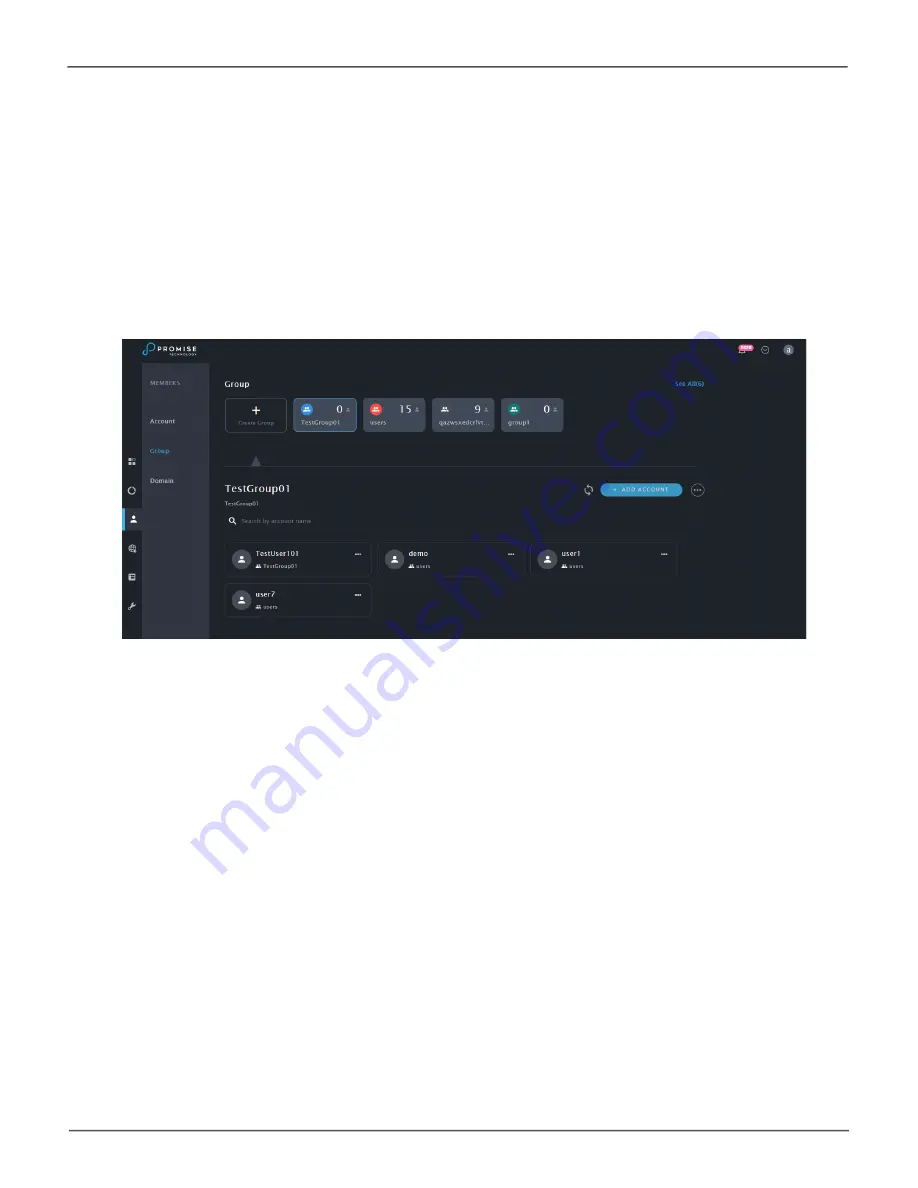
Adding Members to a Group

To add members to an existing group:

1.  In the 

Group

 menu, click on the 

Group

 icon to view details for that group.

2.  Click on the 

Add Account


button, a new menu appears.

3.  Select existing users from the list and click 

Save

. The users are added to the group. 

Group Details

Summary of Contents for PegasusPro R16

Page 1: ...PegasusPro R16 Product Manual Version 1 0 2021 PROMISE Technology Inc All Rights Reserved Server Appliances ...

Page 2: ...this or any other PROMISE T echnology product Notice Although PROMISE T echnology has attempted to ensure the accuracy of the content of this document it is possible that this document may contain technical inaccuracies typographical or other errors PROMISE T echnology assumes no liability for any error in this publication and for damages whether direct indirect incidental consequential or otherwi...

Page 3: ...re that you install and run on your computer as well as how to perform advanced system management using the web based user interface WebPAM InSight This manual is written specifically for the PegasusPro R16 This manual includes a full table of contents chapter task lists and numerous cross references to help you find the specific information you are looking for Also included are four levels of not...

Page 4: ... number can be found on the product nameplate label along with all required approval markings and information When requesting compliance information for this product always refer to this regulatory model number The regulatory model number is not the marketing name or model number of the product Compliance information Global notice for Class A equipment Operation of this equipment in a residential ...

Page 5: ...erference to radio communications Operation of this equipment in a residential area is likely to cause harmful interference in which case the user will be required to correct the interference at his own expense This device complies with Part 15 of the FCC Rules Operation is subject to the following two conditions 1 this device may not cause harmful interference and 2 this device must accept any in...

Page 6: ...nt Regulations CAN ICES 3 A NMB 3 A Cet appareil numérique de la class A respecte toutes les exigences du Règlement sur le matériel brouilleur du Canada CAN ICES 3 A NMB 3 A European Union Regulatory Notice Class A device A device that is marketed for use in a commercial industrial or business environment A Class A device should not be marketed for use by the general public ...

Page 7: ...or other products that produce heat Never use the product in a wet location Avoid inserting foreign objects through openings in the product Move products with casters carefully Avoid quick stops and uneven surfaces The installation and maintenance of products must be carried out by qualified personnel If the product sustains damage requiring service disconnect the product from all power sources an...

Page 8: ...ountry You must use a power cord rated for your product and for the voltage and current marked on the electrical ratings label of the product The voltage and current rating of the cord must be greater than the voltage and current rating marked on the product Do not place objects on AC power cords or cables Arrange them so that no one may accidentally step on or trip over them Do not pull on a cord...

Page 9: ...hen working in hot plug areas of an energized server storage networking or rack product Some products have covers or doors to access hot plug components and may allow access to hazardous energy circuits or moving fans The doors should remain locked during normal operation OR The server storage networking or rack product should be installed in a controlled access location where only qualified perso...

Page 10: ...lectric shock or damage to the equipment when handling hot plug power supplies Install the power supply before connecting the power cord to the power supply Unplug the power cord before removing the power supply from the product If the system has multiple sources of power you must unplug all AC power cords from the power supplies to completely disconnect power from the system Batteries ...

Page 11: ... not dispose of this product as household waste or commercial waste Waste electrical and electronic equipment should be appropriately collected and recycled as required by practices established for your country For information on recycling of this product please contact your local authorities your household waste disposal service or the shop where you purchased the product ...

Page 12: ...and power on 16 5 Connect Thunderbolt 3 Private Port 17 6 Connect 10G Network Share Port 18 7 Connect 1G Network WebPAM Insight Management 19 HDD Replacement 20 Removing the Drive Carrier 20 Installing 3 5 Disk Drive in the Carrier 21 Using PROMISE Utility Pro 22 Pegaus Utility Pro 23 First Time Setup 23 Members First Time Using PROMISE Utility Pro on Mac 27 Members First Time Using PROMISE Utilit...

Page 13: ...Team Folder 50 Editing Deleting Members and Permission Settings 51 Device Information 52 Device Information 52 Device Settings 53 Device Health 54 Physical Drive Status 55 Administration 56 Events Log 56 Firmware Update 56 Import Export Settings Files 56 Service 57 Protocol 57 Registration 57 Configuring A New Storage Volume 58 Contacting Technical Support 60 Limitations 60 RMA Methods 60 Limited ...

Page 14: ...wing topics Packing List Specifications Hardware Front Panel Rear Panel Packing List Check the shipping package to make sure you have the following items PegasusPro R16 includes 16 hard disk drives installed in drive carriers Power cord 1 5 meter Thunderbolt 3 cable Quick Start Guide ...

Page 15: ...g with HDD installed Certification CB CE FCC ICES 003 EMI Class A Form Factor CPU Intel CPU i7 8700 3 2 GHz 65W 12MB Cache 6 Cores Memory 64GB UDIMM DDR4 4 x 16GB up to 128GB Memory Slot 4 x Long DIMM DDR4 Drives The PegasusPro is shipped with sixteen 3 5 inch 7200 rpm SATA Hard Disk Drive HDD Modules mounted in the drive bays Drive Support 3 5 2 5 SAS 12Gb s SATA 6Gb s HDD SSD RAID RAID level sup...

Page 16: ... of data availability to the host computer If so configured a hot spare drive will automatically replace a failed drive securing the fault tolerant integrity of the logical drive The self contained hardware based RAID logical drive in the PegasusPro R16 provides maximum performance in a compact external enclosure The PegasusPro R16 enclosure features the system power button and two USB ports locat...

Page 17: ...tatus LED displays GREEN when a drive is configured and working properly When the lights are RED the HDD requires manual replacement ORANGE indicates background RAID activity on this particular HDD no user action is required Drive Activity Steady BLUE when HDD link is established flashes BLUE during drive activity PegasusPro R16 Front Panel Left side USB ports Power button Drive Status one LED per...

Page 18: ... HDD high temperature alert remains dark when not ready Global RAID Status Lights GREEN when healthy or RED if any RAID volume is offline ORANGE for critical state of any logical drive Global HDD Activity Blinks BLUE to indicate one or more drives are being accessed remains dark when no drives are being accessed System Heartbeat Flashes BLUE slowly at regular intervals to indicate the firmware and...

Page 19: ... 3 DAS Private ports 10G NAS Share ports VGA and HDMI video monitor connections 1G Ethernet ports for device management over the local network and USB 3 2 ports Available PCI options include SAS 12G HBA forJBOD expansion 1 PSU fan vent 2 Power insert 3 System fan vent left PegasusPro R16 Rear Panel PegasusPro R16 power supply left side 1 2 3 ...

Page 20: ...re ports For collaborative accounts accessing over network Ports are numbered 1 4 starting from the bottom 10G port numbers are printed in white text in the illustration 5 Two Thunderbolt 3 DAS Private ports For single user accessing DAS volume 6 PCIe slot available for optional SAS 12G HBA for JBOD expansion PegasusPro R16 Thunderbolt 3 10G ports and optional PCIe slots rear panel right side Pega...

Page 21: ...Setup This chapter contains the following topics Unpacking Download Software and Driver Install PegasusPro Driver on your Mac Install PROMISE Utility Pro on your Mac Connect Power and power on Connect Thunderbolt 3 Private Port Connect 10G Network Share Port Connect 1G Network WebPAM Insight Management CAUTION Make sure to protect the PegasusPro from dust moisture extreme temperatures and sudden l...

Page 22: ...er cord and power on the PegasusPro R16 5 Connect the PegasusPro Private Port to your computer with a Thunderbolt 3 cable 6 Connect the PegasusPro Share Port to the network Unpacking Carefully remove contents of shipping package unpack the device and shipped components from the protective packaging The equipment contained in the shipment is sensitive to electrostatic discharge The system is heavy ...

Page 23: ...port on your computer a PROMISE PegasusPro Driver should be installed and loaded before you using PegasusPro on Mac or Windows system Follow instructions for your OS in the wizard to install the PROMISE Pegasus Driver The final step will be to restart the computer in order to complete the installation Install Driver on Mac Follow the instructions below for Mac users Windows users skip ahead for in...

Page 24: ...asusPro Product Manual 3 Type the administrator password of your computer and click Install Software 4 Click Continue Installation to confirm you want to continue with the installation It will be necessary to restart your computer ...

Page 25: ...puter 1 Double click on the driver installation file to launch the install wizard Click on the Next button to begin installation 2 In the License Agreement dialog you must click I accept the terms of the license agreement to continue If you click agree you can click Next to continue The installer will start 3 Click Finish to close the menu You will need to restart your computer ...

Page 26: ...S you are using Install Utility on Mac To install the PROMISE Utility Pro on Mac 1 Double click on the PegasusPro icon on your desktop to view the device contents 2 Find the file R_PROMISE_Utility_ Pro dmg and double click on it to mount the virtual drive containing the installation software package 3 Double click on the PROMISE_Utility_Pro pkg file to begin the software installation Note that the...

Page 27: ...r the installation if desired by clicking the Change Install Location button Otherwise click on Install to continue the installation in the default location 7 It takes a few seconds for the utility software to be installed When the installation has completed a message informs you that the installation was successful 8 Click Close to end the installation procedure The PROMISE Utility Pro is now ava...

Page 28: ...y on Windows To install the PROMISE Utility Pro on Windows 1 Double click on the utility installation file to launch the install wizard Click on the Next button to begin installation 2 Click Install to continue The installer will start 3 Click Finish to close the menu ...

Page 29: ...sert the female end of one of the supplied power cable in to a power cable receptacle on the power supply unit and plug the other end in to a suitable power outlet 2 Press the Power button on the front left bracket facing 4 Connect Power and power on Power insert and PSU on rear panel of PegasusPro R16 ...

Page 30: ...nection is called the Private Port it is used by one individual with access to two DAS volumes After connecting the Thunderbolt 3 cable two DAS volumes appear on the desktop PegasusProDAS_1 PegasusProDAS_2 Later the host system can use PROMISE FileBoost to move content from the DAS volumes to Shared folders used for team collaboration 5 Connect Thunderbolt 3 Private Port PegasusPro R16 Thunderbolt...

Page 31: ...re Port enables collaborative workflow for users connected via 10G network Users install the same software PROMISE Utility Pro and use it to mount shared folders for collaborative work Mac users can use the SANLink3 high performance Ethernet to Thunderbolt 3 bridge to complete the 10G network connection to their workstation 6 Connect 10G Network Share Port PROMISE SANLink3 Ethernet to Thunderbolt ...

Page 32: ...rnet port on your computer use a SANLink3 Ethernet to Thunderbolt 3 bridge or similar device to complete the physical link SANLink3 Ethernet port has autonegotiatation for the port speed so connecting to a 1G or 100 Mbs switched network is not a problem Also keep in mind that both the management computer and PegasusPro must be in the same IP subnet If your network has DHCP service this is easily d...

Page 33: ... and data connectors facing away from the carrier handle Removing the Drive Carrier The drive carrier accommodates 2 5 inch and 3 5 inch drives HDDReplacement PegasusPro models are shipped with Hard Disk Drives HDD installed so it will not be necessary to install new drives in order to use the device If it is necessary to change a drive follow the instructions in this section It is best to have id...

Page 34: ...t so that the screw holes on the sides line up correctly with the power and data connectors facing away from the carrier handle 3 Insert the screws through the holes in the drive carrier and into the sides of the disk drive Install only the counter sink screws supplied with the drive Install four screws per drive Snug each screw Be careful not to over tighten 4 Reinstall the drive carrier into the...

Page 35: ...gasusPro is shipped ready to use with the Disk Pool and RAID already configured most users will not need to change any of these Also note that making changes to the RAID or Storage Pool configuration will erase any data that is stored on the effected disks To use the PegasusPro you first need to install the most up to date hardware drivers and PROMISE Utility Pro software Pegasus Utiity Pro allows...

Page 36: ...irst Time Setup If this is the first time using PROMISE Utility Pro make sure to follow the instructions to power on and connect the device in Installation and Setup on page 8 If you have installed the latest driver and software begin with the section Connect Power and power on starting on page 14 Follow the steps below if you are setting up PegasusPro for the first time 1 Launch the PROMISE Utili...

Page 37: ...mation is used for accessing the management interface on the network as well You will need to change the default login settings the first time you set up the system Upon logging in you are presented with an opportunity to change the login password for the administrator You must change the password in order to proceed to the next menu ...

Page 38: ...m folders are available to be shared over the 10G network Only the administrator can create Team folders on the shared space To create a new folder click on the icon in the lower right corner of the menu and follow the on screen instruction See next page for summary of Folder Type uses and actions 4 At this point the administrator can approve member requests for access manage member groups are per...

Page 39: ...ed automatically Only one Public Folder is allowed Available for use to the administrator Cannot be renamed Cannot be deleted The Public Folder is available for use to all members Home Personal Folder The Home Folder contains member personal folders It cannot be renamed It cannot be deleted using the PROMISE Utility Pro It can be deleted using Finder Personal Folders are created automatically for ...

Page 40: ...ou can click on the Remember me on this computer option box to enable automatic login Click on the Next button to continue to the password entry dialog If this is the first time using PROMISE Utility Pro you have the option to enable Auto Startup This is used to save time so you do not need to manually mount the storage folders located on the PegasusPro After launching the utility a dialog menu as...

Page 41: ...st need to get permission from the administrator Click on the Ask For Access Now button A request is sent immediately to the administrator to accept or deny the request Presumably the administrator will be running PegasusPro and will respond quickly While you await a reply the menu presents the locked icon If you need to cancel the request click on the Cancel Request button When access is granted ...

Page 42: ...rs in the Folders menu Note that you will no longer see this banner once you have a password 4 Once you are accepted by the administrator you can Mount the folders available to your account When you mount a folder it appears in Finder and becomes available for use These folders function the same as a network drive you can read or write to the Team folder and your personal folder You can also be gr...

Page 43: ...t you can click on the Remember me on this computer option box to enable automatic login Click on the Next button to continue to the password entry dialog If this is the first time using PROMISE Utility Pro you have the option to enable Auto Startup This is used to save time so you do not need to manually mount the storage folders located on the PegasusPro After launching the utility a dialog menu...

Page 44: ... PegasusPro you first need to get permission from the administrator Click on the Ask For Access Now button A request is sent immediately to the administrator to accept or deny the request Presumably the administrator will be running PegasusPro and will respond quickly While you await a reply the menu presents the locked icon If you need to cancel the request click on the Cancel Request button When...

Page 45: ... name will automatically be assigned using the account name Administrator with an index number attached with an underscore There can be only one account named Administrator 4 Once you are accepted by the administrator you can Mount the folders available to your account When you mount a folder it appears in Finder and becomes available for use These folders function the same as a network drive you ...

Page 46: ... Click on the icon in the lower right corner enter a name for the new folder If there are more than one Team Volume first choose the New Team Volume option that appears 2 Add Members to group allowed to access the new Team Folder Click on the icons for the Members you want to add and click on Continue Up to 20 members can be added to a Team folder ...

Page 47: ... allowed to add delete or edit their files in the Team folder read write and Members that can view content but not make changes read only Hover the cursor over Members to move from one category to the other then click Create Folder to finish 4 The new Team folder appears in the Folders list ...

Page 48: ...es data transfer performance to reduce time needed for completion Again the time savings is significant when large quantities of data are routinely being moved from one Member folder to another For the administrator or any user connected to PegasusPro via Thunderbolt 3 DAS it is necessary to eject the DAS Volumes first before launching FileBoost You can use the Eject function in Finder to eject th...

Page 49: ... the right panel You can use the Copy and Move buttons to first choose the action you want to perform then use the menu buttons or drag and drop function to move or copy files to the desired location 2 Choose the items to copy or move from the Source Volume and click on the action button i e COPY TO or MOVE TO button located under the panel Alternatively select the items drag them to the destinati...

Page 50: ...ro PegasusPro Product Manual 3 The items appear in the target location Click X to close the menu when you are finished copying or moving files 4 Status on the transfers appear above the menu Click outside the menu to close it ...

Page 51: ...IP subnet Accessing WebPAM Insight The simplest way to access WebPAM Insight is to click on the link embedded in the PROMISE Utility Pro interface To launch WebPAM Insight in the default web browser click the icon to view the various options and select Manage device Your default browser will launch and present the Dashboard menu of WebPAM Insight Link to WebPAM Insight management in PROMISE Utilit...

Page 52: ...ion The icons labeled on the left side in the example below Dashboard Storage Members Network Device and Administration are links to functional menu groups All configuration and administrative actions can be completed using the linked menus Dashboard Show the Dashboard Storage Storage Pool List Spare Drive List Members Member Account and Member Group management Network Network interface management...

Page 53: ...losure hardware and functional systems of the PegasusPro Click on the arrow icon to view a drop down menu to create a Service Report find the current version of WebPAM Insight or link to the Support menu on the PROMISE website Click on the Bell icon to view the events menu Click on the a to logout of the administrator account or to edit details for the account Dashboard WebPAM Insight drop down me...

Page 54: ... Members icon in the left panel to go to the Members main menu Member accounts are listed in the main menu in alphabetical order by Account name Other information in the menu includes Display Name Primary Group individual accounts can be in more than one group and the Status of the account By default there is only a single account for the administrator newly added accounts appear as they are creat...

Page 55: ...t button a new menu appears 2 Enter a Name and a Display Name for the account 3 Choose the Primary Group in which the account is placed and click Next A new menu appears 4 Enter a Password Re type the password to verify it is correct and click Next 5 The new account appears in the Members list Create Account menu Account Password menu ...

Page 56: ...ting Account To remove an existing account 1 Go to the Members Main Menu click on the icon in the right column for the account to be removed and select the Delete option a new menu appears 2 Confirm that you want to remove the account click on Delete Account Members menu ...

Page 57: ... New Member Group To create a new member group 1 In the Group menu click on the Create Group icon a new menu appears 2 Enter a Group Name and a Description for the account 3 Click on Save The new group appears listed in the Group menu Group menu ...

Page 58: ... a Group To add members to an existing group 1 In the Group menu click on the Group icon to view details for that group 2 Click on the Add Account button a new menu appears 3 Select existing users from the list and click Save The users are added to the group Group Details ...

Page 59: ...ess or other network settings on this interface you will need to reconnect to the device for further management changes The 10G and 1G Ethernet network settings are managed via the Ethernet menu To view this menu click on the Network icon in the left tool bar then click on Ethernet in the left panel To configure network settings on any Ethernet interface click the settings icon for the interface a...

Page 60: ...a switch that supports IEEE 802 3ad dynamic link The slave selection for outgoing traffic is done based on a transmit hashing method This may be changed from the XOR method via the xmit_hash_policy option mode 5 balance tlb This mode is called Adaptive transmit load balancing The outgoing traffic is distributed based on the current load on each slave and the incoming traffic is received by the cur...

Page 61: ...he menu for team and user management click the Storage menu icon in the left panel of the interface The first menu that appears is the Team Volume and Team Folder List The default configuration of the PegasusPro R16 has a shared team volume Team_Volume_01 already set up If you want to change the name of the volume you need to go to the Pool configuration menus Note however that making changes to t...

Page 62: ...irm your decision to delete the folder To confirm type the name of the folder and click on Confirm to remove the folder To create a new Team Folder 1 Type a Folder Name and click to enable or disable protocols for the folder SMB FTP NFS or WEBDAV all enabled by default 2 The option of enabling Time Machine backups for the team folder can also be enabled or disabled enabled by default 3 Click the S...

Page 63: ... with the blue T icon are eligible for member management in this menu 2 In the menu that appears click on the icon for the members you want to add to the team folder 3 Choose the permission level Read Write Read Only for the newly added members 4 Click the Submit button Click icon to add members Select members to add to the team folder Assign permission level for added members ...

Page 64: ...ead write permission settings go to the Folders List click on the Details icon for the folder and choose the Edit Details option Note that this is also where you can change the name of the folder To delete members from a team folder click on the Details icon for the user and choose the Remove user from this folder option Team Folders list Edit Details Folder Information ...

Page 65: ...s under the Device banner are used to present information about the enclosure Device Name Model Status Description EnclosureType WWN Serial Number Click See more details to expand the menu SCSI Protocol Supported Cache UsageHardwareVersion Host Cache Flushing Disabled by default Dirty Cache Usage FirmwareVersion Software Version Device Information Information presented in the Device main menu incl...

Page 66: ...Pro devices on the 10G network Alert Sound Sound Mute Enabled by default Use this to enable or disable the audible alarm on the PegasusPro System Date and Time Click the Edit button to change Date and Time settings Restore Factory Default Click on Reset to restore system settings to factory default settings Note that if a reset is conducted all data in the Home folder will be moved to the administ...

Page 67: ...ft panel provides a quick view of the status Device Health Click the Health link in the Device menu to view system health status information for the following Controller Power Supply Unit PSU Fan Blower Temperature Sensors Voltage Sensors WP DEVICE JBOD Status jpg JBOD Status in Device menu ...

Page 68: ...sical Drive Status Click on the Physical Drives link in the Device menu to view the current status of the physical drives populating the enclosure Basic information includes that drive health the type capacity and configuration status Physical Drives Status ...

Page 69: ...stem firmware make sure to first download the latest firmware from the PROMISE website and save the file to the administrator s computer The Firmware Update menu allows drag and drop or Browse functions to locate the downloaded firmware update file You can also use TFTP from a remote system if preferred Choose the update file and follow the on screen instructions to install the new firmware A syst...

Page 70: ...MB NFS and HTTP must be enabled for client Members to use the PegasusPro Registration It is strongly recommended that you register your PegasustPro to enable optimum service if you should require assistance or technical support To register you must login with your PROMISE account If you do not have an account it is easy and quick to get one To create a new PROMISE account click on the Sign Up link...

Page 71: ... PegasusPro R16 contains one storage pool with storage volumes PegasusPro_DAS1 PegasusPro_DAS1 and Team_Volume_01 with Public and Home folders If you have deleted the default storage pool the Pool menu will instruct you to create a new storage pool to begin the configuration You have the option of using the Template option to create the default storage setup one pool two equal sized volumes or you...

Page 72: ...ply need to enter a name for the storage pool click Yes or No to create or not create a spare drive and click on Create The new pool will use all available drives for one storage pool with two volumes When completed the Storage Pool List will look like the example here Pool List with Default Storage Configuration Pool List Details ...

Page 73: ...day RMAs issued after 12 00 noon PST M F ship out the next business day RMA Methods 1 Cross Ship NOT applicable in APAC and EMEAR For this method Credit card information is required for security purposes The replacement item is first sent to you customer Thirty 30 days from the day of shipment are allotted for returning the defective unit If the defective part is not returned within the allotted 3...

Page 74: ...ww promise com Austria Technical Support E Support https support promise com Web Site http www promise com France Technical Support E Support https support promise com Web Site http www promise com Germany Europaplatz 9 44269 Dortmund Germany Technical Support E Support https support promise com Web Site http www promise com Sweden Technical Support E Support https support promise com Web Site htt...

Page 75: ...e http www promise com United Kingdom Technical Support E Support https support promise com Web Site http www promise com Taiwan Technical Support E Support https support promise com Web Site http www promise com China Room 1108 West Wing Shi Chuang Plaza 22 Information Road Shangdi IT Park Haidian District Beijing 100085 Fax 86 10 8857 8015 Technical Support E Support https support promise com We...

Page 76: ... promise com Web Site http www promise com Singapore Technical Support E Support https support promise com Web Site http www promise com Japan 3F Mura Matsu Bldg 3 8 5 Hongo Bunkyo ku Tokyo 113 0033 Japan Technical Support E Support https support promise com Web Site http www promise com 63 Contact Technical Support PegasusPro Product Manual ...

Page 77: ...ich are new and in cartons on the date of purchase b is not transferable c is valid only when accompanied by a copy of the original purchase invoice This warranty shall not apply to defects resulting from a improper or inadequate maintenance or unauthorized modification s performed by the end user b operation outside the environmental specifications for the product c accident misuse negligence mis...

Page 78: ...o vary the terms of this limited warranty PROMISE s sole responsibility with respect to any product is to do one of the following a replace the product with a conforming unit of the same or superior product b repair the product PROMISE shall not be liable for the cost of procuring substitute goods services lost profits unrealized savings equipment damage costs of recovering reprogramming or reprod...

Page 79: ... from the use of any product Returning the Product For Repair If you suspect a product is not working properly or if you have any questions about your product contact our Technical Support staff and be ready to provide the following information Product model and serial number required Return shipping address Daytime phone number Description of the problem Copy of the original purchase invoice The ...

Page 80: ... the product s problem s Write an attention line on the box with the RMA number Include a copy of your proof of purchase You are responsible for the cost of insurance and shipment of the product to PROMISE Note that damage incurred due to improper transport or packaging is not covered under the Limited Warranty When repairing returned product s PROMISE may replace defective parts with new or recon...

Reviews: