19
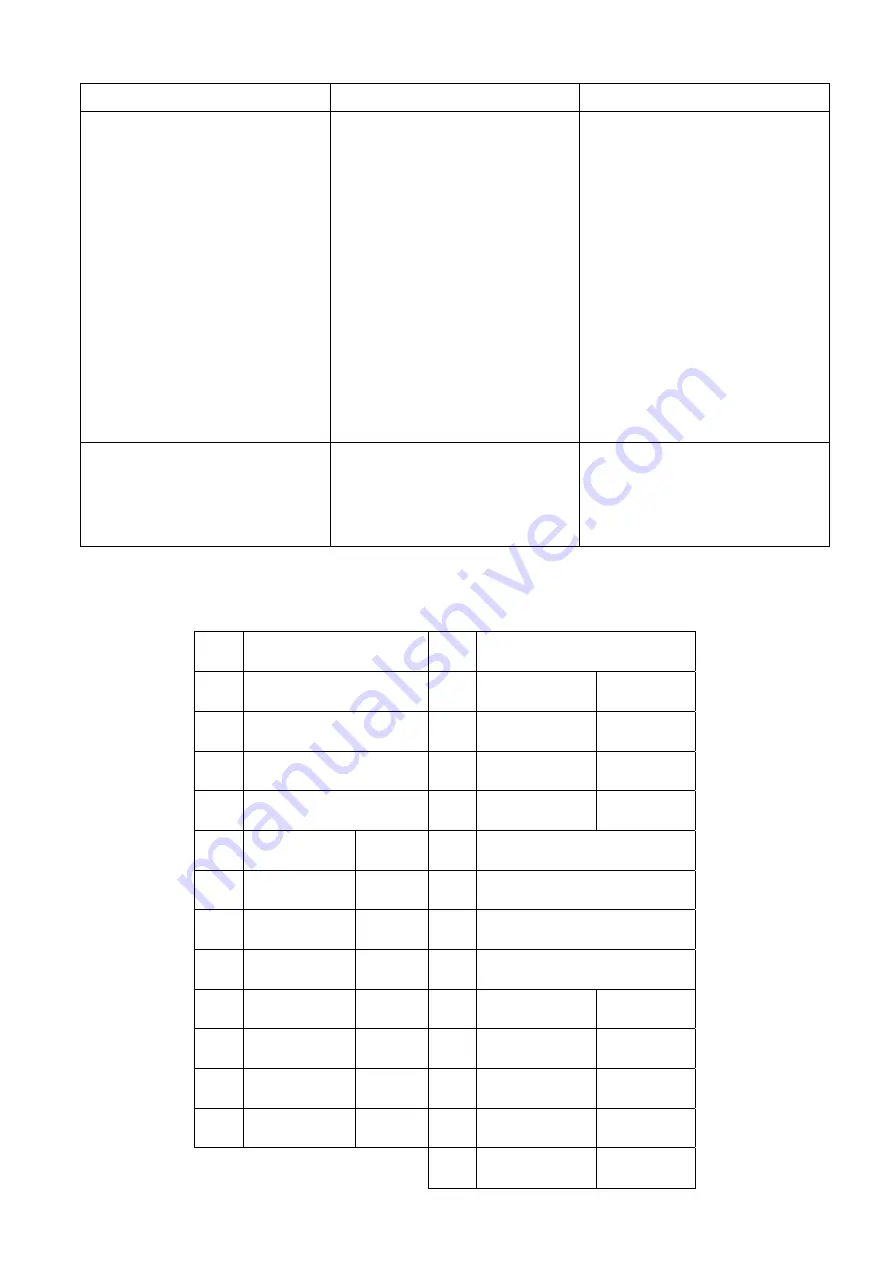
Problem
Cause
Correction
No or improper sealing.
NOTE :
Please do not adjust
sealing longer than regular time,
or it will reduce the life of Teflon
tape and silicone rubber.
Sealing wire is broken.
Sealing wire is loose.
Insufficient pressure.
Sealing transformer is damaged.
Teflon tape or silicone rubber is
damaged.
Sealing time and cooling time are
too short.
Sealing pressure is too low.
Replace it.
Tighten it.
Pressure bar is damaged, replace
it.
Replace it.
Replace it.
Adjust to proper time.
Replace the pressure bag.
Lid does not close.
Vacuum valve is damaged.
Limit switch is disconnected or
damaged.
Replace it.
Reconnect or replace it.
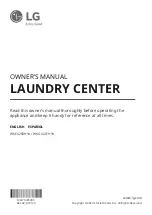
5.2 25PIN D Type Terminal Wiring Connection Instructions
P IN
NO
FUNCTION
PIN
NO
FUNCTION
1
AC24V Input —
For Internal
13
External
DC24V
Rectificated
2
AC24V Input —
For Internal
14
External
DC24V
Rectificated
3
AC24V Input —
For External
15
Sealing Bar 2
Heat Contact
Relay
Contact
4
AC24V Input —
For External
16
Pulse Soft Air
Contact
Relay
Contact
5
Air Inlet Valve
Relay
Contact
17
x
6
Sealing Press
Bar Gas Flushing
Relay
C
on
t
ac
t
18
x
7
Sealing Bar 1
Heat
Relay
Contact
19
x
8
External Special
Gas Valve
Relay
Contact
20
x
9
Vacuum Valve
Relay
Contact
21
Over Relay Input
Same As 25
External
Input
10
COM
Relay
Contact
22
Internal
Grounding
External
Input
11
Internal
Grounding
External
Input
23
COM point
Relay
Contact
12
Vacuum Lid
Signal Input
External
Input
24
Vacuum Motor
Contact
Relay
Contact
25
Over Relay Input
Same As 21
External
Input
Summary of Contents for DC-800
Page 19: ...16 ...
Page 23: ...20 5 3 PNEUMATIC DIAGRAM ...
Page 24: ...21 5 4 ELECTRICAL DIAGRAM FB ...
Page 25: ...22 5 4 ELECTRICAL DIAGRAM TB ...
Page 27: ...6 1 BODY 24 DC80100000 Body Diagram ...
Page 29: ...6 2 WORKING BED BOTTOM 26 C C Working bed Bottom Diagram DC80200000 ...
Page 32: ...6 3 1 CUSHION BAR FB 29 Cushion Bar Diagram D80K2FB000 ...
Page 34: ...6 3 2 CUSHION BAR FBG 31 D80K2FBG00 Cushion Bar Diagram ...
Page 36: ...6 3 3 CUSHION BAR FBPK 33 D80K2PK000 Cushion Bar Diagram ...
Page 38: ...6 3 4 CUSHION BAR FBPKG 35 D80K2PKG00 Cushion Bar Diagram ...
Page 40: ...6 3 5 SEALING BAR BOTTOM FBTB 37 DC802TB000 Sealing Bar Bottom Diagram ...
Page 42: ...6 3 6 SEALING BAR BOTTOM FBTBG 39 DC802TBG000 Sealing Bar Bottom Diagram ...
Page 44: ...6 3 7 SEALING BAR BOTTOM FBTBPK 41 D80K2TK000 Sealing Bar Bottom Diagram ...
Page 46: ...6 3 8 SEALING BAR BOTTOM FBTBPKG 43 D80K2TKG00 Sealing Bar Bottom Diagram ...
Page 48: ...6 4 CHAMBER LID DIAGRAM 45 Chamber Lid Top Diagram DC80300000 ...
Page 50: ...6 5 1 SEALING BAR TOP FB 47 D80K312A00 Sealing Bar Top Diagram ...
Page 53: ...6 5 2 SEALING BAR TOP PK 50 DC80350A00 Sealing Bar Top Diagram ...
Page 56: ...53 6 6 ELECTRICAL BOX FB 6 6 ELECTRICAL BOX TB ...


