13
pressure to keep the bit cutting.
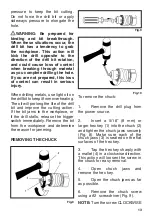
Do not force the drill bit or apply
sideways pressure to elongate the
hole.
WARNING: Be prepared for
binding and bit breakthrough.
When these situations occur, the
drill bit has a tendency to grab
the workpiece. This action will
kick the drill opposite to the
direction of the drill bit rotation,
and could cause loss of control
when breaking through material
as you complete drilling the hole.
If you are not prepared, this loss
of control can result in serious
injury.
When drilling metals, use light oil on
the drill bit to keep it from overheating.
The oil will prolong the life of the drill
bit and improve the cutting action.
If the bit jams in the workpiece, or
if the drill stalls, release the trigger
switch immediately. Remove the bit
from the workpiece and determine
the reason for jamming.
REMOVING THE CHUCK
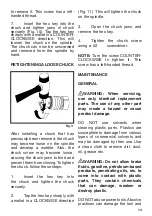
Fig.8
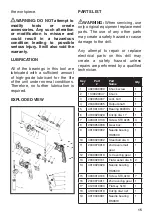
Fig.9
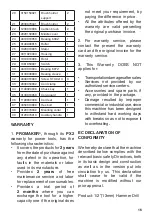
Fig.10
To remove the chuck:
1.
Remove the drill plug from
the power source.
2.
Insert a 5/16” (8 mm) or
larger hex key (1) into the chuck (2)
and tighten the chuck jaws securely
(Fig. 8). Make sure each of the
chuck jaws (3) is seated on the flat
surfaces of the hex key.
3.
Tap the hex key sharply with
a mallet (4) in a clockwise direction.
This action will loosen the screw in
the chuck for easy removal.
4.
Open chuck jaws and
remove the hex key.
5.
Open the chuck jaws as far
as possible.
6.
Remove the chuck screw
using a #2 screwdriver (Fig. 9).
NOTE: Turn the screw CLOCKWISE
Summary of Contents for PRO-TP800
Page 1: ...1 2 13mm Hammer Drill User s Manual Model No PRO TP800 English 2 I Espa ol 22...
Page 17: ...NOTES...
Page 18: ...NOTES...
Page 19: ...NOTES...
Page 20: ...www promakertools com...
Page 21: ...Taladro Percutor de 1 2 13mm Manual del Usuario Modelo No PRO TP800...
Page 39: ...NOTAS...
Page 40: ...www promakertools com...

