


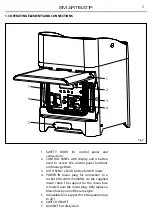


11
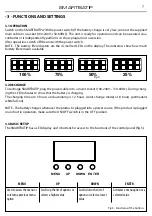
SMARTBATIP
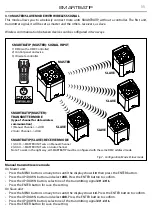
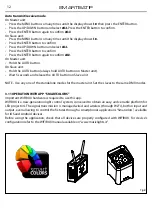
3.10 MASTER/SLAVE MODE WITH WIRELESS SIGNAL
This mode allows you to wirelessly connect more units SMARTBATIP, without a controller. The first unit,
transmitter signal, it will be set as master and the others, receivers, as slave.
Wireless communication between devices can be configured in two ways:
Fig.7 - Configuration Master/Slave mode
SLAVE
SLAVE
SLAVE
SLAVE
MASTER
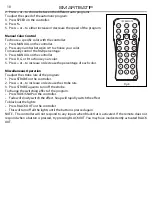
IRC REMOTE
BLACK
OUT
AUTO
STROBE
SPEED
SOUND
SENSI-
TIVITY
%
MANUAL
FADE
SNAP
R
G
B
+
0
1
2
3
4
5
6
7
8
9
A
UV
W
SMARTBATIP (MASTER): SIGNAL INPUT
1) DMX (with a DMX Controller)
2) Control panel on device
3) IR remote controller
SMARTBATIP (MASTER):
TRANSMITTER MODE
(type of channel for data wireless
communication)
1) Manual Channel --> dtCH
2) Auto Channel --> dtAU
SMARTBATIP (SLAVE): RECEIVER MODE
1) drCH --> MASTER UNIT sets on Manual Channel
2) drAU --> MASTER UNIT sets on Auto Channel
Note: To work in the right way, all SMARTBATIP must be configured with the same DMX address/mode.
Manual transmit/receive mode
On Master unit:
• Press the MENU button so many times until the display shows
S-tr
then press the ENTER button.
• Press the UP/DOWN button and select
dtCH.
Press the ENTER button to confirm.
• Press the UP/DOWN button, select one of the transmitting signal
dt 1 - dt 16.
• Press the ENTER button for save the setting.
On Slave unit:
• Press the MENU button so many times until the display shows
S-tr.
Press the ENTER button to confirm.
• Press the UP/DOWN button and select
drCH.
Press the ENTER button to confirm.
• Press the UP/DOWN button, select one of the transmitting signal
dr 1 - dr 16.
• Press the ENTER button for save the setting.
Summary of Contents for SMARTBATIP
Page 1: ...MANUALE UTENTE USER MANUAL SMARTBATIP IT EN PORTABLE BATTERY POWERED UPLIGHTER...
Page 38: ......
Page 39: ......