background image

LUMA700

30

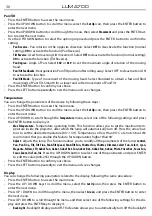
Pan/Tilt

• 

Press the ENTER button to access the main menu.

• 

Press the UP/DOWN button to scroll the menu, select the 

Set Up

 icon, then press the ENTER button to 

enter the next menu.

• 

Press the UP/DOWN button to scroll through the menu, then select 

Movement

 and press the ENTER but-

ton to enter the next menu.

• 

Use the UP/DOWN button to select the option proposed and press the ENTER  button to confirm the 

setting.

 -

Pan Reverse 

- Pan rotation in the opposite direction. Select 

OFF

 to deactivate the function (normal 

setting); 

ON

 to activate the function (Pan Reverse).

 -

Tilt Reverse - 

Used for reversing tilt movement. Select 

OFF

 to deactivate the function (normal setting); 

ON

 to activate the function (Tilt Reverse).

 -

Pan Degree - 

Angle of Pan. Select 

540°

 or 

630°

 to set the maximum angle of rotation of the moving 

head.

 -

Pan/Tilt Feedbacks - 

Reorganization Pan/Tilt position after rolling away. Select OFF to deactivate or ON 

to activate the function.

 -

Pan/Tilt Mode - 

Type of movement of the moving head. Select Standard to obtain a fast and fluid 

movement of Pan/Tilt, Smooth for a slower and softer movement of Pan/Tilt.

• 

Press the ENTER button to confirm your choice.

• 

Press the LEFT button repeatedly to exit the menu and save changes.

Temperature

You can change the parameters of the device by following these steps:

• 

Press the ENTER button to access the main menu.

• 

Press the UP/DOWN button to scroll the menu, select the 

Set Up

 icon, then press the ENTER button to 

enter the next menu.

• 

Press UP/DOWN to scroll through the 

Temperature 

menu, select one of the following settings and press 

the ENTER button to display it.

 -

Max Temperature 

- Temperature operating limits. This function allows you to set the maximum tem-

perature inside the projector, after which the lamp will automatically turn off. Press the arrow but-

tons to set the desired temperature (80° -139°). Temperatures of less than 90° C are not critical. We 

recommend that you enable this feature for temperatures higher than 90°.

 -

Adjust - 

Adjusts the lamp. This function allows you to modify all the parameters of the lamp: 

Control, 

Pan, Pan Fine, Tilt, Tilt Fine, Pan&Tilt Speed, Pan&Tilt Fun, Shutter Fun, Shutter, Dimmer, Color1 Fun, Color1, Cyan, 

Magenta, Yellow, CTO, Gobo1 Fun, Gobo1, Gobo1 Rot. Fun, Gobo1 Rot., Gobo2 Fun, Gobo2, Prism, Prism Rot., Focus Fun, 

Focus, Zoom, Iris Fun, Iris

. Press the UP/DOWN button to select one of the parameters and press ENTER 

to edit the value (000-255) through the UP/DOWN button.

• 

Press the ENTER button to confirm your choice.

• 

Press the LEFT button repeatedly to exit the menu and save changes.

Display

You can change the following parameters related to the display, following the same procedure:

• 

Press the ENTER button to access the main menu.

• 

Press the UP / DOWN keys to scroll the menu, select the 

Set Up

 icon, then press the ENTER button to 

enter the next menu.

• 

Press UP / DOWN to scroll through the menu, then select 

Screen

, and press the ENTER button to enter 

the next menu.

• 

Press UP / DOWN to scroll through the menu, and then select one of the following settings for the dis-

play and press the ENTER key to display it.

 -

Back Light

 - Backlight display Auto Off. This feature allows you to automatically turn off the backlight 

Summary of Contents for LUMA700

Page 1: ...MANUALE UTENTE USER MANUAL LUMA700 MOVING HEAD IT EN...

Page 2: ...arziale per propri scopi commerciali vietata Al fine di migliorare la qualit dei prodotti la Music Lights S r l si riserva la facolt di modificare in qualunque momento e senza preavviso le specifiche...

Page 3: ...3 7 Modalit Scenes Record 3 8 Modalit Musicale 3 9 Sensibilit microfono 3 10 Collegamento 3 11 Modalit DMX 3 12 Configurazioni canali DMX 3 13 Indirizzamento DMX 3 14 Collegamenti della linea DMX 3 1...

Page 4: ...gli interventi devono essere sempre e solo effettuati da personale tecnico qualificato Rivolgersi al pi vicino centro di assistenza tecnica autorizzato Se si desidera eliminare il dispositivo definiti...

Page 5: ...lle Condizioni Generali di Garanzia Si prega dopo l acquisto di procedere alla registrazione del prodotto sul sito www musiclights it In alternativa il prodotto pu essere registrato compilando e invia...

Page 6: ...minoso 15 500 lm Angolo di proiezione Fast zoom 5 50 0 4 sec con rapporto 1 10 Gruppo ottico ad alta resa luminosa Lenti antiriflesso ad alta definizione con trattamento acromatico Messa a fuoco elett...

Page 7: ...o Timer ore di vita del proiettore Controllo temperatura periferiche di base braccio testa Batteria tampone per accensione dell interfaccia display anche senza alimentazione Struttura e corpo mobile G...

Page 8: ...235 Diagramma di luminosit Disegno tecnico Illuminance at a Distance 5 50 2 5m 5 0m 10 0m 0m 0 28 2 2m 0 56 4 4m Lux Center Beam Angle 5 50 Beam Width 80420 3566lx 19950 1008lx 1 11 8 8m 0 84 6 6m 510...

Page 9: ...estione delle diverse funzioni 9 DMX OUT XLR a 3 poli 1 massa 2 DMX 3 DMX 10 DMX IN XLR a 3 poli 1 massa 2 DMX 3 DMX 11 DMX OUT XLR a 5 poli 1 massa 2 DMX 3 DMX 4 N C 5 N C 12 DMX IN XLR a 5 poli 1 ma...

Page 10: ...ati con una rotazione in senso orario fino all arresto Assicurarsi che l unit sia saldamente fissata al fine di evitare vibrazioni e scivolamenti durante il funzionamento L area di collocazione deve a...

Page 11: ...y ed i pulsanti che permettono la gestione del menu e la completa programmazione del proiettore fig 4 Fig 4 Funzione dei tasti e icone display UP DOWN LEFT RIGHT ENTER BATTERY Per incrementare il valo...

Page 12: ...poso il display mostra l indirizzo DMX del proiettore Invece durante lo stato di impostazione del menu quando trascorre un certo tempo di attesa senza che venga premuto alcun tasto la visualizzazione...

Page 13: ...ment Pan Reverse YES NO Tilt Reverse YES NO Pan Degree 540 630 Pan Tilt Feedbacks YES NO Pan Tilt Mode Standard Smooth Screen Backlight Always On Min 01 99 Flip Display YES NO Display Bright Value 00...

Page 14: ...ssword 050 unlocks the following settings Private Reload ON OFF All Reload ON OFF 4 INFORMATION Time I nfo Temperature Fans Speed ChannelValue Error Message Fixture Model SoftwareVer 5 STAND ALONE Pla...

Page 15: ...lta con il tasto ENTER Premere il tasto UP DOWN per selezionare le diverse modalit di funzionamento Part 1 Receive Part 2 Receive Part 3 Receive quindi premere il tasto ENTER per confermare la scelta...

Page 16: ...o ENTER per confermare Premere il tasto UP DOWN per selezionare lo Step 01 Step 64 desiderato quindi premere il tasto ENTER Premere il tasto UP DOWN per selezionare la Scene desiderata da impostare pe...

Page 17: ...emere il tasto UP DOWN per selezionare la modalit di funzionamento Master se l unit collegata in serie ad altre unit ed essa svolge la funzione di Master Alone se l unit non collegata ad altre unit Pr...

Page 18: ...modifiche apportate Le tabelle a pagina 21 indicano le modalit di funzionamento e i relativi valori DMX Come interfaccia DMX l unit possiede dei contatti XLR a 3 e 5 poli Edit User La funzione EditUse...

Page 19: ...19 LUMA700 Fig 6 Esempio di configurazione a 21 canali DMX DMX Address 96 DMX Address 54 DMX Address 33 DMX Address 75 DMX512 Controller...

Page 20: ...ile i dati di controllo DMX Collegare l uscita DMX del controller con l ingresso DMX della prima unit Collegare quindi l uscita DMX con l ingresso DMX della successiva unit l uscita di quest ultima co...

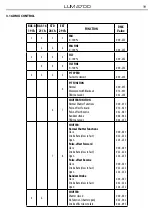
Page 21: ...utter Functions Pulse effect Forward Pulse effect Reverse Random strobe TBD not used 000 015 016 031 032 047 048 063 064 255 7 8 SHUTTER Normal Shutter Functions Close Strobe Rate slow to fast Open Pu...

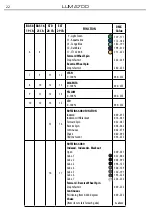
Page 22: ...048 063 064 079 080 111 112 255 10 11 COLOR Indexed Indexed w Blackout Bounce 1 Open 2 Open Dark Red 3 Dark Red 4 Dark Red Pink 5 Pink 6 Pink Amber 7 Amber 8 Amber Light Green 9 Light Green 10 Light G...

Page 23: ...Red 4 Dark Red Pink 5 Pink 6 Pink Amber 7 Amber 8 Amber Light Green 9 Light Green 10 Light Green Aquamarine 11 Aquamarine 12 Aquamarine Congo Blue 13 Congo Blue 14 Congo Blue Dark Blue 15 Dark Blue 1...

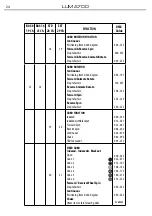
Page 24: ...13 14 YELLOW 0 100 000 255 10 12 14 15 CTO 0 100 000 255 15 16 ROTATING GOBO FUNCTION Indexed Indexed with Blackout Forward Spin Reverse Spin Continuous Shake TBD not used 000 015 016 031 032 047 048...

Page 25: ...from slow to fast Gobo 5 from slow to fast Gobo 6 from slow to fast ForwardWheel Spin Stop to fastest ReverseWheel Spin Stop to fastest 000 005 006 011 012 017 018 023 024 029 030 035 036 041 042 047...

Page 26: ...ate Stop to fastest Forward Spin Stop to fastest Reverse Spin Stop to fastest 000 191 192 207 208 223 224 239 240 255 19 20 GOBO FUNCTION Indexed Indexed with Blackout Forward Spin Reverse Spin Contin...

Page 27: ...000 006 007 013 014 020 021 027 028 034 035 041 042 048 049 055 056 062 063 069 070 076 077 083 084 090 091 097 098 118 119 139 140 160 161 181 182 202 203 223 224 239 240 255 14 16 21 22 EFFECTS Inde...

Page 28: ...063 064 079 080 255 27 28 IRIS Indexed Max diameter to Min diameter Pulse opening with Revese Blackout Pulse Slow to Fast 000 255 000 255 18 20 IRIS Indexed Pulse openingWith Forward Blackout Pulse o...

Page 29: ...OLOR FUNCTION 10 11 COLOR 6 8 COLOR 7 9 11 12 CYAN 8 10 12 13 MAGENTA 9 11 13 14 YELLOW 10 12 14 15 CTO 15 16 ROTATING GOBO FUNCTION 16 17 ROTATING GOBO 11 13 ROTATING GOBO 17 18 GOBO ROTATION FUNCTIO...

Page 30: ...TE COLORI GOBOS ROTATING GOBOSWHEEL GOBO 5 GOBO 6 GOBO 7 GOBO 1 GOBO 2 GOBO 3 GOBO 4 FIXED GOBOSWHEEL GOBO 5 GOBO 6 GOBO 1 GOBO 2 GOBO 3 GOBO 4 COLORWHEEL COLOR 1 COLOR 2 COLOR 3 COLOR 4 COLOR 5 COLOR...

Page 31: ...re nel menu quindi selezionare PID Code e pre mere il tasto ENTER per confermare Attraverso i tasti direzionali inserire il PID Code quindi premere il tasto ENTER per confermare la scelta Premere il t...

Page 32: ...l tasto UP DOWN e premere il tasto ENTER per confermare Selezionare l opzione proposta con il tasto UP DOWN e premere il tasto ENTER per confermare Max Temperature Temperatura limite di funzionamento...

Page 33: ...ne proposta con il tasto UP DOWN e premere il tasto ENTER per confermare FanMode Modalit di funzionamento delle ventole Selezionare la modalit di funzionamento desi derata tra Auto Speed High Speed qu...

Page 34: ...load Program Reload Private Reload All Reload quindi premere il tasto ENTER per confermare Premere i tasti UP DOWN per selezionare ON oppure OFF quindi premere il tasto ENTER per confermare 3 23 INFOR...

Page 35: ...all accumulo di polveri e grassi La frequenza con la quale effettuare le operazioni sotto indicate dipende da diversi fattori quali la quantit di movimenti degli effetti e la qualit dell ambiente di...

Page 36: ...ositivo regolarmente Installare il gruppo ottico correttamente Il proiettore non alimentato Mancanza di alimentazione di rete Cavo di alimentazione danneggiato Alimentatore interno difettoso Verificar...

Page 37: ...Note...

Page 38: ...by any means for any commercial use In order to improve the quality of products Music Lights S r l reserves the right to modify the characteristics stated in this instruction manual at any time and w...

Page 39: ...peration in automatic mode 3 7 Scenes Record mode 3 8 Music mode 3 9 Sensitivity microphone 3 10 Linking 3 11 DMX mode 3 12 DMX configuration 3 13 DMX addressing 3 14 Connection of the DMX line 3 15 C...

Page 40: ...technical personnel Contact the nearest sales point for an inspection or contact the manufacturer directly If the unit is to be put out of operation definitively take it to a local recycling plant fo...

Page 41: ...www musiclights it Please remember to register the piece of equipment soon after you purchase it logging on www musiclights it The product can be also registered filling in and sending the form avail...

Page 42: ...5 50 Fast Zoom 0 4 sec with 1 10 ratio High efficiency optical system High definition anti reflection lenses with achromatic coating Focus motorized focusing from 2 m to infinity Autofocus function vi...

Page 43: ...emperature indication of base arm head Battery backup for user operation without connecting to the main Structure and moving body Internal protection IP20 Aluminium structure with hi resistance poly c...

Page 44: ...5 235 Photometric data Technical drawing Illuminance at a Distance 5 50 2 5m 5 0m 10 0m 0m 0 28 2 2m 0 56 4 4m Lux Center Beam Angle 5 50 Beam Width 80420 3566lx 19950 1008lx 1 11 8 8m 0 84 6 6m 5105...

Page 45: ...lay and 5 button used to access the control panel functions and manage them 9 DMX OUT 3 pole XLR 1 ground 2 DMX 3 DMX 10 DMX IN 3 pole XLR 1 ground 2 DMX 3 DMX 11 DMX OUT 5 pole XLR 1 ground 2 DMX 3 D...

Page 46: ...Always ensure that the unit is firmly fixed to avoid vibration and slipping while operating The mounting place must be of sufficient stability and be able to support a weight of 10 times of the unit s...

Page 47: ...anel of LUMA700 has a display and 5 buttons for the complete programming and manage ment of the projector menu fig 4 Fig 4 Functions of the buttons and display icons UP DOWN LEFT RIGHT ENTER BATTERY I...

Page 48: ...the display shows the projector s DMX address During menu setting status after a wait time without any key having been pressed the display automatically returns to rest status It should be noted than...

Page 49: ...ment Pan Reverse YES NO Tilt Reverse YES NO Pan Degree 540 630 Pan Tilt Feedbacks YES NO Pan Tilt Mode Standard Smooth Screen Backlight Always On Min 01 99 Flip Display YES NO Display Bright Value 00...

Page 50: ...ssword 050 unlocks the following settings Private Reload ON OFF All Reload ON OFF 4 INFORMATION Time I nfo Temperature Fans Speed ChannelValue Error Message Fixture Model SoftwareVer 5 STAND ALONE Pla...

Page 51: ...DOWN button to scroll through the menu and then select Play and press the ENTER button to enter the next menu Press the UP DOWN button to scroll through the menu and select Slave Receive and press EN...

Page 52: ...ss the UP DOWN button to scroll through the menu select Edit Chases and press the ENTER button to enter the next menu Press the UP DOWN button to scroll through the menu select Edit Chase 1 Edit Chase...

Page 53: ...s ENTER to confirm Press the UP DOWN button to select the mode of operation Master if the mobile head is connected in series to other units and it performs the Master function Alone if the fixture is...

Page 54: ...the ENTER button to confirm your choice Press the LEFT button repeatedly to exit the menu and save changes The tables on page 19 show the mode of operation and their values DMX The unit is equipped wi...

Page 55: ...17 LUMA700 Fig 6 Example 21 DMX channels configuration DMX Address 96 DMX Address 54 DMX Address 33 DMX Address 75 DMX512 Controller...

Page 56: ...f the first unit Connect the DMX output to the DMX input of the following unit Connect again the output to the input of the following unit until all the units are connected in chain When the signal ca...

Page 57: ...utter Functions Pulse effect Forward Pulse effect Reverse Random strobe TBD not used 000 015 016 031 032 047 048 063 064 255 7 8 SHUTTER Normal Shutter Functions Close Strobe Rate slow to fast Open Pu...

Page 58: ...048 063 064 079 080 111 112 255 10 11 COLOR Indexed Indexed w Blackout Bounce 1 Open 2 Open Dark Red 3 Dark Red 4 Dark Red Pink 5 Pink 6 Pink Amber 7 Amber 8 Amber Light Green 9 Light Green 10 Light G...

Page 59: ...Red 4 Dark Red Pink 5 Pink 6 Pink Amber 7 Amber 8 Amber Light Green 9 Light Green 10 Light Green Aquamarine 11 Aquamarine 12 Aquamarine Congo Blue 13 Congo Blue 14 Congo Blue Dark Blue 15 Dark Blue 1...

Page 60: ...13 14 YELLOW 0 100 000 255 10 12 14 15 CTO 0 100 000 255 15 16 ROTATING GOBO FUNCTION Indexed Indexed with Blackout Forward Spin Reverse Spin Continuous Shake TBD not used 000 015 016 031 032 047 048...

Page 61: ...from slow to fast Gobo 5 from slow to fast Gobo 6 from slow to fast ForwardWheel Spin Stop to fastest ReverseWheel Spin Stop to fastest 000 005 006 011 012 017 018 023 024 029 030 035 036 041 042 047...

Page 62: ...ate Stop to fastest Forward Spin Stop to fastest Reverse Spin Stop to fastest 000 191 192 207 208 223 224 239 240 255 19 20 GOBO FUNCTION Indexed Indexed with Blackout Forward Spin Reverse Spin Contin...

Page 63: ...000 006 007 013 014 020 021 027 028 034 035 041 042 048 049 055 056 062 063 069 070 076 077 083 084 090 091 097 098 118 119 139 140 160 161 181 182 202 203 223 224 239 240 255 14 16 21 22 EFFECTS Inde...

Page 64: ...063 064 079 080 255 27 28 IRIS Indexed Max diameter to Min diameter Pulse opening with Revese Blackout Pulse Slow to Fast 000 255 000 255 18 20 IRIS Indexed Pulse openingWith Forward Blackout Pulse o...

Page 65: ...COLOR FUNCTION 10 11 COLOR 6 8 COLOR 7 9 11 12 CYAN 8 10 12 13 MAGENTA 9 11 13 14 YELLOW 10 12 14 15 CTO 15 16 ROTATING GOBO FUNCTION 16 17 ROTATING GOBO 11 13 ROTATING GOBO 17 18 GOBO ROTATION FUNCTI...

Page 66: ...LOR GOBOS WHEEL ROTATING GOBOSWHEEL GOBO 5 GOBO 6 GOBO 7 GOBO 1 GOBO 2 GOBO 3 GOBO 4 FIXED GOBOSWHEEL GOBO 5 GOBO 6 GOBO 1 GOBO 2 GOBO 3 GOBO 4 COLORWHEEL COLOR 1 COLOR 2 COLOR 3 COLOR 4 COLOR 5 COLOR...

Page 67: ...to control the unit with the RDM protocol Press the UP DOWN button to scroll through the menu select PID Code and press EN TER to confirm Use the arrow keys to enter the PID Code then press the ENTER...

Page 68: ...WN to scroll through the Temperature menu select one of the following settings and press the ENTER button to display it Max Temperature Temperature operating limits This function allows you to set the...

Page 69: ...isplay it Fans Mode Select this function to set the fans operation mode Use the arrow buttons to select Auto Speed High Speed Press the ENTER button to confirm your choice NoSignal Select this feature...

Page 70: ...enu Press the UP DOWN button to select the favourite recovery mode Basic Reload Program Reload Private Reload All Reload then press the ENTER button to confirm Press the UP DOWN button to select ON or...

Page 71: ...The frequency with which the following operations are to be carried out depends on various factors such as the amount of the effects and the quality of the working environ ment air humidity presence...

Page 72: ...ssembly Misaligned lens assembly Clean the fixture regularly Install lens assembly properly Fixture does not power up No power Loose or damaged power cord Faulty internal power supply Check for power...

Page 73: ...conseguenti sono a carico del possessore dell apparecchio A tutti gli effetti la validit della garanzia avallata unicamente dalla presentazione del certificato di garanzia The guarantee covers the un...

Page 74: ...ate Data acquisto FORM TO BE FILLED IN AND MAILED CEDOLA DA COMPILARE E SPEDIRE FORM TO BE FILLED IN AND KEPT CEDOLA DA COMPILARE E CONSERVARE PROV ZIP CODE C A P MODEL MODELLO SERIAL N SERIE N Purcha...

Page 75: ......
Page 76: ...t della Music Lights S r l PROLIGHTS is a brand of Music Lights S r l company MUSIC LIGHTS S r l Via Appia km 136 200 04020 Itri LT ITALY Phone 39 0771 72190 Fax 39 0771 721955 www musiclights it emai...

Reviews: