PROKORD SMART HOME W411-E J300 Manual Download Page 9

16

17

Functions

User-defined area cleaning

Use the mobile app (required) to set the size and location of

a specific area that you want to clean. You can set one or more 

areas and the robot cleans accordingly.

Schedule cleaning

You can schedule cleaning sessions through the mobile app or 

the remote control. The robot starts to clean automatically at 

the appointed time and returns to the charging base after the 

cleaning session.

Restricted area

Set one or more restricted areas using the mobile app (required). 

The robot then avoids cleaning these areas. 

Note:


      The robot may enter the restricted area due to positioning 

errors, abnormal sensors, etc.

     The permanently restricted area may become invalid if big 

changes in positioning of the charging base or furniture are made. 

Therefore, try not to move or interfere with the robot during 

cleaning.

     The permanent restricted area may be lost if the map is rebuilt.

Wi-Fi reset

If your mobile phone cannot be connected to the robot, press          

     and      simultaneously for 3 seconds until a voice states

"Wi-Fi has been reset" and the indicator light turns purple and 

flickers slowly.

DND mode (Do Not Disturb)

The robot will neither sweep the floor nor issue a voice 

messages automatically under ONO mode. Set the time of the 

ONO mode in the mobile app.

Adjustment of suction power

You can adjust the suction power to silent level, standard level 

and high level in the mobile app or with the remote.

Introduction

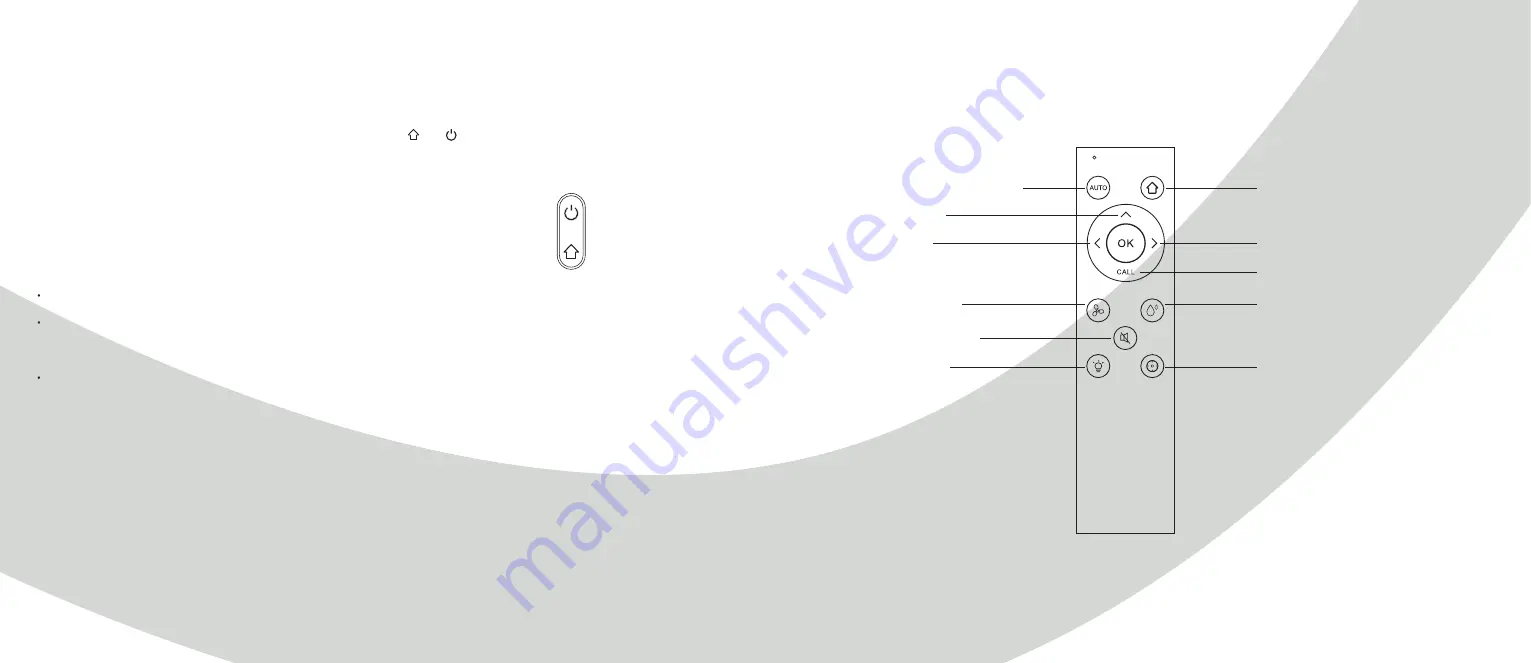
Remote control instruction

Auto cleaning start/pause

Recharging start/pause

Turn right

Find robot

Adjustment ofwater flow

Partial cleaning start/pause

Go forward

Turn left

Adjustment of

suction power

DND mode on/off

Light on/off

Summary of Contents for SMART HOME W411-E J300

Page 1: ...1 PROKORD SMART HOME W411 E...

Page 2: ...ng mode of first vaccum and then mopp You can download the app to your smart phone to oversee the cleaning map and running status of the robot in real time as well as adjust the cleaning area and sche...

Page 3: ...arging base Adapter HEPA filter sponge Duster cloth Left side brush x 2 Right side brush x 2 Parts List Included products parts 2 in 1 electric controll water tank Cleaning brush with knife Cleaning b...

Page 4: ...professional use Dustbin button Robot Product Introduction Anti drop sensor Charging contact Universal wheel Side brush Battery cover Driving wheel Rolling brush Rolling brush cover buckle Sensor and...

Page 5: ...right side brush R correspond to L and R on the bottom case by pressing L and R until you hear a clicking sound Place the charging base against the wall according to the illustration below Make sure t...

Page 6: ...fill the tank with clean water Please remove the dustbin by hand before filling it with water Installation To install the mopping module into the robot push it horizontally along the rear part of the...

Page 7: ...is in standby mode to turn it off The indicator light will go out Note The robot cannot be turned off while it is being charged CLEAN PAUSE After the robot is started press the button on the robot or...

Page 8: ...arging base automatically after each cleaning Note Do not move the robot frequently when it is cleaning If it is necessary to move the robot please put it back near the position where you picked it up...

Page 9: ...charging base or furniture are made Therefore try not to move or interfere with the robot during cleaning The permanent restricted area may be lost if the map is rebuilt Wi Fi reset If your mobile ph...

Page 10: ...t and hairs and reassemble the brushes 3 Make sure the left side brush L and the right side brush R correspond respectively to the L and R markings on the bottom of the robot Press the side brushes on...

Page 11: ...sensor Anti collision sensor for radar Anti collision sensor Infrared recharging sensor Signal emission area Charging base pins Battery The host is furnished with high performance lithium ion batteri...

Page 12: ...start the robot Main brush side brush or wheel may be twined by foreign matters please shut down the robot and remove foreign matters The dust box is full please clear it The filter screen is blocked...

Page 13: ...p radar is covered or placed in an open area there is no obstacle within an area of 6x6m2 After error 9 is issued user takes out the duck chamber and error 10 is triggered Error 10 Dust container has...

Page 14: ...re fragile parts Turn off the robot and charging base during cleaning or maintenance Do not wipe any parts of the robot or charging base using a wet cloth or other liquids Use the product in accordanc...

Page 15: ...28 For a smarter way of life...

Reviews: