PROKORD SMART HOME W411-E J300 Manual Download Page 8

14

15

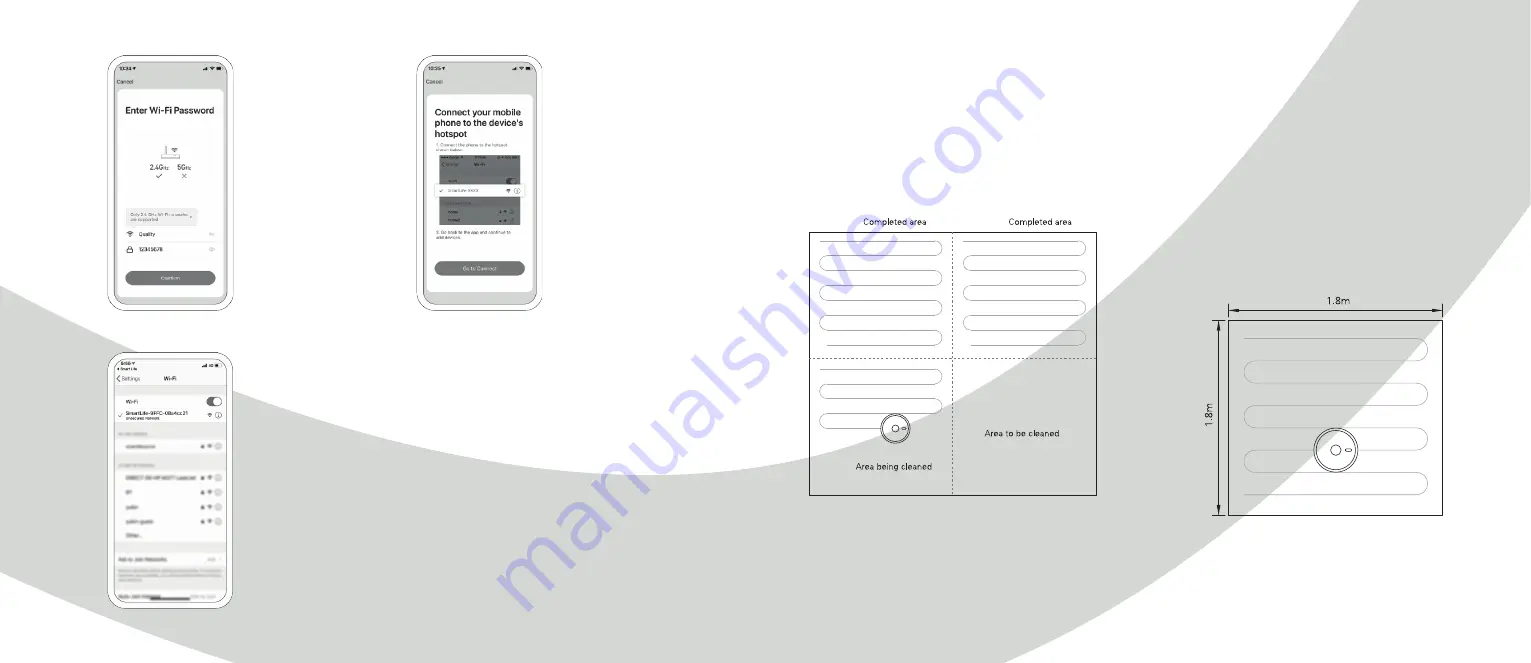
10. Go to Wi-Fi settings on

your phone and connect to

“Smart Life XXXXXX”

(the Wi-Fi name is unique

for your robot).

No password is needed.

Return to the App and complete

the setup; it will connect

automatically. A voice informs

you that the device is connected.

8. Enter your Wi-Fi

password and press

confirm. 5 GHz is currently

not supported.

9. Press on the button

at the bottom of the screen

to confirm.

Functions

Local cleaning

After the robot is powered on, it scans and generates a map 

and divides it into different areas. The robot then starts to 

clean the areas one by one along the wall in an orderly manner 

and plans the cleaning route according to the illustration 

below. The robot returns to the charging base automatically 

after each cleaning.

Note:

 Do not move the robot frequently when it is cleaning.

If it is necessary to move the robot, please put it back near the 

position where you picked it up. When it starts again, it tries

to reposition itself. After successful positioning, it follows the 

planned path and continues to work. If the positioning fails,

the robot aborts the mission, makes a new map, and does the 

cleaning again.

Partial cleaning with app

When a local area needs a deep cleaning, you can through

the app (required) specify that point on the map. The robot 

automatically drives close to the point, use the point as its 

centre, and cleans within 1.5 x 1.5 m.

Partial cleaning without app

Move the robot to the place you want to clean. Press and hold 

the 0 button for 3 seconds. The robot does a deep E clean 

within 2 x 2 m, with its initial position as its centre. See the 

illustration down below.

Summary of Contents for SMART HOME W411-E J300

Page 1: ...1 PROKORD SMART HOME W411 E...

Page 2: ...ng mode of first vaccum and then mopp You can download the app to your smart phone to oversee the cleaning map and running status of the robot in real time as well as adjust the cleaning area and sche...

Page 3: ...arging base Adapter HEPA filter sponge Duster cloth Left side brush x 2 Right side brush x 2 Parts List Included products parts 2 in 1 electric controll water tank Cleaning brush with knife Cleaning b...

Page 4: ...professional use Dustbin button Robot Product Introduction Anti drop sensor Charging contact Universal wheel Side brush Battery cover Driving wheel Rolling brush Rolling brush cover buckle Sensor and...

Page 5: ...right side brush R correspond to L and R on the bottom case by pressing L and R until you hear a clicking sound Place the charging base against the wall according to the illustration below Make sure t...

Page 6: ...fill the tank with clean water Please remove the dustbin by hand before filling it with water Installation To install the mopping module into the robot push it horizontally along the rear part of the...

Page 7: ...is in standby mode to turn it off The indicator light will go out Note The robot cannot be turned off while it is being charged CLEAN PAUSE After the robot is started press the button on the robot or...

Page 8: ...arging base automatically after each cleaning Note Do not move the robot frequently when it is cleaning If it is necessary to move the robot please put it back near the position where you picked it up...

Page 9: ...charging base or furniture are made Therefore try not to move or interfere with the robot during cleaning The permanent restricted area may be lost if the map is rebuilt Wi Fi reset If your mobile ph...

Page 10: ...t and hairs and reassemble the brushes 3 Make sure the left side brush L and the right side brush R correspond respectively to the L and R markings on the bottom of the robot Press the side brushes on...

Page 11: ...sensor Anti collision sensor for radar Anti collision sensor Infrared recharging sensor Signal emission area Charging base pins Battery The host is furnished with high performance lithium ion batteri...

Page 12: ...start the robot Main brush side brush or wheel may be twined by foreign matters please shut down the robot and remove foreign matters The dust box is full please clear it The filter screen is blocked...

Page 13: ...p radar is covered or placed in an open area there is no obstacle within an area of 6x6m2 After error 9 is issued user takes out the duck chamber and error 10 is triggered Error 10 Dust container has...

Page 14: ...re fragile parts Turn off the robot and charging base during cleaning or maintenance Do not wipe any parts of the robot or charging base using a wet cloth or other liquids Use the product in accordanc...

Page 15: ...28 For a smarter way of life...

Reviews: