background image

16

 of 

20


SETTINGS MENU 

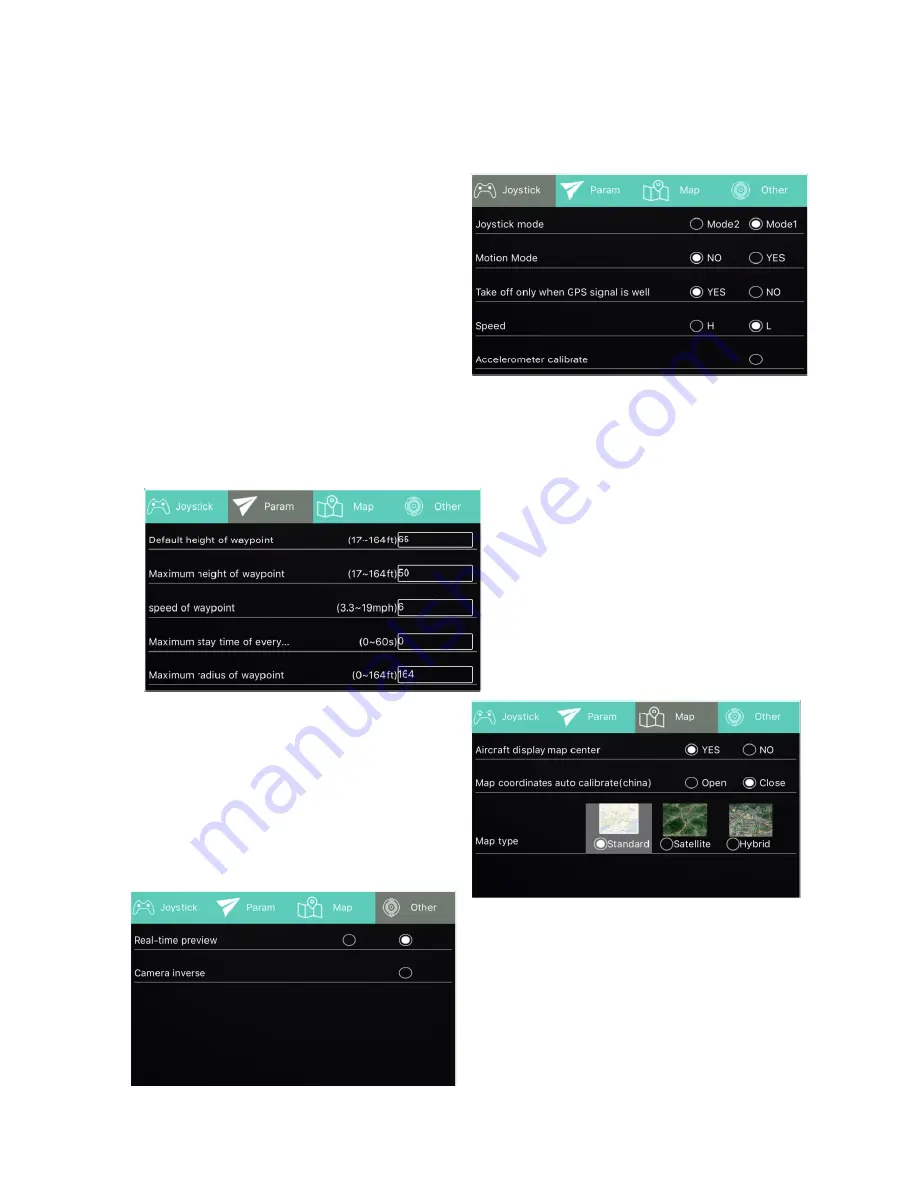
The settings menu is separated into 4 sections: Joystick, Param, Map and Other. 

JOYSTICK 

Joystick mode: Allows the left and right 

joysticks to be swapped. 
Motion Mode: Allows the drone to be 

controlled by tilting your phone. 
Take off only when GPS Signal is good.  

Drone will only take off when the signal is 

above 8 when activated. 
Speed: Change the speed between High and Low 
Calibrate Accelerometer: Advisable to calibrate before each flight 
Calibrate Magnetometer: Advisable to calibrate before each flight 

 
PARAM 

Allows the default height, max height 

and speed of waypoint to be set.  You 

can also set the Maximum stay a 

each waypoint, maximum radius of 

waypoint and the default height of 

homeward travel. 


MAP 

Select whether the drone is displayed in 

the centre of the map, and the type of 

map to be displayed (Between standard 

Satellite, and Hybrid) 


OTHER 

Select the image quality of the preview, 

and option to inverse the camera. 


720P

480P

Summary of Contents for ORBIT PFBD201

Page 1: ...USER MANUAL ORBIT PFBD201 Thank you for choosing ProFlight Please read this user manual before using this drone and keep it safe for future reference ...

Page 2: ...NFOLDING THE ARMS 7 FOLDING THE ARMS 7 REPLACEMENT OF THE PROPELLERS 8 BINDING OF CONTROLLER AND RECEIVER 8 GPS COMPASS CALIBRATION 9 GYROSCOPE CALIBRATION 10 GPS LOCATION SEARCH 10 PREPARING FOR TAKE OFF 11 FLIGHT INSTRUCTIONS 11 AIRCRAFT FUNCTIONS FEATURES 12 HEADLESS MODE 12 ORBIT MODE 12 SPEED CONTROL 12 AUTO RETURN 13 CAMERA 13 APP 14 TROUBLESHOOTING GUIDE 19 SUPPORT 20 ...

Page 3: ...erate your drone in open spaces away from vehicles buildings traffic and people Always keep out of reach of children Avoid exposure to water as moisture can cause damage to the electronics Never operate your drone with low transmitter batteries The battery charger included with the drone has been designed to safely charge the Li Po battery Mishandling of Li Po batteries can result in a fire person...

Page 4: ...s this level this is to protect the battery SAFETY PRECAUTIONS Only fly in an open space Ensure good GPS signal Keep within line of sight Fly at a height below 80m When flying ensure that the drone is kept away from other people trees electric wires buildings airports or signal transmitting tower etc Ensure that the weather conditions are suitable for flying Do not fly the drone during snow rain f...

Page 5: ...und 180 minutes DO NOT leave the battery unattended whilst charging WARNINGS DO NOT use other USB cables They may lead to incorrect charging and could cause damage or present a safety risk When reinserting the battery make sure it is secure and fully clicks into place PREPARING FOR FIRST FLIGHT 1 Fully read and understand the safety warnings and precautions 2 Make sure both the transmitter and air...

Page 6: ... installed the battery cover must be re fitted CONTROLLER DIAGRAM 1 Speed Button 2 Power Button 3 Decoration Antenna 4 Headless mode Short Press Orbit mode Long Press 5 Left Joystick Start Video Short Press 6 Auto Take Off Auto Land Short Press Emergency Stop Long Press 7 Ring 8 Auto Return Short Press GPS Calibration Long Press Right Joystick 1 2 1 3 4 5 6 7 8 9 SMARTPHONE HOLDER 9 Take photo Sho...

Page 7: ...itch 2 Blades 3 Motor 4 Camera 5 Battery 1 2 3 4 5 Unfold each arm ensuring that they click into position Fold each arm individually by sliding the switch on the underside of the arm to unlock the mechanism and then carefully push the arm into the folded position ...

Page 8: ... BINDING OF CONTROLLER RECEIVER 1 Place the aircraft on a flat surface in an open area and insert the battery in before turning on The lights on the underside of the drone will flash 2 Turn on the controller 3 Press the left joystick up until the controller bleeps 4 Press the left joystick down until the controller bleeps again The front lights on the drone will illuminate while the rear lights fl...

Page 9: ...illuminate 3 Then hold the drone with the front facing down and rotate it anticlockwise for 3 full revolutions The lights at the front of the drone will illuminate The lights will then return to the same status as prior to calibration indicating that calibration has finished For accuracy the GPS should be calibrated before each flight and we would advise that the drone is at least 50cm away from t...

Page 10: ... calibration This should be carried out before each flight GPS LOCATION SEARCH Once the drone has been calibrated as shown in the previous steps the drone should be placed on a flat surface in an open area in order to for it to fix its location via GPS Once the location has been fixed the rear lights will stop flashing and will be illuminated It can take around 2 minutes for the drone to fix on it...

Page 11: ...o rotate TAKE OFF There are two options for take off It can be triggered by using the take off button which will result in the drone hovering at a set height above the ground Alternatively the left joystick can be pushed forward FLIGHT INSTRUCTIONS Before your first flight make sure you are familiar with the controls of the aircraft Left Joystick Throttle Rudder Right Joystick Elevator Aileron Not...

Page 12: ...rbit mode by long pressing the headless flight button The camera of the drone will automatically aim at the position of the smartphone The orbit is controlled using the right joystick 1 Move the joystick to the left to orbit anti clockwise increase the speed of the anticlockwise orbit 2 Move the joystick to the right to slow the anticlockwise orbit or to orbit in a clockwise direction 3 Move the j...

Page 13: ...tion of take off The controller will continuously bleep to indicate the loss of contact LOW BATTERY AUTO RETURN If the battery is low the drone will automatically return to the position of take off and the front of the drone will flash rapidly If the battery is out of power all the lights will flash quickly find a suitable place to land before the drone carries out an emergency land in its current...

Page 14: ...vice Turn on the aircraft while ensuring your controller is turned off Go to the settings on your mobile device Open the WiFi settings and search for a device starting with LW 1080P GPS Select it and wait for it to connect Open the LW FPV App and press the START button at the bottom of the screen This will lead you to the control screen and show the view of the camera ...

Page 15: ...enu 15 Record Video 7 Altitude Distance 16 Take Photo 8 Vertical and horizontal speed 17 Folder 9 GPS Co ordinates and signal info JOYSTICK CONTROLS Once the drone is connected display the joystick controls and the drone can be flown using the onscreen joysticks after the drone has been unlocked and the take off button has been pressed The controller must be turned off to control the drone from th...

Page 16: ...ween High and Low Calibrate Accelerometer Advisable to calibrate before each flight Calibrate Magnetometer Advisable to calibrate before each flight PARAM Allows the default height max height and speed of waypoint to be set You can also set the Maximum stay a each waypoint maximum radius of waypoint and the default height of homeward travel MAP Select whether the drone is displayed in the centre o...

Page 17: ...en Joystick WAYPOINT MODE Before starting the waypoint mode check the Param settings within the menu to ensure they are suitable for the location Then set the drone hovering at a height above 50 metres ensuring there are no obstacles between the drone and the waypoints To exit waypoint mode use the joystick Joystick mode Waypoint mode Follow me mode Orbit flight Pen Press to view waypoint options ...

Page 18: ...ne further away to extend the orbit Back Move the drone close to decrease the size of the orbit Press the joystick mode button to turn off orbit flight WARNINGS Always calibrate the drone before controlling using the APP Ensure you understand the operating instructions provided before attempting to fly Only compatible with Android 5 0 and above If you experience problems with the image the drone i...

Page 19: ...uctions on page 14 2 Reconnect using the instructions on page 14 3 Aircraft can not fly on App when main controller is turned on Turn off controller reset aircraft app and WiFi to reconnect to App 5 Camera not working in App 1 Aircraft not connected to App 1 Reconnect using the instructions on page 14 Disposal Do not dispose this product as unsorted municipal waste Collection of such waste must be...

Page 20: ...ou have been through the troubleshooting and the unit is failing to operate our service line can be contacted on 0871 971 3141 Office hours 9AM 5PM Monday to Friday www prolightuk co uk Unit J6 Lowfields Business Park Lowfields Way Elland West Yorkshire HX5 9DA ...

Reviews: