background image

5

ON/OFF TOGGLE SWITCH
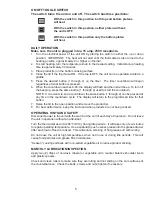
The switch turns the unit on and off.  The switch has three positions:


With the switch in this position, both top and bottom platens  


will heat.

With the switch in this position, neither platen will heat;  
the unit is OFF.


With the switch in this position only the bottom platen  


will heat.

DAILY OPERATION
Make sure the unit is plugged into a 15 amp, 230V receptacle.

.  Turn the electrical power of the unit ON by placing the switch in either the up or down 

position.  IMPORTANT:  The heat will not start until the thermostat is also turned to the 

heating position, approximately  or higher on the dial.

.  To start heating, turn the temperature knob to the desired setting.  Initial start-up heating 

time is approximately 0 minutes.

.  Place product(s) on the bottom cooking surface.

4.  Close the lid if the top if also ON.  If the top is OFF, the unit can be operated similar to a 

griddle.

5.  Press  the  desired  button  (  through  4)  on  the  timer.    The  timer  countdown  will  begin 

regardless of what button is pressed.

6.  When the countdown reaches 0:00, the display will flash and the unit will beep.  To turn off 

the beeping, press the same button ( through 4) used to start the countdown.  


NOTE:  If one wants to end a countdown, the same button ( through 4) can be pressed at 

any time in the countdown cycle.  The display will return to the programmed time for that 

button.

7.  Raise the lid to the open position and remove the product(s).

8.  For best performance, keep the lid closed when products are not being cooked.

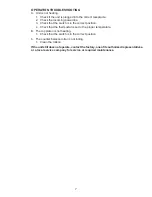
OPERATING HINTS AND SAFETY

Disconnect power to the unit with the switch at the end of each day of operation.  Do not leave 

the unit in operation without an attendant.
Turn the thermostat down to 00°F (9°C) during idle periods.  It will take only a few minutes 

to regain operating temperature.  Use a spatula to push excess grease into the grease drawer 

after each load of food is cooked.  This will reduce smoking of hot grease and carbonizing.
Do not leave the unit at high temperatures when not in use or during idle periods.  This will 

cause food particles and grease film to carbonize.

"Season" cooking surfaces with non-salted vegetable oil to reduce product sticking.

MONTHLY LUBRICATION/INSPECTION

Apply two () drops of non-toxic mineral or vegetable oil to counter balance shoulder rivets 

and plastic spacers.
Check and clean rollers to make sure they are rolling and not sliding on the cam surfaces of 

the counterbalance.  Check the bolts, screws and nuts; tighten if necessary.

Summary of Contents for GR10T4K-CE

Page 1: ... TABLE TOP TWO SIDED TOASTER MODEL GR10T4K UK GR10T4K CE Installation and Operation Instructions 2M Z9364 Rev A 1 31 2011 ...

Page 2: ...dures policies and regulations the specifications contained in this sheet are subject to change without notice While Star Manufacturing exercises good faith efforts to provide information that is accurate we are not responsible for errors or omissions in information provided or conclusions reached as a result of using the specifications By using the information provided the user assumes all risks in...

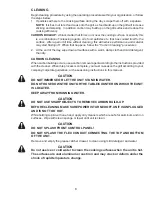
Page 3: ... internal packaging materials for inspection The carrier will make an inspection and will supply necessary claim forms VENTILATION AND CLEARANCES The installation of any components such as a vent hood grease extractors and or fire extinguishing systems must conform to their applicable nationally recognized installation standards and or local building codes ELECTRICAL CONNECTION CAUTION Before maki...

Page 4: ...3 200 F 93 C 4 250 F 121 C 5 300 F 148 C 6 350 F 176 C 7 400 F 204 C 8 450 F 232 C 9 500 F 260 C 10 550 F 287 C PROGRAMMING THE TIMER The timer may be factory pre set If changes are required follow these steps 1 Press and hold the PGM button located on the left side of the display 2 Press and hold one of the buttons 1 through 4 that needs to be programmed After approximately 1 second the display w...

Page 5: ...tton 1 through 4 used to start the countdown NOTE If one wants to end a countdown the same button 1 through 4 can be pressed at any time in the countdown cycle The display will return to the programmed time for that button 7 Raise the lid to the open position and remove the product s 8 For best performance keep the lid closed when products are not being cooked OPERATING HINTS AND SAFETY Disconnect...

Page 6: ...ildupoccurs useacarbonremovalagentaccordingtotheinstructionsprovided with the cleaner When this process is complete you must re season the grill according to your company corporate guidelines or the seasoning instructions in this manual CAUTION DO NOT IMMERSE OR LET THE UNIT STAND IN WATER DO NOT HOSE DOWN THE UNIT OR THE TABLE COUNTER ON WHICH THE UNIT IS LOCATED KEEP AWAY FROM RUNNING WATER CAUT...

Page 7: ...rrect position 4 Check that the thermostat is set to the proper temperature B The top platen is not heating 1 Check that the switch is in the correct position C The counter balance roller is not rolling 1 Clean the rollers If the unit still does not operate contact the factory one of its authorized representatives or a local service company for service or required maintenance ...

Page 8: ...ve cleaners This warranty does not apply to the non stick properties of such materials This warranty is not valid on Conveyor Ovens unless a start up check out has been performed by a Factory Authorized Technician In order to make a claim under this warranty a warranty report must be filed with Star Manufacturing International Inc in St Louis Missouri U S A by the dealer distibutor through which pr...

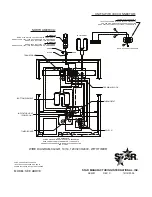
Page 9: ...TRANSFORMER TERMINAL BLOCK FOR REFERENCE WIRING DIAGRAM IS SHOWN AS UNIT IS ASSEMBLED WITH THE BOTTOM PLATE REMOVED ITEMS ARE IN GENERAL LOCATION BUT MAY BE RELOCATED OR SCALED FOR CLARITY 8 8 1 1 11 12 12 11 5 2 5 2 4 4 10 10 9 9 13 3 3 7 6 7 INDICATOR LIGHT POWER ON TIMER BOARD SWITCH THERMOSTAT BOTTOM ELEMENT 20 19 18 G UNITS WITH IEC CONNECTOR POWER INLET CONNECTOR IEC 320 C 20 POWER INLET ON ...

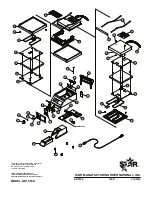
Page 10: ...TOCA R CALI ENTE PR EC AU CIO N Maint engas e lejos de ma ng ue ra No roc ia con o dejar que la base este estan cada sobre agua Favo rde no sume rgir Do not hose down Do not imme rse or let CA UT IO N base stand in wate r 11 13 10 9 12 1 43 5 40 7 2 4 8 18 19 39 20 21 22 44 23 24 25 26 37 49 33 27 27 29 30 31 3 6 17 52 51 46 45 50 47 48 NAMEPLATE 55 54 53 STAR MANUFACTURING INTERNATIONAL INC CERTA...

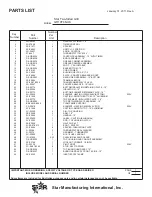
Page 11: ...0V 6VA 21 2R Z2907 1 COUNTER BALANCE 10 IRON 22 D9 Z2774 1 BOTTOM INSULATION RETAINING PLATE 10 23 D9 Z2908 1 INSULATION 10 24 D9 Z2773 1 BOTTOM ELEMENT RETAINING PLATE 10 25 2N Z2020 1 ELEMENT HEATING 1000W 240V BOTTOM 230V 26 2F Z1929 1 CASTING SMOOTH BOTTOM 10 ALUMINUM 27 D9 Z2772 1 TOP ELEMENT INSULATED PLATE 10 28 D9 GR0084 1 TOP RETAINING PLATE ASSEMBLY 10 29 B9 04 WB 0046 1 CLAMP WIRE SUPPO...

Page 12: ...STAR INTERNATIONAL HOLDINGS INC COMPANY Star Holman Lang Wells Bloomfield Toastmaster 10 Sunnen Drive St Louis MO 63143 U S A 314 781 2777 www star mfg com ...

Reviews: