


72
Chapter
3
Overview
•
Ver Image Shift
•
Hor Image Shift
•
Orientation
3.
When the desired submenu displays, press the
+
or - key to scroll
through the values or options.
4.
Press the
↵
key to select a value. An asterisk (*) displays next to the
selected value or option.
5.
If there are more submenu values or options you want to change, use the
,↑, ↓, +,
and
−
keys to access the value and the
↵
key to select it. At
any time, you may press the
key to return to the main menu.
6.
At any time, you may press the PAUSE key twice to exit the configuration
menu and place the printer online. Once you have finished selecting all
your options, save your configuration.
IMPORTANT
If you do not save your configuration, all your new values will be lost
when you power off the printer.
Saving A Configuration
You can save up to eight different configurations to meet eight unique print job
requirements.
The configurations are saved and stored in the printer and are not lost when
the printer is turned off.
NOTE: If the Protect Configs. option is enabled, the new configuration will not
be saved until the existing configuration is deleted.
Follow these steps to save a new configuration:
1.
Press the
key until the following message displays:
2.
Press the
↓
key until the following message displays:
3.
Press the
-
or
+
key to cycle through the options (1-8). Note that the
factory default configuration is not listed.
4.
When the desired number displays, press the
↵
key to select it. The
following message displays briefly:
..
.
..
.
..
.
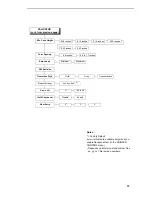
MENU MODE
CONFIG. CONTROL
Save Config.
1*
Saving
Configuration
Summary of Contents for T5000 Series
Page 1: ...R User s Manual T5000 Thermal Printer ...
Page 2: ......
Page 10: ......
Page 16: ...Table of Contents ...
Page 76: ...76 Chapter 3 Overview Figure 3 Sample Configuration Printout ...
Page 77: ...77 Sample Configuration Printout cont ...
Page 268: ...268 Chapter 5 Solving Other Printer Problems ...
Page 288: ...288 Appendix D Removing The Media Cutter ...
Page 292: ...292 Appendix E Installing The Media Cutter Tray ...
Page 298: ...298 Appendix F ...
Page 311: ......


