background image

Creating Discs

23

Queue Project

. To queue another project to run after the 

current one is finished simply setup the project as you 

normally would.  When you get to the third step of the project

setup wizard, if a project is currently running, a Queue

button will appear instead of a Go button.  Click it to

queue the job.

B.5 

Backup Project

 (PC Disc Publishers Only)

To create a new backup project you must setup a data project

and then schedule it.  Follow these steps:
1. Choose Data Project from the project starter window.  
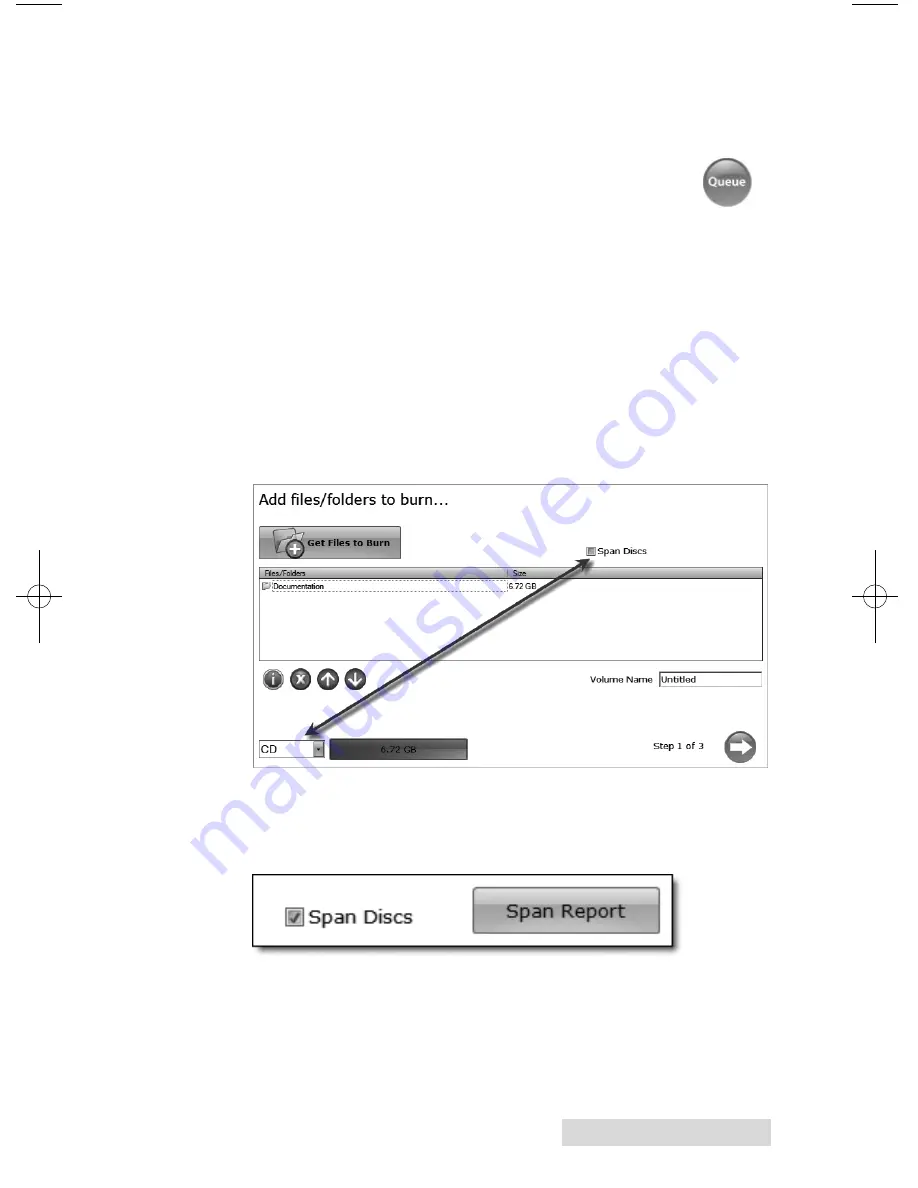
2. Add the files or folders that you would like to backup.

Typically there will be more data to backup than will fit on

any one CD, DVD etc.  If that happens you will receive a

warning message and the data bar at the bottom of the

screen will turn red.  

To resolve this issue you may choose to span the data over

several CDs or DVDs or change the media to a different

type with more data capacity. 

If you choose to check the span disc box you do not need

to change media type.  A Span Report button will appear

which will tell you how the data will be distributed over

the chosen media type.

XRP.qxd  4/18/2011  2:55 PM  Page 23

Summary of Contents for Bravo 4102 XRP

Page 1: ...041811 511291 USER S MANUAL For Macintosh and PC 2011 All rights reserved For the most recent version of this manual please visit http www primera com manuals html...

Page 2: ...l not occur in a particular installation If this equipment does cause harmful interference to radio or television reception which can be determined by turning the equipment off and on the user is enco...

Page 3: ...B5 Backup Project PC Disc Publisher Only 23 B6 Rip Audio PC Disc Publisher Only 26 B7 PTProtect PC Disc Publisher Only 27 B8 Project Sets PC Disc Publisher Only 28 C Creating a Print Label Using SureT...

Page 4: ...th the icon and the document will jump to that p age If you want to return to the Table of Contents move the icon to the top of the page and click on the arrow marked T OC Navigating through the Index...

Page 5: ...guide to quickly and easily create discs with your new Optical Disc Publisher A separate Help file is provided with your Publisher that explains the operation of the PTPublisher Software Click the ico...

Page 6: ...computer USB for printing AND eSata for the drives Both eSATA and USB are required The eSATA PCI express card included with the unit may need to be installed if you do not already have eSATA ports on...

Page 7: ...her Gray Plastic Input and Output Bins Power Cord Cyan Magenta Yellow and Black Ink Cartridges Replaceable Print Head QuickStart Installer Disc USB 2 0 Interface Cable Beige eSATA cable s Blu ray only...

Page 8: ...to the Output Bin The CD DVD Recorder is automatically loaded and unloaded by the Publisher s Robotic Disc Transporter The Recorder Tray Button manually opens or closes the Recorder Tray In normal op...

Page 9: ...The bins will hold up to 50 discs The right side bin is the Input Bin for blank media the left side bin is the Output Bin for finished discs The Reject Area is where discs are dropped if they do not...

Page 10: ...rformance If your PC does not have at least these minimum system requirements system performance may not be acceptable MAC Intel CPU running OS X version 10 6 or higher 512 MB RAM Free hard drive spac...

Page 11: ...ized by Primera Refer to the following steps when loading discs into the Publisher Open the front cover of the Publisher The Publisher will automatically position the cartridge carrier and Robotic Dis...

Page 12: ...change or ignore 0 If any cartridge reaches 0 during a job you will be prompted to change that cartridge At this point you can change or ignore Under normal circumstances this will be your first warni...

Page 13: ...p slightly 3 Remove the cartridge 4 Locate a new cartridge and remove it from its packaging Remove the foil outer package and the clear plastic shrink wrap Also remove the cartridge cap Note If you op...

Page 14: ...as input doubling your disc capacity from 50 discs to 100 discs In this mode the finished discs will be deposited through the front reject area of the Publisher In Kiosk mode all discs would be ejecte...

Page 15: ...1 Add Data 2 Add a Print File 3 Set the number of copies and adjust options Summary The instructions below explain how to do the most common project A Copy Project A Copy Project can be used to copy a...

Page 16: ...lect a label button When you have selected print label file click the next arrow There are several ways to select a print file See the explainations below for more information For any job type you cho...

Page 17: ...ings are dependent upon the specific discs you are using Each disc media brand or type has a different sized non printable outer margin or inner diameter It also has a different printable surface For...

Page 18: ...i cally be selected for you Click the Go button to start the job B USING PTPUBLISHER PTPublisher allows you to record and print CDs DVDs and BDRs Blu ray using a variety of project types described bel...

Page 19: ...rocedure is not for copying already created and mastered original audio CDs If you have already created a master audio CD in another application or this application and you would like to make addition...

Page 20: ...e or create an image and then use it in the project The master disc is read from the specified drive to the hard drive of your computer The master is stored in the Global Image format gi in a user spe...

Page 21: ...the disc 3 Once the print file is selected a preview will be displayed 4 At this point you may choose to move on to the next step by clicking the next arrow However there are print quality and print a...

Page 22: ...part You may also add your own image add text and any other design features 3 Save your label by going to the File menu Save as 4 Close SureThing or Disc Cover 5 You will be asked if you would like to...

Page 23: ...ettings such as burn speed and number of copies Note A saved project file does not include the data to be burned or the print file to be printed If these files are moved or deleted the project file wi...

Page 24: ...er file system to the disc UDF 1 02 with a Joliet bridge is the default Most of the differences between file system types relate to file name length and character restrictions and folder level depth I...

Page 25: ...inished media will be placed in Kiosk bin Kiosk Mode still requires the same type of media in both the right and left bins See Section 1H for instructions on setting up the Kiosk bin Bin Selection Ena...

Page 26: ...displays Drive Status Printer Robot Arm Status and Project Status Drive Status shows the current status of the drive during a job The recording progress is displayed on the progress bar along with th...

Page 27: ...these steps 1 Choose Data Project from the project starter window 2 Add the files or folders that you would like to backup Typically there will be more data to backup than will fit on any one CD DVD e...

Page 28: ...the media type only changes the media that the software expects It is up to the user to make sure the selected media is in the correct bin 3 Once you have selected the data click the next arrow to ad...

Page 29: ...into a backup project You will be prompted to save your project Do not move projects once you have saved them Always choose only one copy even if your project will be spanned across multiple discs On...

Page 30: ...rom the sub menu Here you can view all scheduled projects edit the project or change the frequency or time of the automatic backup Note All backup runs are full backups PTPublisher does not do increme...

Page 31: ...rotect a DVD that is stored on your hard drive as VIDEO_TS and AUDIO_TS folders Instructions for each of the two methods are found in the instructions with the PTProtect dongle or in the PTPublisher s...

Page 32: ...rojects to a project set and start them both with a single Go command Or if you package six discs together as a set you can create a project for each volume add them all to a set and click Go to start...

Page 33: ...ng the arrow icons or the delete icon 8 Run the project set multiple times by using the toggle at the the bottom of the window 9 Click Go to start the project set Note 1 Open the project to adjust the...

Page 34: ...se the 120mm DiscTemplate from the window that appears 2 Open the background panel by clicking the arrow on the background button Add your own background to the label by choosing Select Backgound 3A B...

Page 35: ...ics or symbols to the label These graphics will appear on top of the background image You can size them appro priately by dragging the corner of the selected graphic 6 When you have completed the desi...

Page 36: ...top tool bar On the image above the Gallery button is the highlighted center color wheel button on the left side of the top tool bar 3 Choose Backgrounds from the drop down box Click the design that y...

Page 37: ...ll categories Selection Resize or move text images or shapes with this tool Text Create a standard text box Circular Text Create circular text that follows the contour of the outside or inside of your...

Page 38: ...Fill and Shadow Add shadow change thickness or color of geometric objects Image Add transparency or a gradient to images clipart or backgrounds Text Change line spacing character spacing fonts size or...

Page 39: ...er Settings area on this screen E1 Quality Cartridge and Print Area Print Quality This setting affects the quality and speed of the print Ink con sumption is only slightly increased as you increase th...

Page 40: ...ration of the printed image When printing onto the printer manufacturer s TuffCoat media this option can be left at its default setting of 100 When printing onto other brands of printable media you ma...

Page 41: ...reddish tint Best for Photos mode is best used for photographic images where accurate color reproduction is very essential Images printed in this mode will look lighter than those printed in Photo mo...

Page 42: ...ing one disc of any design the Cost Estimator can be used to estimate the cost per discs Ink cost is automatically and continuously calculated based on the black and color cartridge costs entered Only...

Page 43: ...ge maintenance is divided into a larger number of labels Calibrate the Disc Publisher Several advanced calibrations can be performed with this utility Under normal circumstances you would have no reas...

Page 44: ...nted on a CD To do this refer to the following steps 1 Click Center Print Image in the Printer Settings Window 2 Click Start Auto Calibration to begin printing the calibration test print 3 When the pr...

Page 45: ...that make up the print head Clicking the Clean Print Head button will cause the Publisher to pick a disc and place in into the printer tray The Publisher will then print a simple pattern that will fl...

Page 46: ...nside the Publisher To accurately interpret what it means when these lights are on off or flashing please refer to the following Ink Cartridge Power LED LED Publisher off on solid Is ready to receive...

Page 47: ...these settings on a PC go to the Tools Menu Options To access these settings on a Mac go the the PTPublisher Menu Preferences C TRANSPORTING THE PUBLISHER To prevent damage to the Publisher s robotic...

Page 48: ...tting an object such as a folded piece of paper in the slot where the lock would normally be located With the Publisher turned on press the Cartridge Button While holding the Cartridge Button press th...

Page 49: ...ng to manually clean the print head Manually clean the print head as a last resort The nozzles on a print head are extremely delicate manually cleaning can actually cause damage to a print head Manual...

Page 50: ...missing from a print or if some of the print nozzles are still clogged after repeated manual cleanings as described in Section 3D Follow this procedure 1 Open the Cover Press the Ink Cartridge Button...

Page 51: ...print head Before placing the new print head in the carriage clean the copper contacts on the car riage and the print head with the alcohol wipes included with the new print head 5 Close the latch unt...

Page 52: ...oblem If you still have difficulty contact the technical support via one of the methods listed below Source Location Primera Knowledge Base www primera com kb PTPublisher Software Help files Open the...

Page 53: ...or more free hard drive space available USB 2 0 port Minimum MAC System Intel CPU running OS X version 10 6 or higher 512 MB RAM Free hard drive space of at least 10 GB Disc Capacity 50 disc input 50...

Page 54: ...19 Closed Disc 20 Copy Project 11 14 Cost Estimator 38 Data Project 15 Disc Cover 11 31 File System 20 Gallery 33 Identifying the Parts 4 Image Project 16 Inner Diameter 13 18 37 Input Bin 5 Internal...

Page 55: ...udio 26 Robot Options 10 21 Saturation 36 Save Project 19 Schedule Project 19 Set Time and Date to Mastering Time 21 Span Discs 24 Specifications 49 System Requirements 6 Technical Support 48 Test Rec...

Page 56: ...Printed in the United States of America P N 511291...

Reviews: