background image

44

Using PTBurn Client to Submit a Job

1.

From the PTBurn Client Job Type Window (available by clicking
New Job or launching the PTBurn Client) click 

Print Job.

2. 

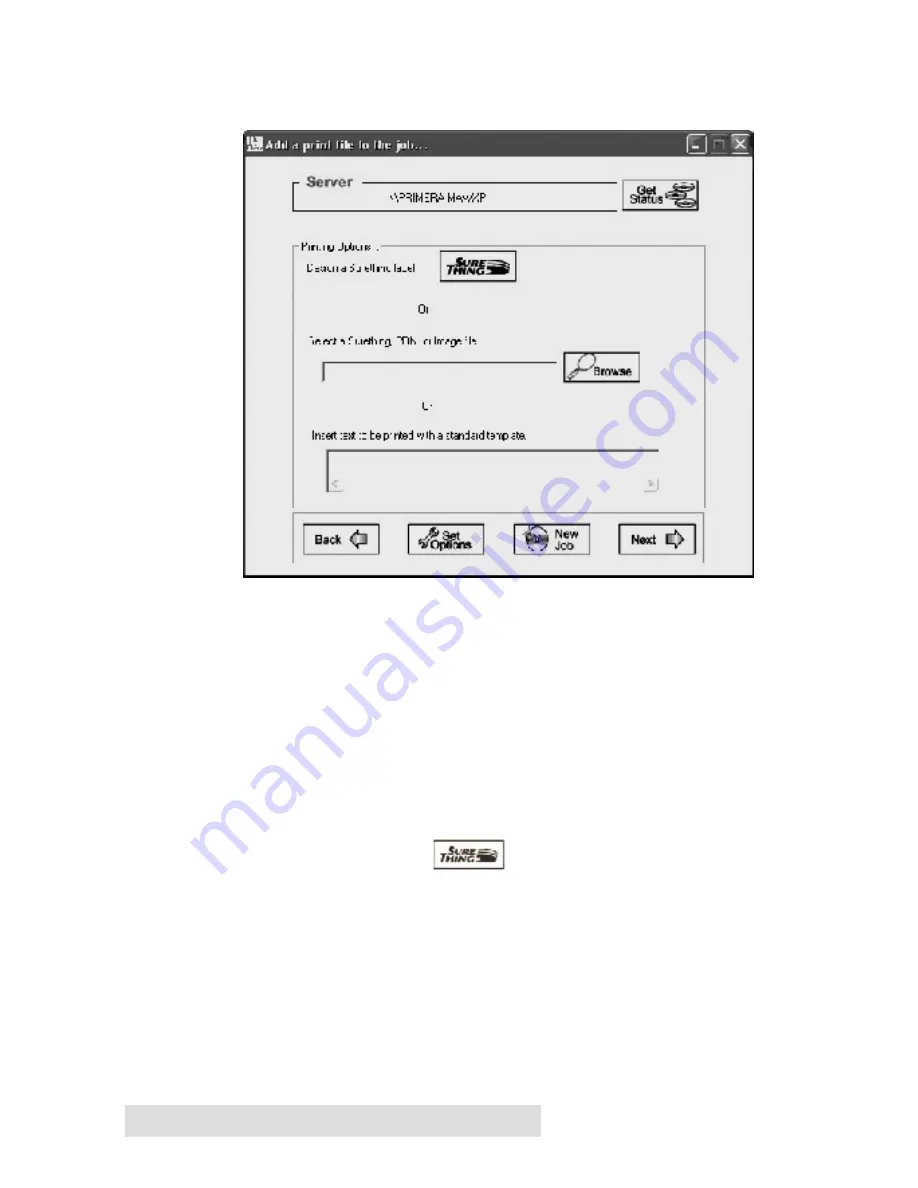
This will launch the Print File Window and ask you to select the
image you wish to print on your discs.

Print File Window

The 

Print File

Window contains three options for printing:

·

Design a SureThing Label

·

Browse for save SureThing Files, BMPs, or JPGs

·

Insert Custom Text into a standard template

Click the 

SureThing

button               if you would like to 

create a new disc design in SureThing CD Labeler.  See 
Section 6: Using SureThing CD Labeler for more information on this
software. 

NOTE

:  If the PTBurn Client is installed on the same PC as the PTBurn

Server make certain that SureThing is closed before submitting jobs.
If SureThing is open when a PTBurn Server attempts to print, the
job will fail.

Summary of Contents for 510869

Page 1: ...PTBurn Network Software User s Manual 2003 All rights reserved...

Page 2: ...tial damages in connection with the furnishing performance or use of this material This document contains proprietary information that is protected by copyright All rights are reserved No part of this...

Page 3: ...plication Window 8 B PTBurn Server Settings 10 B 1 Robotics Settings 11 B 2 Administration Settings 14 B 3 Job Handling Settings 18 Section 4 Installation and Setup of the PTBurn Client Software 21 A...

Page 4: ...Disc Design 53 B Using Merge Fields 58 Section 7 Troubleshooting and Technical Support 59 A Problems and Solutions 61 B Reinstalling PTBurn Server 64 C Reinstalling PTBurn Client 64 D Technical Suppo...

Page 5: ...und the network The PTBurn Server Software will constantly monitor the PTBurnJobs Shared Folder for job requests and then queue submitted jobs for processing The PTBurn Server is able to prioritize jo...

Page 6: ...s simply as using an office printer or copier B NOTE ON TERMS AND CONVENTIONS From this point forward the following terms and conventions will apply The Disc Publisher will be abbreviated simply as th...

Page 7: ...duction 3 D SYSTEM REQUIREMENTS PTBURN CLIENT 750 MHz Pentium III IV CPU or better Windows 2000 or XP Professional 512 MB SDRAM Free hard drive space of at least 10 GB or better 10 100 Ethernet Connec...

Page 8: ...N SERVER As mentioned above PTBurn Server is the server application and must be installed on the PC to which the Publisher is connected Make certain this PC is networked and accessible to all who will...

Page 9: ...w be guided through the installation of the SureThing CD Labeler Software Once complete close the SureThing Installer and return the PTBurn Master Installer You will now be prompted to reboot your sys...

Page 10: ...will be temporarily copied while jobs are queued for processing Once a job has finished these files will be deleted Keeping that in mind you will want to make sure you are creating this folder on a d...

Page 11: ...urnJobs Shared folder The folder must be shared with full access to all users and must contain subdirectories named Log and Status After clicking OK you will see the following alert the first time PTB...

Page 12: ...by clicking Start Programs PTBurn Server If you see an Available Client Alert click OK to open the software You will see the Server Main Application Window This window is where the current status of t...

Page 13: ...ave been submitted to the Server The widow also displays the number of discs requested with the job priority set in the client and the Client who submitted the job to the server Press the Open Log but...

Page 14: ...le the disc jobs that have been submitted by clients Note that this window will not be available while the server is completing queued jobs Once the server is idle the Settings window will be availabl...

Page 15: ...isher creates discs In this window you will have the following options Enable Kiosk Mode will allow your server to operate in Kiosk Mode Kiosk Mode allows the Disc Publisher to use both 25 disc bins a...

Page 16: ...is a good idea after a clean install to make certain the Server is communicating properly with the Disc Publisher In the Options Services window you will see an option for the USB Port currently used...

Page 17: ...er of discs and clicking the Start Test button This will cause the Disc Publisher to load discs one at a time from the input bin into the recorder then to the printer and finally to the output Click E...

Page 18: ...r Utility works is available clients will be automatically added to the Clients In Use list on a first come first serve basis until the number of available clients has been used As mentioned in the In...

Page 19: ...imera Technology Supply Sales Representative click the Enter New License Key button and enter the key in the area provided Click Submit when finished Once you have unlocked the users you can administe...

Page 20: ...ected from the Available Client Window and added by clicking the Add button Click the Setup Admin Notifications button to access the user list for your network and select the workstation that you woul...

Page 21: ...pies in a job request When the server processes the job 4 discs are successful and 1 fails If this option is disabled the job will be completed as is with 4 good discs and 1 failure If this is enabled...

Page 22: ...he Server aborts the job and goes to the next request in the queue Once you have these values set click Save Values You will then need to close and restart the PTBurn Server to have these changes take...

Page 23: ...licked OK the selected folder will automatically be made The Server Software will automatically force this folder to be shared with full access rights to everyone on the network The Server will also c...

Page 24: ...20 Setting up the PTBurn Server ection 4 Installation and Setup of...

Page 25: ...alled as follows 1 Close down all other software applications 2 Insert the included CD into your computer s CD ROM drive 3 After a moment the installer should automatically launch If not right click t...

Page 26: ...and Setup of the PTBurn Client Software Once the Client has installed you will see this window Click Close to go back to the installer 5 The Client has installed now you will be asked to install the p...

Page 27: ...6 Once SureThing has fully installed you may be asked to reboot your computer the installer will ask you to click Finish Your PTBurn Client has been successfully installed Before you can start using...

Page 28: ...ime the Client has been launched it will try to find the server You will see the following dialog Depending on your network and the workstations availability this may take as long as 5 minutes Do not...

Page 29: ...ugh sending each type of job available through the PTBurn Client Software A JOB TYPE WINDOW When launching PTBurn Client or clicking the New Job button you will see PTBurn Client s Job Type Window Job...

Page 30: ...hing or submit a JPG or BMP file created in any application for printing The Print Job is used when the client only wishes to print on discs without recording any information Open Job All the other jo...

Page 31: ...es or folders As you add files and folders you will see the size of the resulting disc at the bottom of the Data Job Window Files and folders can also be removed from this window by right clicking in...

Page 32: ...a Job files you wish to burn to this disc select Next 4 You will now be asked to add a print file to your job Print File Window The Print File Window contains three options for printing Design a SureT...

Page 33: ...the PTBurn Client is installed on the same PC as the PTBurn Server make certain that SureThing is closed before submitting jobs If SureThing is open when a PTBurn Server attempts to print the job will...

Page 34: ...re not perfectly accurate you will end up with an egg shaped or misshapen print area on the disc If you flood the entire area of the disc with color you will have a perfectly formed print area on the...

Page 35: ...ce you have selected your Print File click Next This will bring up the Burn Window In the Burn window name your Job or use the default job name generated by the Client You can also select the Priority...

Page 36: ...b that allows the user to select one or more audio files MP3 WMA or WAV and create a CD Audio disc that will play in any ordinary CD Player The Audio Job is created as follows 1 From the PTBurn Client...

Page 37: ...a Job 33 pasted into this area or added by right clicking in the file area and selecting Add Files After the files are added to the File Selection Window you can rearrange the order of tracks by selec...

Page 38: ...ve Track Up or Move Track Down buttons 3 Once you are satisfied with the contents of your Audio Disc press Next You will now be asked to add a print file to your job Print File Window The Print File W...

Page 39: ...SureThing CD Labeler for more information on this software NOTE If the PTBurn Client is installed on the same PC as the PTBurn Server make certain that SureThing is closed before submitting jobs If S...

Page 40: ...areas on the disc The PTBurn Server will crop the image to the shape of a disc for you If you try to crop out areas for the outer and inner diameter of the disc and you are not perfectly accurate you...

Page 41: ...u do not want to use a SureThing Design or Image file but only wish to print a simple line of text on the disc enter the text in the Custom Text Window There is a standard template that PTBurn Server...

Page 42: ...lick Burn Your job will be submitted You can monitor the status of jobs in the Get Status Window described later in this section D CREATING AN IMAGE JOB Image Jobs are jobs created using a disc image...

Page 43: ...Submit a Job 39 New Job or launching the PTBurn Client click Image Job This will launch the File Selection Window Click Browse to select your ISO or GI disc image file Once you have selected the Disc...

Page 44: ...the SureThing button if you would like to create a new disc design in SureThing CD Labeler See Section 6 Using SureThing CD Labeler for more information on this software NOTE If the PTBurn Client is...

Page 45: ...hite or non printed areas on the disc The PTBurn Server will crop the image to the shape of a disc for you If you try to crop out areas for the outer and inner diameter of the disc and you are not per...

Page 46: ...wish to print a simple line of text on the disc enter the text in the Custom Text Window There is a standard template that PTBurn Server will use for your image and will insert the custom text in to t...

Page 47: ...indow when starting a new job Click Burn Your job will be submitted You can monitor the status of jobs in the Get Status Window described later in this section E CREATING A PRINT ONLY JOB The Print On...

Page 48: ...ons for printing Design a SureThing Label Browse for save SureThing Files BMPs or JPGs Insert Custom Text into a standard template Click the SureThing button if you would like to create a new disc des...

Page 49: ...the disc area If it is not symmetrical it will center it on the disc proportionately so you may see some white or non printed areas on the disc The PTBurn Server will crop the image to the shape of a...

Page 50: ...at 300 dpi as a JPG or BMP If you do not want to use a SureThing Design or Image file but only wish to print a simple line of text on the disc enter the text in the Custom Text Window There is a stand...

Page 51: ...click the Save button to save this job as a PJB file Saved jobs can be reopened in the PTBurn Job Type Window the first window when starting a new job Click Print Your job will be submitted You can mo...

Page 52: ...click of a button one can see how many jobs are in queue how many discs have been completed what stage the current job is in and whether or not the Server is online and producing discs Click the Get...

Page 53: ...this button you will see the following message It can take as long as 5 minutes to scan your network depending on the status of workstation and speed of computers on the network It is important to let...

Page 54: ...e selected job is currently in the printing stage We can also see when it was submitted when it was started the completion time when it is finished and the jobs currently ahead of it in queue You will...

Page 55: ...design This powerful feature allows users to automate the unique labeling of discs Serial numbers dates text fields and even images can be merged into standard SureThing Designs making each disc label...

Page 56: ...rded data If this checkbox is not checked the PTBurn Server would be allowed to burn multiple sessions on discs Verify Disc tells PTBurn Server to check the disc bit for bit to make certain an accurat...

Page 57: ...e in SureThing s Online Help by pressing F1 on your keyboard or clicking Help then Contents in the SureThing Main Application Window A CREATING A DISC DESIGN To create a quick easy design in SureThing...

Page 58: ...sign then click Next If you do not want to use any of the included backgrounds and want to import your own simply click Cancel to return to the Wizard then click Next 5 You will now be prompted to sel...

Page 59: ...Smart Design as shown here simply double click on text to change areas If you would like to insert a graphic or photo click the Photos Clipart tool on the left side of the screen Select Use Picture T...

Page 60: ...the image box and reposition it by clicking and dragging If you would like to remove the border around the imported image double click on the graphic to open the Picture Property box and select the C...

Page 61: ...h your design save it and close SureThing This Print File is ready to be used with your PTBurn Client B USING MERGE FIELDS SureThing s Merge Field features allow you to create a print file containing...

Page 62: ...and DOS PC8 dBASE files For this example we are using a simple CSV comma separated file created in Excel In SureThing click Insert then select Set Merge File Select your file and click Set Once you h...

Page 63: ...d dragging on the handles of the field to make sure it is large enough for the amount of text to be displayed Once you are satisfied with the design save the SureThing File When you use this SureThing...

Page 64: ...Use Merge File with SureThing option see Section 5H Advanced Job Options The Print File Window will prompt you for the merge file you used with this template You will need to include the merge file wh...

Page 65: ...the server status is listed as OK If the Disc Publisher is out of discs or ink administrator attention may be required to get the Disc Publisher back on line Please refer to the Disc Publisher User Ma...

Page 66: ...ical Support Explorer Right click on the folder and select Properties Click the Sharing tab and look at the sharing properties Make sure the folder is shared and User Limit is set to Maximum Allowed C...

Page 67: ...administrator attention may be required to get the Disc Publisher back on line Please refer to the Disc Publisher User Manual for information on changing ink or adding discs If there is more than one...

Page 68: ...ete your Shared Job Folder When reinstalling the PTBurn Server we want to make sure it creates a new shared folder b Insert your PTBurn Network Software Disc and let the Installer Program launch This...

Page 69: ...instructions provided in Section 4 of this manual D TECHNICAL SUPPORT This manual and the Disc Publisher Users Manual should help in resolving most issues However if you still need assistance we are...

Page 70: ...16 Getting Status 26 Image File Job 26 37 38 Kiosk Mode 12 Log File 9 65 Merge Data 58 Open a Saved PTBurn Job 47 Print Files 31 35 37 38 42 46 57 58 60 Print Only Job 43 PTBurn Client Installing 19 P...

Page 71: ...Index 67 System Requirements Client 3 System Requirements Server 3 Verify 50...

Page 72: ...Printed in the United States of America P N 510869...

Reviews: