background image

Power Tote P-100 Lift System

www.pridemobility.com

     9

I I I .   I N S T A L L A T I O N

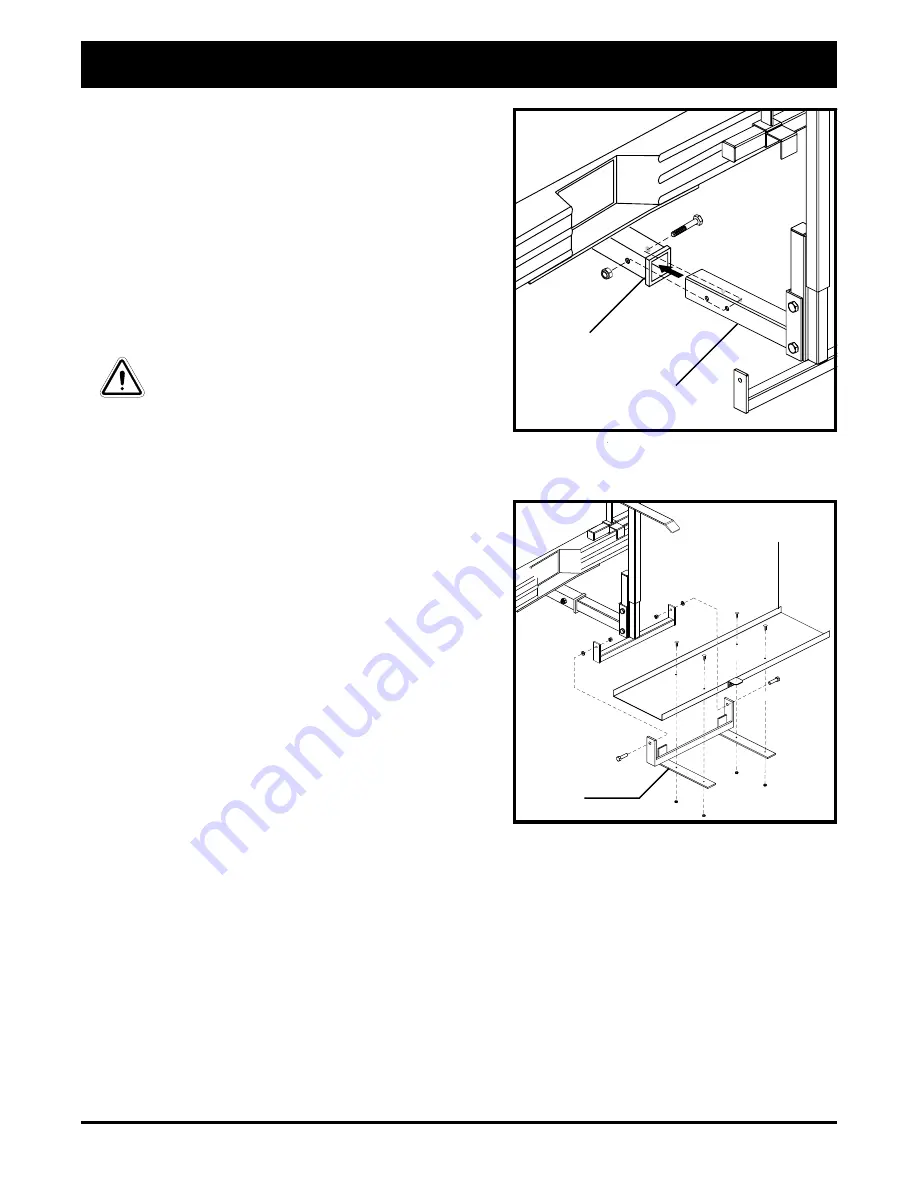
NOTE: Ensure the hitch bolt is tightened firmly before
securing the nut to the hitch assembly to minimize the
chance that the lift will tilt during transport.

5. Route the lift system wiring harness through the vehicle.

Refer to “Wiring Harness Installation.”

WARNING! Prevent product damage!

Route the wiring harness through the

vehicle rather than under the vehicle to

avoid coming in contact with sharp edges,

extreme temperatures, moving parts, and

roadway debris. Power shorts may occur

if wires come in contact with hot exhaust

parts or sharp edges.

WARNING! Never attach the wiring

harness to a secondary power source. Do

not attempt to use trailer wiring to power

the lift system. The wiring harness must

be connected directly to the vehicle

battery.

6. Position the lift platform over the lift H-frame, aligning the

mounting holes in each. See figure 4.

7. Secure the lift platform to the H-frame with the supplied

hardware. See figure 4.

Wiring Harness Installation

The wiring harness is approximately 25 ft. (7.62 meters) long
and will accommodate most vehicles.

NOTE: You may wish to perform a practice run before
installing the wiring harness. Route a piece of light
rope (equivalent to the gage of the wiring harness)
along the anticipated path observing contact points,
potential rubbing/chafing points, and any sharp edges.
Remove sharp edges with a fine grade file, then treat
the steel with a rust inhibitor or metal sealant.

Figure 3. Lift Frame Vehicle Mounting (Class 3 Hitch
Tube Shown)

Figure 4. Lift Platform Installation

LIFT PLATFORM

H-FRAME

HITCH TUBE

HITCH
RECEIVER

Summary of Contents for Power Tote P-100

Page 1: ...Power Tote P 100 Power Tote P 100 Power Tote P 100 Power Tote P 100 Power Tote P 100...

Page 2: ...order PROHIBITED These actions should be prohibited These actions should not be performed at any time or in any circumstances Performing a prohibited action can cause injury to personnel and or damage...

Page 3: ...P 100 Lift System www pridemobility com 3 C O N T E N T S I INTRODUCTION 4 II SAFETY 6 III INSTALLATION 8 IV OPERATION 11 V CARE AND MAINTENANCE 13 VI TROUBLESHOOTING 14 VII SPECIFICATIONS 15 VIII WA...

Page 4: ...oduct over the internet or from a previous owner and you have any questions about the safe use and or maintenance of the product please visit Pride s web site www pridemobility com or contact your aut...

Page 5: ...ccess to the most interactive educational venue available today for people with mobility needs their families and friends From our home page select Owners Club to enter a page dedicated to current and...

Page 6: ...completely Read and follow the information in the owner s manual Maximum lifting capacity Crush Hazard Pinch crush points created during assembly and operation Keep hands clear Lift system intended fo...

Page 7: ...g into the vehicle make absolutely certain through visual inspection that there are no obstructions in the path of the drill bit such as the fuel tank exhaust pipes or electrical wires LIFTING NON PRI...

Page 8: ...eittoattachthehitchbracket hitchtubetotheliftframe See figure 1 2 If your vehicle is equipped with a Class 1 hitch receiver slidethehitchbracketoverthehitchreceiver aligningthe mounting holes Secure t...

Page 9: ...use trailer wiring to power the lift system The wiring harness must be connected directly to the vehicle battery 6 PositiontheliftplatformovertheliftH frame aligningthe mountingholesineach Seefigure4...

Page 10: ...be existing holes Be certain that the harness is protected with a rubber grommet when passing it through the metal panels and into theenginecompartment 3 Insidetheenginecompartment securetheharnesstot...

Page 11: ...oles road bumps and railroad tracks Figure 6 Key Switch Operation Follow these steps to operate the PowerTote P 100 Lift 1 Insert the key into the key switch 2 Turn and hold the key clockwise to lower...

Page 12: ...orm during operation Make sure the lift does not rub against or interfere with the vehicle in any way If you notice any contact between the lift platform and the vehicle stop lift operation immediatel...

Page 13: ...orreplaceanyprob lempartsbeforeusingtheliftsystem T BARINNER TELESCOPING TUBE T BAR Figure 10 Lift Frame Maintenance General Cleaning Guidelines Theliftsystemcanbehandwashedalongwiththevehiclewithsoap...

Page 14: ...What if the lift system operates slowly up or down Makesurethevehiclebatteryisfullycharged Make sure all connections to the motor and battery are secure Check the wiring harness for signs of wear or d...

Page 15: ...www pridemobility com 15 V I I S P E C I F I C A T I O N S SPECIFICATIONS MaximumLiftCapacity 100 lbs 45 35 kg MaximumWheelchairWidth Folded 12 in 30 5 cm MaximumHitchtoGroundClearance 20 in 50 8 cm M...

Page 16: ...tyProductsProvidermustperformwarrantyservice DonotreturnfaultypartstoPride MobilityProductswithoutpriorwrittenauthorization Alltransportationcostsandshippingdamageincurredwhile submittingpartsforrepai...

Page 17: ...Power Tote P 100 Lift System www pridemobility com 17 N O T E S...

Page 18: ...18 www pridemobility com Power Tote P 100 Lift System N O T E S...

Page 19: ......

Reviews: