background image

13

PRESTIGIO P323MW / P373MW

ENG

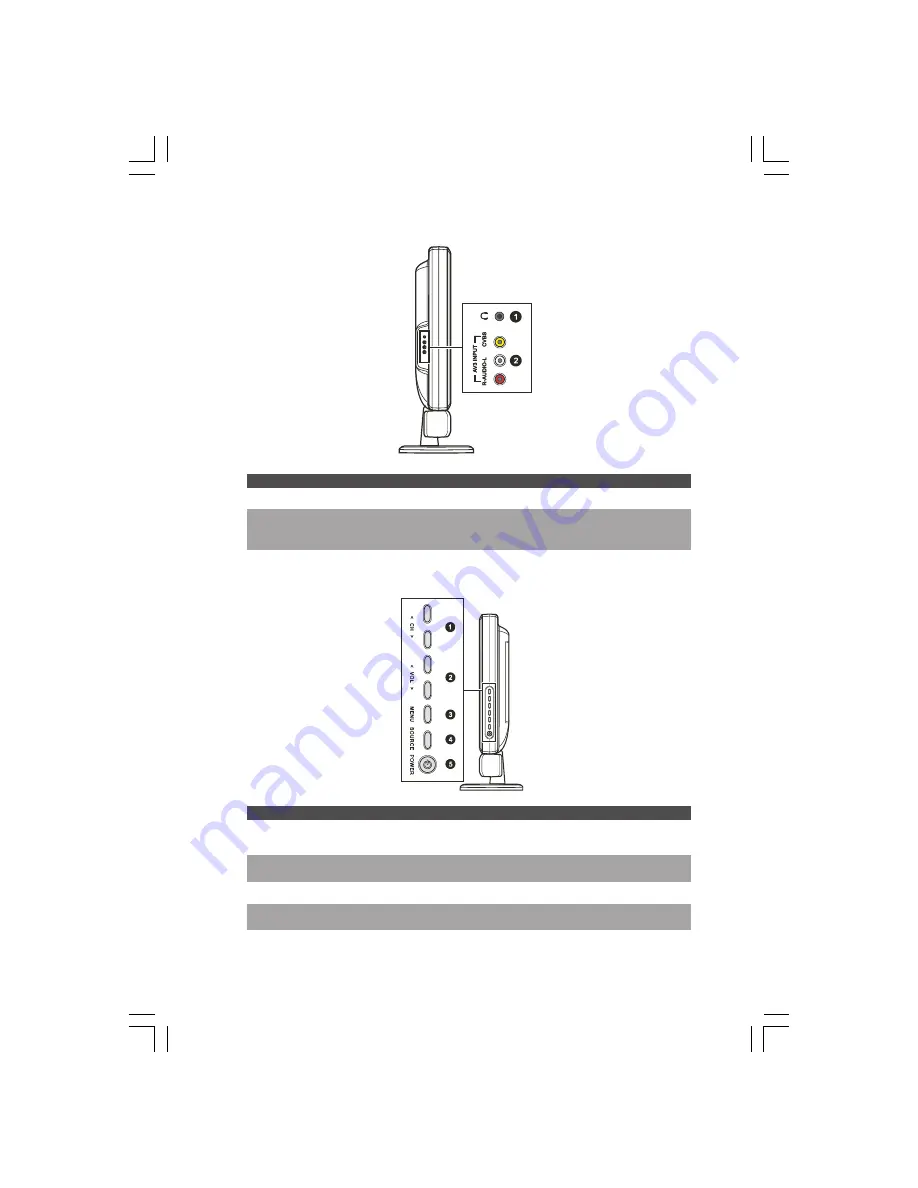
2.5 Right-Side Panel Inputs/Outputs

Ref

Component

Description

See Also

1

Headphone Connector

Connects to a set of headphone.

2

AV3 In Connectors

Connects to a variety of video equipment that supports

Chapter 4

composite connection such as DVD players, VCR’s and
game consoles.

2.6 Left-Side Panel Controls

Ref

Component

Description

See Also

1

CH \/

Goes to the next or previous channel.

Section 3.2

CH /\

OSD active: selects OSD items.

Chapter 6

2

VOL <

Decreases or increases the volume.

Section 3.2

VOL >

OSD active: adjusts OSD setting values.

Chapter 6

3

MENU Button

Opens or closes the OSD menu.

Chapter 6

4

SOURCE Button

Switches to another input source
(TV, AV1, AV2, AV3, SV1, SV2, SCART2 RGB, VGA, and YPbPr).

5

Power Button

Turns the TV ON and OFF (standby).

Section 1.4

Summary of Contents for P323MW

Page 1: ...P323MW P373MW ENG Prestigio P323MW P373MW User s Manual Trademarks Allbrandandproductnamesaretrademarksorregisteredtrademarksoftheirrespectivecompanies Note Theinformationinthismanualissubjecttochangewithoutnotice ...

Page 2: ...eaning the product Use a damp cloth to clean the product Do not use liquid cleaners or aerosol cleaners 3 Ventilation The vents and other openings in the cabinet are designed for ventilation Do not cover or block these vents and openingsasinsufficientventilationcancauseoverheatingand orshortenthelifeoftheproduct Donotplacetheproductonabed sofa rugorothersimilarsurface sincetheycanblockventilationo...

Page 3: ...atching TV 16 3 1 Before You Can Watch TV 16 Selecting Country 16 Scanning TV Channels UHF Antenna Only 17 3 2 Basic TV Controls 17 Selecting TV Channels 17 Adjusting Volume 17 Selecting Mono Stereo Mode 18 3 3 Basic TV Controls 18 Removing RearrangingChannels 18 RemovingChannels 18 RearrangingChannels 18 CHAPTER 4 Connecting External Devices 19 4 1 Understanding Video Connections 19 4 2 Connectin...

Page 4: ...theOnScreenDisplay OSD Chapter7 Troubleshooting givessolutionstocommonproblems AppendixA Specifications providesbriefspecificationsandregulatoryinformationfortheLCDTV 5 2 Using Hold 26 5 3 Using Twin Picture 26 Part 1 Activating PIP Mode 26 Part 2 Selecting the Input Source 27 Adjusting PIP Display and Sound Output 28 5 4 Using Parental Control 28 Setting up Parental Control 28 Viewing Blocked Pro...

Page 5: ...n in this manual Afterunpacking youshouldfindthesestandarditems 1 TV Set 2 PowerCord 3 RemoteControl 4 AAABattery x2 5 UserManual 1 2 Preparation Inserting the Batteries 1 PreparetwoAAAbatteries Itisrecommendedthatthebatteriesareofthesametypeandmanufacturer Twobatteries aresuppliedwithyourLCDTV 2 Removethebatterydoorbypressinginwardsonthebatterylatchandliftingitupandawayfromtheremotecontrol ...

Page 6: ...on the Wall Optional CAUTION Mounting an LCD TV requires the skills of a qualified technician Do not attempt to mount the TV by yourself The manufacturer bears no responsibility for improper installation resulting in accident or injury TheLCDTVcanbemountedontoavarietyofmountingfixtures purchasedseparately thatarecompliantwithVESA VideoElectronicsStandardsAssociation standards 200mmx100mm Beforemou...

Page 7: ... or an Antenna Analogue NOTE To receive an optimal signal it is recommended that you use a 75 ohm F type coaxial cable For proper reception of UHF channels an external antenna is required For reception of cable channels you have to subscribe to a cable TV company and use the cable supplied by your local cable company 1 PrepareanF typecoaxialcable 2 ConnectoneendofthecorrespondingcoaxialcabletotheT...

Page 8: ...ugging the connector always hold the plug head Never pull on the cord 1 4 Powering the TV On and Off NOTE Before using the LCD TV for the first time remember to remove the plastic film that protects the panel during transport Main Power Switch WhenusingtheLCDTVforthefirsttime makesurethatthemainpowerswitchlocatedontherearoftheLCDTVisset totheon I position ThepowerindicatoronfrontoftheLCDTVwillillu...

Page 9: ...n ToturntheTVon pressthePOWERbuttonlocatedontherightsidepaneloftheTVorthepowerbuttonontheremote control The power indicator on front of the LCDTV lights green to indicate that theTV is on ToturntheTVoff pressthePOWERbuttonlocatedontherightsidepaneloftheTVorthepowerbuttonontheremote control The power indicator on front of the LCDTV lights orange to indicate that theTV is in off standby mode ...

Page 10: ... coating and Hard Coating 3H TVsystemcompatibility PAL SECAM SAPsystem MTS OSD OnScreenDisplay adjustment PIP Picture In Picture function Teletextsupport VGA TV AV SCARTx2 Composite Componentinputsupport AV output support 2 2 Front Panel Indicators Ref Component Description See Also 1 Remote Sensor Receives signal input from the remote control 2 Power Indicator Green On Section 1 4 Orange Standby ...

Page 11: ... a variety of video equipment that supports Chapter 4 composite connection such as DVD players VCR s and game consoles 2 TV In Connector Connects to a UHF antenna or cable TV Chapter 1 3 Power Connector Connects to an A C outlet for powering the display Section 1 3 4 Main Power Switch Turns the main power on and off Section 1 4 ...

Page 12: ...audio out connector 3 Y Pb PrInConnectors Connects to video equipment such as DVD players and Chapter 4 digital set top boxes that utilize component video 4 SCART 1 Audio L R CVBS in out S video in Chapter 4 SCART 2 Audio L R CVBS in out RGB Connectors Connects to video andaudio equipment such as VCRs DVD players digital set top boxes and gaming systems that utilize SCART video ...

Page 13: ...nd game consoles 2 6 Left Side Panel Controls Ref Component Description See Also 1 CH Goes to the next or previous channel Section 3 2 CH OSD active selects OSD items Chapter 6 2 VOL Decreases or increases the volume Section 3 2 VOL OSD active adjusts OSD setting values Chapter 6 3 MENU Button Opens or closes the OSD menu Chapter 6 4 SOURCE Button Switches to another input source TV AV1 AV2 AV3 SV...

Page 14: ...nel MENU Opens the OSD menu or returns Chapter 6 to the previous menu LIST Shows the teletext page that is selected in the Favorite page menu OK Executes the selection in the OSD Chapter 6 PICTURE Enters the Picture sub menu Section 6 2 directly SOUND Enters the Sound sub menu Section 6 3 directly DISPLAY Shows the current state STEREO Toggles the audio mode Section 3 2 between Mono or Stereo FORM...

Page 15: ...6 Toggles between teletext only and both teletext and video SIZE Zooms in the teletext window Section 5 6 HOLD Freezes the teletext window Section 5 6 REVIEW Opens the hidden information in the teletext window Red Executes the red function in Section 5 6 button the teletext window Also functions as delete key in the program list Green Executes the green function in Section 5 6 button the teletext ...

Page 16: ... for the first time you need to specify the country you are located Once the country has been set itisnotnecessarytosetitagaininthefuture 1 PresstheMENUbuttontoopentheOSDmainmenu 2 PresstheP buttonthreetimesandpressOKtoopentheSystemmenu 3 Press the P button to select Country and pressV orV to select your country ...

Page 17: ...s the P or P button to select Frequency 2 PresstheV orV buttontoaddorminusthevalueoffrequency Thisvaluewillberetainedthenexttimeyoupower on your TV 3 2 Basic TV Controls Selecting TV Channels YoucanselectTVchannelsinthreeways Pressing P or P on the remote control PressingCH orCH ontherightpaneloftheTV Pressing the number buttons on the remote control Toselecta1 digitchannel pressthedigit Toselecta...

Page 18: ...umayfindthatthereisachannelthatyoudonotwanttoviewwhenscrollingthrough available channels using the P or P button You can remove channels using the following instructions 1 PresstheLISTbuttontodisplaytheprogramlist Tenchannelscanbedisplayedperpage Theleftcolumnshowsthe channelnumberwhiletherightcolumnshowstheprogramname 2 Press the P or P button to highlight the channel to be removed 3 Press the re...

Page 19: ...s the standard that connects almost all consumer video equipment TVs laser disc players VCRs camcorders and gaming consoles Composite video combines the three basic elements of a video picture colour brightness and synchronization data into a single combined composite signal Component Video Component video takes the advancement from composite 1 signal to S Video 2 signals a step further It carries...

Page 20: ... the other ends to the corresponding left and right audio connectors on the DVD player 6 TowatchaDVD turnonyourLCDTV presstheSOURCEbuttontoopentheSourceSelectmenu pressP toscrollthrough the source list and select Y Pb Pr as the input source Press OK to confirm Y Pb Pr as your selection 7 TurnontheDVDplayer NOTE For more information see the instructions supplied with your DVD player Using the Compo...

Page 21: ...RT Connection 1 PreparetheSCARTcable 2 ConnectoneendoftheSCARTcabletotheSCARTconnectorattheSCART1 SCART2locationsontheLCDTV Connect the other end to the corresponding SCART connector on the DVD player 3 TowatchaDVD turnonyourLCDTV presstheSOURCEbuttontoopentheMainSourcemenu press toscrollthrough the source list and select SV1 or SCART2 RGB as the input source Press ENTER to confirm SV1 or SCART2 R...

Page 22: ...positevideoconnector yellow ontheVCR camcorder gameconsole 3 Connect the R red and L white audio cable ends to the R Audio L connectors at the AV3 location on the LCDTV ConnecttheotherendstothecorrespondingleftandrightaudioconnectorsontheVCR camcorder gameconsole 4 Tousetheconnecteddevice turnonyourLCDTV presstheSOURCEbuttontoopentheSourceSelectmenu pressthe P buttontoscrollthroughthesourcelistand...

Page 23: ...sponding SCART connector of the VCR camcorder game console 3 Tousetheconnecteddevice turnonyourLCDTV presstheSOURCEbuttontoopentheSourceSelectmenu Press toscrollthroughthesourcelistandselectSV1orSCART2RGBastheinputsource PressENTERtoconfirmSV1orSCART2 RGBasyourselection 4 Turn on theVCR camcorder game console NOTE For more information see the instructions supplied with your VCR camcorder game cons...

Page 24: ...onnection 2 Connect the composite video cable with yellow colored connectors one end to the yellow AV output connector on the LCDTV and the other end to the corresponding connector on the other LCDTV or video recording device 3 ConnecttheR red andL white audiocables notsupplied oneendtotheLCDTVandtheotherendtotheother LCDTV or audio recording device 4 Turn on the other LCDTV or video audio recordi...

Page 25: ...ttoeliminatetheblackbarsandhave thevideoimagefillthescreenitisnecessarytochangetheaspectratiomode Original 4 3 shown in Wide screen Original 4 3 shown in Normal screen To change the aspect ratio you can use the remotecontrol or OSD Using the Remote Control PresstheFORMATbuttontotogglebetween4 3Expanded 16 9 4 3 orPanoramaaspectratios Using the OSD 1 PresstheMENUbuttontoopentheOSDmainmenu 2 PressOK...

Page 26: ...npresstheHOLDbuttonagain 5 3 Using Twin Picture Twin Picture allows you to simultaneously view two pictures from two different sources on the same screen PIP Picture In Picture displaysthesubpictureinasmallscreenontopofthemainscreen NOTE Only VGA or YPbPr signal source support PIP function Activation of twin picture occurs in two steps Part1 ActivatingPIPmode Part2 Selectingtheinputsourceforthemai...

Page 27: ...ctureisTVandthesubpictureisAV1 Tochange the input source 1 PresstheP buttontoselectPIPSource 2 To select the input source for the sub picture press theV orV button to select a source from the list Press OK to activateyourselection IfyouselectTVasthePIPsource pressP orP orinputthechannelnumbertochangechannels ThefollowingaretheallowablePIPsources TV AV1 AV2 AV3 SV1 SV2 SCART2RGB VGA YPbPr ...

Page 28: ... 4 Using Parental Control Parental Control allows you to block programs that you feel are inappropriate for your viewing audience such as programscontainingviolence adultlanguageandnudity Setting up Parental Control 1 PresstheMENUbuttontoopentheOSDmainmenu 2 PresstheP buttonthreetimesandpressOKtoopentheSystemmenu 3 IntheSystemmenuitem presstheP buttontoselectChildLock 4 PressOKtoentertheChildLocks...

Page 29: ...ar in the corner of the screen indicating the remaining time in minutes You can use the remote control or OSD to set up the timer Using the Remote Control Sleep Timer only Press the SLEEP button on your remote control to toggle between OFF 5 Min 10 Min 30 Min 60 Min 90 Min or 120 Mintimers NOTE The setting using your remote control will override your setting on the OSD s System menu Using the OSD ...

Page 30: ...yed on the lower portion of your screen 2 PressP PtoentertheFavouritemenusetpreviously seechapter6fordetails 3 Press P or P button to scroll through the page 4 Press CLOCK to input the number of the submenu on the last line of your screen Then press red button to subtract the value or green button to add the value 5 Pressthenumberkeystoselectthepageyouwanttoview Sincetherearenopagesunder100 ifyoup...

Page 31: ... MENU Opens or closes the OSD menu When a sub menu is active closes the current menu and goes back to the previous menu V V In the OSD main menu selects a sub menu icon In a sub menu adjusts the value or switches the setting to the next option P P Navigates to an item in a sub menu OK SOURCE In the OSD main menu opens the sub menu of the highlighted icon In a sub menu enters the selection NOTE Thr...

Page 32: ...gtabledescribesallofthe itemsinthismenu Item Description Operation Brightness Adjustthebackgroundbrightnesslevel V to brighten the screen V to darken the screen Contrast Adjust the black and white contrast level V to increase contrast level V to decrease contrast level Colour Temperature Toggle the colour temperature between Warm V or V to select and OK to Standard orCold activate your selection F...

Page 33: ...olume V to decrease volume Treble Adjust the treble V to increase high frequency sound V to decrease high frequency sound Bass Adjust the bass V to increase low frequency sound V to decrease low frequency sound Balance Adjust the left and right audio balance V to emphasize the right speaker V to emphasize the left speaker Loudness Enable the loudness function OK to activate the function A check ma...

Page 34: ...tivate your selection Name Set the name of the current program Channel Select the channel V or V to select and OK to activate your selection Frequency Fine tune the current frequency V or V to select and OK to activate your selection Pict System Select between PAL or SECAM V or V to select and OK to activate your selection Sound System Select between B G DK I or L V or V to select and OK to activa...

Page 35: ... Dutch Danish orCzech Country Toggle between the available 11 countries V or V to select and OK to activate your selection channelsignals Sys Sub Open the system submenu V or V to select and OK to activate your selection OSD Transparency Adjust the OSD s transparency level Standby Enter the Standby state after poweringon MAX Program Set the maximum program number Child Lock Open the parental contr...

Page 36: ...lose all your previous settings and scanned channels 6 6 Favourite Menu PresstheMenubuttontoopentheOSDmainmenu PresstheP buttonfourtimestoselectandpressOKtoopenthe Favouritemenu TheFavouritemenuallowsyoutopresetfavouritechannelsforquick one buttonaccess PresstheP orP buttontoselectaniteminthismenuandmakeyourchanges Thefollowingtabledescribesallofthe itemsinthismenu Item Description Operation Progr...

Page 37: ... s horizontal position V to move toward the right V to move toward the left The adjusted value will depend on the screen resolution V Position Adjust the OSD s vertical position V to move upward V to move downward The adjusted value will depend on the screen resolution Phase Adjust the A D sampling phase V or V to select and OK to activate your selection PIP OpenthePIPsubmenu V or V to select and ...

Page 38: ... connected to your computer make sure the computer is not in a suspend mode The colour is abnormal Make sure that the input source cable is connected securely and correctly to your LCDTV Adjustthesettingstofityourcolourpreferences Thepictureisnotclear Makesurethattheantennacableisproperlyconnected Ifusinganantenna makesuretherearenoobstructionsblockingthereception Ifyouuseanykindofamplifiertoboost...

Page 39: ...ge Speakers 15 W 15 W Detachable Earphone Yes MTS Stereo Yes Terminals AVInput Video SCARTx2 CompositeRCAx1 CVBS ComponentRCAx1 Y Pb Pr Audio L RRCAx2 AVOutput Video CompositeRCAx1 Audio L RRCAx1 Convenience OSD Language English French German Italian Polish Portuguese Span ish Finnish Dutch Danish andCzech PictureFeature PIP Screen Stand Yes Power Source 90 240 V AC 50 60 Hz PowerConsumption 220 W...

Page 40: ... cord x 1 Environment Operating Temperature 0 C to 35 C 32 F to 95 F OperatingHumidity 10 to 90 no condensation Storage Temperature 20 C to 60 C 4 F to 140 F StorageHumidity 10 to 90 no condensation Regulatory Compliance CE CB NOTE Because we continually strive to improve our products we may change specifications and designs without prior notice ...

Reviews: