background image

1

4

6

3

2

7

7

User Guide


Predia Go!II

14

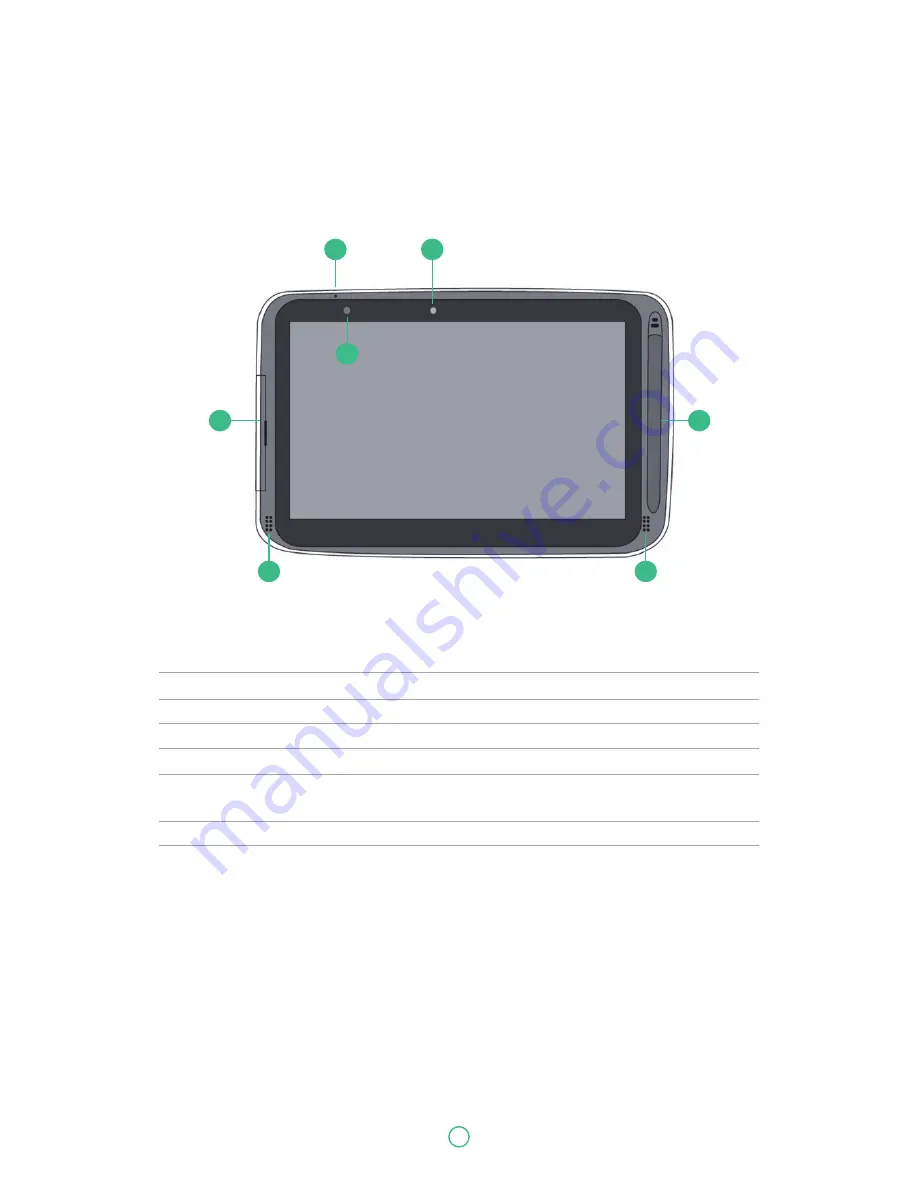
Tablet layout

This topic introduces the tablet hardware features and basic information you need to start using 
the tablet.

Front view

No. Name 

Function

Microphone 

Mainly for speech recognition and video communication.

Light sensor (optional) 

It detects the brightness of the environment.

Front facing camera 

Often for taking self-portraits as well as for video conferencing.

I/O cabinet 

See page 4 for details.

Touchscreen 

 It is a see-touch device: You look at it and also touch it with your 
fingers to control the tablet.

Digital pen slot 

This is where you can rest the touch pen.

Speaker 

 The sound system has two speakers for playing music, notification 
sounds, and other audio data.

Summary of Contents for Go! II

Page 1: ...www predia nl Predia Go II User Guide...

Page 2: ...nt will the manufacturer be liable for direct indirect special incidental or consequential damages arising out of the use or inability to use the product or documentation even if advised of the possib...

Page 3: ...fferent from that to which the receiver is connected Consult the dealer or an experienced radio TV technician for help Caution Any changes or modifications not expressly approved by the party responsi...

Page 4: ...nd 55 C 14 F and 131 F Do Not Placing this device next to a heat source Leaving it in the direct sunlight for long time or in a place where the temperature may rise signi ficantly such as inside a car...

Page 5: ...arphones or headphones Caution Risk of cut from broken glass Your tablet has a glass display that may shatter into sharp pieces If such happens do not touch the broken area and pieces Please return yo...

Page 6: ...from 5 15GHz to 5 25GHz in order to reduce any potential for harmful interference to MSS Mobile Satellite Services operations CE Declaration of Conformity The CE Marking on your tablet indicates that...

Page 7: ...et is designed to operate at multiple power levels so as to use only the power required to reach the network Generally the closer you are to a wireless base station antenna the lower the power require...

Page 8: ...to disassemble Do not incinerate Do not heat the battery above 55 C 131 F Avertissement Une manipulation inappropri e de la batterie peut entra ner un incendie une explosion ou des br lures chimiques...

Page 9: ...pter should not be handled by the children Emphasize to students that this device is an educational tool and not a toy The computer power supply battery pack or power cord should not be dropped crushe...

Page 10: ...re using this computer inside the classroom or home environment Do not place near the fire or other sources of heat Do not expose to magnetic fields Do not expose to direct sunlight Do not expose to r...

Page 11: ...tablet laptop 21 Installing your magnifying lens 22 3 Using your computer 23 Powering ON OFF 23 Powering on your computer 23 Powering on for the first time 23 Powering off your computer 24 Putting you...

Page 12: ...an App 33 Wireless LAN 33 Enabling wireless connection 33 Connecting to a wireless LAN 34 Micro SD Card Slot 34 To insert your micro SD card 34 To remove your memory card 34 Connecting an External Dev...

Page 13: ...con trols tablet features and accessories Package contents Carefully unpack your box and take out the items listed below If any of the items are missing or damaged please contact your dealer immediate...

Page 14: ...ht sensor optional It detects the brightness of the environment 3 Front facing camera Often for taking self portraits as well as for video conferencing 4 I O cabinet See page 4 for details 5 Touchscre...

Page 15: ...he camera is mainly used when you are taking photos or recording videos 2 Volume up down Press here to increase or decrease the sound volume 3 Power Lock Push here to power on off or lock on off your...

Page 16: ...insert a Micro SD memory card 3 Micro USB port This is where you can establish a USB connection 4 Micro HDMI port This is where you can connect your HDMI external screen 5 DC in This is where you plu...

Page 17: ...Name Function 1 Battery charging indicator It turns on in blue when the battery is being charged and turns off when battery is fully charged 2 Front camera indicator This blue indicator lights on whe...

Page 18: ...you can plug in a USB device 3 Touchpad Here is the touchpad that you can use it as you are using a traditional mouse 4 Function keys See details in the next section 5 Back Press it to go back to the...

Page 19: ...y brightness Enables the photo app to take pictures or videos Mutes the audio output Enables the voice recognition feature Decreases the volume level Or when the tablet is muted press here to unmute t...

Page 20: ...connect your tablet to an electrical outlet Charge your tablet until you see the blue battery indicator lights off which means the battery is fully charged 2 Press and hold the power button orange fo...

Page 21: ...sh down the blue latch 4 Detach the screen by pulling it upward Separating your tablet laptop Note The tablet connector on the dock will be locked at the position where you undock your tablet Do not t...

Page 22: ...turn your tablet into a microscope 1 Gently press the magnifying lens over the rear facing camera Make sure the bottom of the lens is fitted into the outer rim of the camera 2 Activate any camera app...

Page 23: ...ttery 2 Press the power button 3 A logo will appear when the system is powered on Powering on for the first time The laptop will require you to do the initial setup which including Activate your Windo...

Page 24: ...d 2 In the Start menu click Power option as shown on the right 3 Select Shut down from the power option menu as shown on the right Putting your computer into sleep mode When you will be away from your...

Page 25: ...e a traditional mouse With it you can move the cursor and perform left click right click double click actions However the actual available actions are application dependent Action name Explanation Lef...

Page 26: ...a left click with a mouse Double tap Slightly press twice with your finger to select an item Press and hold Press and leave your finger on an item This brings up detailed information or opens a menu w...

Page 27: ...experience The Desktop screen is as shown below and natively provides virtual desktop feature To launch the feature you can click the app icon as shown on the left or just press Window key and TAB key...

Page 28: ...menu Search box App shortcuts area Notification area Start menu To open the Start menu you can either click on the windows icon which is also known as Start button located at the left end of the taskb...

Page 29: ...ow After you setup the Cortana settings the search box will look like This is the Cortana icon Cortana is a new virtual assistant built into your Windows 10 Click here to finish the setup and you can...

Page 30: ...right part of the taskbar holds several icons that show you the status of your laptop as shown below This is an area called Notification Area where Click here to show more hidden status icons Shows yo...

Page 31: ...in the keyboard 2 Select Settings This will open the Settings screen as shown below Windows Activation To use all features of your Windows laptop you may need to activate your Windows system Follow th...

Page 32: ...a Microsoft account instead 4 Follow the instruction to register your account information Replacing Desktop with Start screen If you are more familiar with the interface similar to the Start screen in...

Page 33: ...n app 1 Right click the app that you want to remove from your Start menu or taskbar 2 Click Unpin from Start or Unpin from taskbar to remove it from your Start menu or taskbar Wireless LAN Enabling wi...

Page 34: ...a digital camcorder MP3 etc To insert your micro SD card 1 Insert the micro SD card into the card slot as shown below 2 Follow the message on the screen and choose to open and view files 3 A Windows E...

Page 35: ...USB storage device make sure you click the Safely Remove Hardware icon as shown on the left in the notification area of the taskbar to remove the device before disconnecting Connecting to the HDMI po...

Page 36: ...t and to a wall socket In the left corner of your tablet an indicator will light up in blue When the battery is fully charged the indicator will be off While system is off it takes at least 5 hours to...

Page 37: ...charged Battery is starting to drain Battery is about to completely drain and you should using your computer and charge it at once Battery is being charged A battery is an expendable supply so when us...

Page 38: ...need help from your resel ler or your service provider When you observe a problem stop operation immediately because taking further action might re sult in data loss or damage Take a note of what the...

Page 39: ...onds to force the power off and power it on again If these items are properly set and the screen remains blank have the computer serviced Your laptop is in its sleep mode Do one of the following to re...

Page 40: ...et The monitor type is correct Are the operating system or programs installed correctly If they are installed and configured correctly have the computer serviced Make sure that The Mute function is of...

Page 41: ...Bluetooth 10 1 inch TFT Color LCD Resolution 1280x800 5 point touch Front Facing Camera 1 26M Rear Facing Camera 5 0M Actual battery life may vary based on product settings usage patterns and environm...

Page 42: ...49 Watt Arabic Brazil Portuguese English French German Greek Hebrew Hungarian Italian DC Output 5V 3A Input Voltage From 100 240VAC Nominal Input Frequency From 47 63Hz Model Asian Power Devices Inc...

Page 43: ...Dimension Weight Follow control IC keyboard Hot key design US and UK K B Multi languages Supported Chocolate KB General mouse device Right Left button Cursor Moving and Drag function Tap function 1 x...

Reviews: