Page 12
For technical questions, please call 1-888-866-5797.
ITEM 59206
Sa
FE
ty
SE
tup
Op
Era
ti
O
n
Maint
Enanc
E
using the Generator
Before Starting the Generator Engine
Before starting the engine:
a.
Follow the Set up instructions
to prepare the Generator.
b.
unplug all loads from the Generator.
c.
inspect the Generator and engine.
d.
Fill the engine with the proper
amount and type of both
stabilizer-treated fuel and oil.
Basic Generator use procedure - See
following pages for specific instructions
1. Check that the Generator can handle the
wattage needed to power your products.
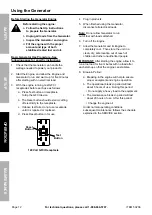
2. Start the Engine, and allow the Engine and
Generator to run and warm up for five minutes
after starting with no electrical load.
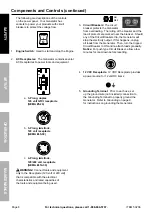
3. With the engine running, test GFCI
receptacles before each use as follows:
a. Press Test button on receptacle
to trip the GFCI device.
b. The Reset button should extend, cutting
off electricity to the receptacle.
c. If above test fails, do not use receptacle
until it is repaired or replaced.
d. Press Reset button in for use.
RESET
TEST
RESET
TEST
reset
Button
test
Button
120 Volt GFci receptacle
4. Plug in products.
5. When finished using the Generator,
disconnect all electrical loads.
note:
Do not allow Generator to run
out of fuel with loads attached.
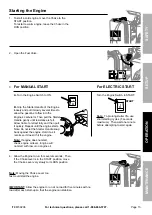
6. Turn off the Engine.
7. Allow the Generator and its Engine to
completely cool. Then store the unit in a
clean, dry, safe location out of reach of
children and other unauthorized people.
iMpOrtant:
After starting the engine, allow it to
run at no load for five minutes with no load after
each start-up so that the engine can stabilize.
8. Break-in Period:
a. Breaking-in the engine will help to ensure
proper equipment and engine operation.
b. The operational break-in period will last
about 3 hours of use. During this period:
• Do not apply a heavy load to the equipment.
c. The maintenance break-in period will last
about 20 hours of use. After this period:
• Change the engine oil.
Under normal operating conditions
subsequent maintenance follows the schedule
explained in the SERVICE section.


