background image

Page 15

For technical questions, please call 1-888-866-5797.

ITEM 59206 


Sa

FE

ty

SE

tup

Op

Era

ti

O

n

Maint

Enanc

E

calculating total Wattage of Devices used with the Generator

Before using the Generator, check that the products 

you want to plug into the unit are below the rated and 

maximum wattage ratings of the Generator.  Use the 

Wattage Calculation Table below, and the watts listed on 

your products, to help calculate multiple wattage totals.

to use the table:

1.  Add up the Running Watts for all items you 

would like to use at any given time.

2.  Make sure that this total is under the 7,250 

running wattage of the Generator.

3.  Find the single highest starting watts for 

the selected items and add to the total. 

4.  Make sure that this total is under the 9,000 

max. starting wattage of the Generator.

5.  Plug in and turn on products from 

largest wattage to smallest.

Wattage calculation table

Equipment

running

Watts

total running Watts  

(must be less than 7,250)

Largest additional Start-up Watts

total Startup Watts needed for all loads 

(must be less than 9,000)

Example

Equipment

running

Watts

Electric Water Heater (2,000 + 0)

2,000

Television (400 + 0)

400

Lawn Mower (1,200 + 1,200)

1,200

Hand Drill (600 + 600)

600

total running Watts  

(must be less than 7,250)

4,200

Largest additional Start-up Watts

1,200

total Startup Watts needed for all loads 

(must be less than 9,000)

5,400

A generator that is rated more than the minimum 

required max. starting watts will last much longer than 

a generator that only supplies the exact watts needed.

to calculate Wattage: 

Volts and amps can be multiplied together 

to get watts (volts x amps = watts).

to calculate additional Start-up Watts  

(if they are not Listed) 

For equipment with a motor:  Use the rated watts 

amount as an estimate of additional Start-up Watts.

For most lights or heaters: 

there are no additional start-up watts.

Wattage Estimate charts

note:

 Wattages listed below are estimates for that 

type of equipment only. Check nameplate wattages 

on all loads before connecting to Generator.

EMErGEncy

Device

running 

Watts

additional 

Start-up 

Watts

Refrigerator/Freezer

700

1500

Radio

100

0

JOB SitE

Device

running 

Watts

additional 

Start-up 

Watts

Air Compressor - 1/2 HP

1000

1000

Table Saw - 10″

1700

1300

Belt Sander - 3″

1200

1200

Hand Drill - 1/2″

600

600

Halogen Work Light

1000

0

Recipricating Saw

900

900

rEcrEatiOn

Device

running 

Watts

additional 

Start-up 

Watts

AM/FM Radio

100

0

Electric Grill

1700

0

Inflator Pump

50

100

CD/DVD Player

100

0

Box Fan - 20″

200

200

Coffee Maker

600

0

HOuSEHOLD

Device

running 

Watts

additional 

Start-up 

Watts

Computer w/ Monitor

800

0

Electric Clothes Dryer

5500

500

Electric Range

2100

0

Electric Water Heater

2000

0

Light Bulb - 100 watts

100

0

Microwave - 1000 watts

1000

200

Sump Pump - 1/2 HP

1000

1100

Television

400

0

Washing Machine

1100

1100

Well Pump - 1/2 HP

1000

1000

LaWn & GarDEn

Device

running 

Watts

additional 

Start-up 

Watts

Hedge Trimmer

400

400

Pressure Washer

1200

1200

Lawn Mower

1200

1200

Edger

1000

1000

HEatinG & cOOLinG

Device

running 

Watts

additional 

Start-up 

Watts

Central AC - 10,000 BTU

1500

1500

Furnace Fan - 1/2 HP

900

1400

Space Heater

1800

0

Window AC - 10,000 BTU

1200

600

Summary of Contents for 59206

Page 1: ...This is a poison you cannot see or smell NEVER use inside a home or garage EVEN IF doors and windows are open Only use OUTSIDE and far away from windows doors and vents When unpacking make sure that the product is intact and undamaged If any parts are missing or broken please call 1 888 866 5797 as soon as possible Copyright 2021 by Harbor Freight Tools All rights reserved No portion of this manua...

Page 2: ...he use of a special tool or lock and key or other means of security and shall be controlled by the authority responsible for the location 2 Gasoline fuel and fumes are flammable and potentially explosive Use proper fuel storage and handling procedures Do not store fuel or other flammable materials nearby 3 Have multiple ABC class fire extinguishers nearby 4 Operation of this equipment may create s...

Page 3: ...ide sensor malfunction Sensor needs service Do not use the Generator until the sensor is working properly For technical questions please call 1 888 866 5797 NOTE Yellow light flashes once after starting to indicate passing self check and is functioning normally Carbon Monoxide sensor must only be serviced by qualified technician to restore it to original settings Do not modify or tamper with the C...

Page 4: ...re the Generator on transport vehicles to prevent the tool from rolling slipping and tilting 23 Industrial applications must follow OSHA requirements 24 Do not leave the Generator unattended when it is running Turn off the Generator and remove safety keys if available before leaving the work area 25 The Generator engine can produce high noise levels Prolonged exposure to noise levels above 85 dBA ...

Page 5: ...tion Do not modify the generator or its engine and do not use the generator for a purpose for which it is not intended 43 Extension Cord Make sure your extension cord is in good condition When using an extension cord be sure to use one heavy enough to carry the current your product will draw An undersized extension cord will cause a drop in line voltage resulting in loss of power and overheating T...

Page 6: ...orrectly 9 Store equipment out of the reach of children 10 Follow scheduled engine and equipment maintenance GFCI Protection This Generator is equipped with two 3 Prong duplex 120V ground fault circuit interrupter GFCI receptacles These outlets provide additional protection from the risk of electric shock Should replacement of the receptacles become necessary use only identical replacement parts t...

Page 7: ...ine Recommended fill level 8 Gallons Engine Oil Type SAE 10W 30 above 32 F 5W 30 at 32 F or below Capacity 1 16 Quart Spark Plug Type NHSP Torch F7TC Gap 0 028 0 031 Valve Clearance Intake 0 004 0 006 Exhaust 0 006 0 008 Run Time 50 load Up to 13 hr Available accessories Wheel kit sold separately The emission control system for this Generator s Engine is warranted for standards set by the U S Envi...

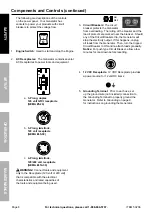
Page 8: ...0 volt or 240 volt that is compatible with the electrical characteristics and rated capacities of the tools and equipment being used 3 ON OFF Circuit Breakers The circuit breaker protects the Generator from overloading The rating of the breaker and the load it protects are marked near the breaker Should any of the Circuit Breakers trip the Generator will stop the electricity output If this happens...

Page 9: ...ent should be operated on approved inverter type generators or pure sine wave generators Note Wheel Kit 64788 sold separately can be used with this Generator Battery Setup Instructions All generators can be started using the recoil method This Generator requires installation of a battery to operate the electric start feature Connect the battery to the Generator engine 1 Place a fully charged lead ...

Page 10: ... a bowl under the fuel cup to catch any spilled fuel 5 Unthread the screws holding the solenoid in place CAUTION Carburetor bowl may have gas in it which will leak upon removing the solenoid bolt 6 Disconnect the solenoid and solenoid seal from the bolt 7 Unthread the bolt holding the fuel cup 8 Remove the bolt Bolt Seal fuel cup Fuel Cup Seal and Main Jet from the body of the carburetor assembly ...

Page 11: ...ut threading it in and remove it to check the oil level The oil level should be up to the full level as shown above 5 If the oil level is at or below the low mark add the appropriate type of oil until the oil level is at the proper level SAE 10W 30 oil is recommended for general use The SAE Viscosity Grade chart on page 18 in the Service section shows other viscosities to use in different average ...

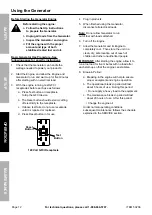
Page 12: ... If above test fails do not use receptacle until it is repaired or replaced d Press Reset button in for use RESET TEST RESET TEST Reset Button Test Button 120 Volt GFCI Receptacle 4 Plug in products 5 When finished using the Generator disconnect all electrical loads Note Do not allow Generator to run out of fuel with loads attached 6 Turn off the Engine 7 Allow the Generator and its Engine to comp...

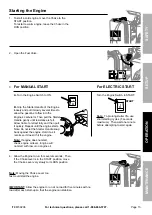
Page 13: ...at the engine can stabilize For MANUAL START A Turn the Engine Switch to ON B Grip the Starter Handle of the Engine loosely and pull it slowly several times to allow the gasoline to flow into the Engine s carburetor Then pull the Starter Handle gently until resistance is felt Allow Cable to retract fully and then pull it quickly Repeat until the engine starts Note Do not let the Starter Handle sna...

Page 14: ...ver exceed the rated capacity for this Generator as serious damage to the Generator and or appliances tools and equipment could result from an overload Starting and running wattage requirements should always be calculated when matching this Generator s wattage capacity to the appliance tool or equipment Use the DC12V Receptacle to power 12VDC equipment WARNING Do not charge batteries without a pro...

Page 15: ...or that only supplies the exact watts needed To Calculate Wattage Volts and amps can be multiplied together to get watts volts x amps watts To Calculate Additional Start Up Watts If They Are Not Listed For equipment with a motor Use the rated watts amount as an estimate of additional Start up Watts For most lights or heaters there are no additional start up watts Wattage Estimate Charts Note Watta...

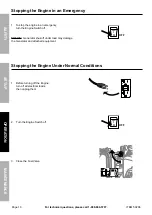
Page 16: ...ngine in an emergency turn the Engine Switch off NOTICE Generator shut off under load may damage the Generator and attached equipment Stopping the Engine Under Normal Conditions 1 Before turning off the Engine turn off all electrical loads then unplug them 2 Turn the Engine Switch off 3 Close the Fuel Valve i O Start OFF RESET TEST RESET TEST i O Start OFF ...

Page 17: ...a qualified technician service the equipment instead Cleaning Maintenance and Lubrication Note This maintenance schedule is intended solely as a general guide If performance decreases or if equipment operates unusually check systems immediately The maintenance needs of each piece of equipment will differ depending on factors such as duty cycle temperature air quality fuel quality and other factors...

Page 18: ... Remove the drain plug and if possible tilt the crankcase slightly to help drain the oil out Recycle used oil 5 Replace the drain plug and tighten it 6 Clean the top of the Dipstick and the area around it Remove the Dipstick by threading it counterclockwise and wipe it off with a clean lint free rag 7 Full level Full level Add the appropriate type of oil until the oil level is at the full level SA...

Page 19: ...n idle for longer than 20 days prepare the Engine for storage as follows 1 CLEANING Wait for Engine to cool then clean Engine with dry cloth NOTICE Do not clean using water The water can cause rust damage over time Apply a thin coat of rust preventive oil to all metal parts 2 FUEL Gasoline Treatment Draining the Fuel Tank To protect the fuel tank during storage fill the tank with fresh gasoline th...

Page 20: ...d to run for 15 20 minutes or the Warranty is VOID 6 AFTER STORAGE Before starting the Engine during or after storage keep in mind that untreated gasoline will deteriorate quickly Drain the fuel tank and change to fresh fuel if untreated gasoline has been sitting for a month if treated gasoline has been sitting beyond the fuel stabilizer s recommended time period or if the Engine does not start ...

Page 21: ...Filter IGNITION SPARK RELATED 1 Power Switch at OFF position 2 Spark plug cap not connected securely 3 Spark plug electrode wet or dirty 4 Incorrect spark plug gap 5 Spark plug cap broken 6 Circuit breaker tripped electric start models only 7 Incorrect spark timing or faulty ignition system IGNITION SPARK RELATED 1 Turn Power Switch to ON 2 Connect spark plug cap properly 3 Clean spark plug 4 Corr...

Page 22: ...ly operate generator outside 2 Carbon monoxide sensor malfunction Sensor needs service Call 1 888 866 5797 as soon as possible Do not use the Generator until the sensor is working properly 3 Make sure to operate generator within rated ambient temperature maintain minimum 5 ft clearance from all sides 4 Fill engine oil to proper level Check engine oil before EVERY use 5 Fill fuel tank with fresh 87...

Page 23: ...ker Plug in product and turn on 3 Turn off and unplug product Test GFCI receptacle If functioning properly reset GFCI plug in product and turn on 4 Have product repaired Product begins to operate abnormally 1 Problem with appliance 2 Rated load capacity exceeded 1 Immediately unplug appliance Have appliance repaired by a qualified technician or replace appliance 2 Lower the number of items plugged...

Page 24: ...D ASSEMBLY DIAGRAM IN THIS MANUAL AS A REFERENCE TOOL ONLY NEITHER THE MANUFACTURER OR DISTRIBUTOR MAKES ANY REPRESENTATION OR WARRANTY OF ANY KIND TO THE BUYER THAT HE OR SHE IS QUALIFIED TO MAKE ANY REPAIRS TO THE PRODUCT OR THAT HE OR SHE IS QUALIFIED TO REPLACE ANY PARTS OF THE PRODUCT IN FACT THE MANUFACTURER AND OR DISTRIBUTOR EXPRESSLY STATES THAT ALL REPAIRS AND PARTS REPLACEMENTS SHOULD B...

Page 25: ...ll Series 2 52 Wire Clip 1 53 Coil Subassembly Charge 1 54 Hex Socket Flange Face Bolt Small Series 2 55 Coil Ignition 1 56 Bolt 2 Part Description Qty 57 Clamp Charge Coil 1 58 Hex Socket Flange Face Bolt Small Series 1 59 Flywheel Subassembly 1 60 Impeller 1 61 Pulley Starter 1 62 Nut Flywheel 1 63 Shroud 1 64 Bolt 5 65 Starter Assy Recoil 1 66 Bolt 3 67 Hex Socket Flange Face Bolt Small Series ...

Page 26: ...lamp 1 141 Pipe Clamp 1 142 Pipe Clamp 1 143 Tube Fuel 1 144 Jacket Rubber 1 145 Cock Assy Fuel 1 146 Bolt 2 147 Crosspiece Subassembly 1 Part Description Qty 148 Bolt 1 149 Support Atr Cleaner 1 150 Seat Engine Frame Shock Absorption 4 151 Bolt 4 152 Nut With Flange 4 153 Cushion Engine Frame Rear 2 154 Nut With Flange 4 155 Protective Rubber Sleeve 2 156 Frame Assy Engine 1 157 Grounding 1 158 C...

Page 27: ...58 59 61 62 60 63 64 65 66 67 67 68 68 69 70 71 72 71 74 75 76 78 77 73 80 82 83 84 79 81 85 86 87 88 89 90 91 92 93 94 95 96 97 98 99 100 101 102 103 104 107 108 105 106 109 110 111 112 113 114 115 116 117 119 118 120 16 121 122 124 125 127 128 126 123 129 130 131 133 132 135 134 136 137 138 139 140 141 143 142 144 145 146 147 148 149 150 151 152 153 154 155 156 160 161 162 164 165 163 166 167 16...

Page 28: ... the exclusion or limitation of incidental or consequential damages so the above limitation of exclusion may not apply to you THIS WARRANTY IS EXPRESSLY IN LIEU OF ALL OTHER WARRANTIES EXPRESS OR IMPLIED INCLUDING THE WARRANTIES OF MERCHANTABILITY AND FITNESS EXCEPT FOR THE EMISSIONS CONTROL SYSTEM WARRANTY BELOW To take advantage of this warranty the product or part must be returned to us with tr...

Page 29: ...s of components of the emissions control system and are covered by this two 2 year warranty For a full list of emissions control components covered by this warranty please see 40 CFR 1068 Appendix I 1 Fuel Metering System a Carburetor and its internal parts b Fuel pump if so equipped c Cold start enrichment system 2 Air Induction System a Intake pipe manifold b Air cleaner 3 Ignition System a Spar...

Page 30: ...Page 30 For technical questions please call 1 888 866 5797 ITEM 59206 Safety Setup Operation Maintenance ...

Page 31: ...Page 31 For technical questions please call 1 888 866 5797 ITEM 59206 Safety Setup Operation Maintenance ...

Page 32: ...26677 Agoura Road Calabasas CA 91302 1 888 866 5797 ...

Reviews: