


C762, C764, C764i Stairclimber
Page 88
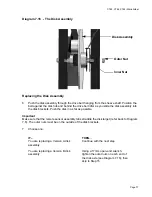
21. Push the disk assembly through the drive belt. Position the belt against the disk hub and
behind the drive belt idler as you slide the disk assembly into the disk brackets.
Important
Make sure that the remote sensor assembly tabs straddle the disk target.
22. Using the 17mm open-end wrench, tighten the outer nuts on each end of the disk axle.
23. Return to Step 14.
24. Remove the set screws that secure the sheave to the sheave shaft. Gently tap the sheave
to re-position it on the sheave shaft.
25. Add a drop of blue loctite to the tip of each set screw. Install the screws on the sheave hub.
26. Return to Step 16.
27. Inspect the gaps between the disk and the magnet assemblies as described in Procedure
5.1.
28. Check the operation of the climber as described in Section Four, then replace the covers as
described in Procedure 7.1.
Summary of Contents for Cardio Theater Integrated Bracket C764i
Page 23: ...C762 C764 C764i Stairclimber Page 23 Diagram 5 3 Magnet Wiring ...
Page 61: ...C762 C764 C764i Stairclimber Page 61 Diagram 7 7 Magnet Wiring ...
Page 100: ...C762 C764 C764i Stairclimber Page 100 Wiring Diagram 8 1 C762 C764 120 Vac ...
Page 101: ...C762 C764 C764i Stairclimber Page 101 Block Diagram 8 2 C762 C764 120 Vac ...
Page 102: ...C762 C764 C764i Stairclimber Page 102 Wiring Diagram 8 3 C762 C764 240 Vac ...
Page 103: ...C762 C764 C764i Stairclimber Page 103 Block Diagram 8 4 C762 C764 240 Vac ...


