background image

18

Copyright © 2020 Quality Machine Tools, LLC

PM-1228VF v3 2020-10

CUTTING PROCEDURE FOR TPI THREADS

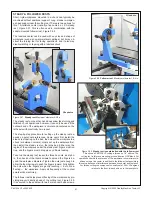
This procedure assumes that a single point thread cutting tool 

will be used, and that the worm wheel on the threading dial 

assembly properly engages the leadscrew, Figure 3-32.

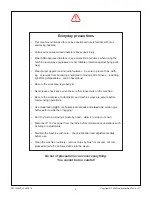
The threading dial cannot used for metric threads! The 

split-nut on the apron must not be disengaged until the 

threading operation is completed.

For metric and UNC/UNF threads the tool is ground to 60

o

 (in

-

cluded angle). It is installed so that its flanks are exactly 30

o


either side of the cross axis, ideally with the compound offset 

as Figure 3-31. Single-point threads are cut in as many as 

10 successive passes, sometimes more, each shaving a little 

more material off the workpiece.

To make the first thread-cutting pass the leadscrew is run at the 

selected setting (tables on following pages), and the carriage 

is moved by hand to set the cutting tool at the starting point of 

the thread. With the tool just grazing the workpiece, the split-

nut  lever  (Figure  3-26)  is  lowered  to  engage  the  leadscrew. 

This can be done at any point, 

provided

 the split-nut remains 

engaged throughout the 

entire multi-pass thread cutting 

process

.

When the first pass is completed, the tool is backed out clear 

the workpiece (using the cross slide), and the spindle is re

-

versed to bring the saddle back to the starting point. The cross 

slide is returned to its former setting, then the tool is advanced 

a few thousandths by the compound for the next pass. Each 

successive pass is done in the same way, each with a slightly 

increased infeed setting of the compound.    

Many users working on U.S. threads save time by disengaging 

the split-nut at the end of each cutting pass, reversing the sad-

dle quickly by hand, then re-engaging, usually by reference to 

the threading dial.

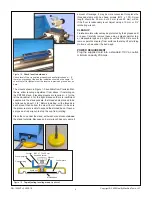
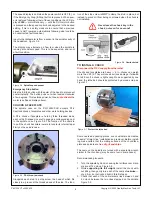
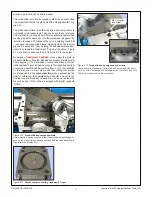
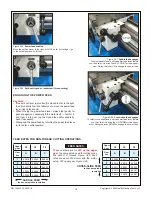
Figure 3-32  

Threading dial (US threads only)

For most TPI numbers every engagement, 

including the first

must at the point where a 

specific


line

 on the threading dial 

comes into alignment with the datum mark. If not, the second 

and subsequent passes will be out of sync. In some cases, 

see the “visualization” Figure 3-34, there is a choice of lines for 

re-engagement, but in every case the process calls for careful 

timing.

GENERAL RULES FOR THE THREADING DIAL

1.  Divide the TPI value by 2: If this gives an 

EVEN whole 

number

, example 12/2 = 6, re-engage at 

any line

 on the 

dial, also 

mid-way

 between the lines.

2.  If the ÷ 2 result is an 

ODD whole number

, examples 10/2 

= 5, 14/2 = 7, re-engage at any 

line

 on the dial, but 

NOT


mid-way between the lines.

3.  If the TPI value is a whole number not divisible by 2, ex-

ample 7, re-engage on the start line, or any line at right 

angles to it.

       If in doubt, re-engage on the start line!

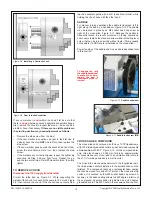
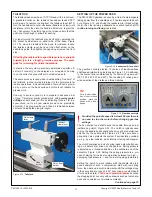
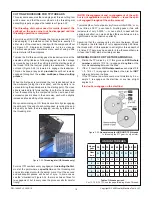
Figure 3-33  

General setup for UNC/UNF (TPI) threads

In this setup the 91T gear is only an idler.

[NOTE: Disengagement and re-engagement of the split-

nut is not applicable to metric threads — leave the split-

nut engaged throughout the entire process]

Typical depths of cut per pass vary from an initial 0.005” or so, 

to as little as 0.001”, even less. A finishing pass or two with 

increments of only 0.0005” — or none at all, to deal with the 

spring-back effect, can make all the difference between a too-

tight thread and one that runs perfectly.

Assuming that the compound is set over at between 29 and 

30 degrees, the total depth of cut is approximately 0.69 times 

the thread pitch, P (this equates to a straight-in thread depth of 

0.6 times P). There may be a need for a few thousandths more 

in-feed than 0.69P, almost certainly not less. 

Table of threads per inch

For 13, 19 & 26 TPI, see the page following Metric Threads.

Upper

gear

30 30 30 49 49 49 60 60 60

Gear

box

A B C A B C A B C

1

72 36 18 44 22 11 36 18

9

2

64 32 16

32 16

8

3

56 28 14

28 14

7

4

48 24 12

24 12

6

5

40 20 10

20 10

5

UNC/UNF THREADS

Summary of Contents for PM-1228VF-LB

Page 1: ...m 50 2000 rpm Large 1 1 2 in bore spindle D1 4 camlock spindle mount 28 in between centers 12 in swing over bed Multi speed gearbox for full range screw cutting TPI mm pitch Bidirectional power feed f...

Page 2: ...ecific machine and the information given here with little or no impact on functionality Please email us if you have questions about any aspect of the manual or your machine see our website www precisi...

Page 3: ...vicing of the leadscrew and feed shaft At the back of the machine allow access for installation of DROs etc Be sure to keep all lifting gear clear of any part of the lathe especially the two shafts at...

Page 4: ...ss slide at headstock and tailstock ends if there is no twisting of the bed the indication should be the same To check the left to right axis rest the level on a precision ground bar as here Figure 1...

Page 5: ...gears All internal gears in the machine are oil bath lubricated A saddle feed gearbox together with a set of external change gears provides for a full range of UNC and UNF threads from 5 to 72 TPI and...

Page 6: ...an be hazardous Be sure the work area is properly lit Never leave chuck keys wrenches or other loose tools on the machine Be sure the workpiece toolholder s and machine ways are secure before commenci...

Page 7: ...to 1000 High range rpm 100 to 2000 Saddle drive thread cutting Leadscrew 8 TPI 3 4 in diameter Inch threads Choice of 27 from 5 to 72 TPI including 13 TPI Metric threads Choice of 14 from 0 5 mm to 4...

Page 8: ...up in the opposite direction to the same speed as before Speed control This is a potentiometer Set it fully counter clockwise for min imum speed Speed display tachometer This is a 4 digit LCD that co...

Page 9: ...wise a few degrees This restores power but does not activate the motor see Speed display above Alongside each stud is a stop screw the head of which fits closely in a groove at the threaded end of the...

Page 10: ...dial only this also shows as 0 025 mm this is an approximation for convenience only it can lead to a cumulative error of more than 1 if working exclusively in metric units The cross slide moves perpen...

Page 11: ...any reference value relative to the handwheels This is especially useful when making a specific depth of cut in the workpiece Suppose the intention is make a 20 thousandths cut in a rotating round bar...

Page 12: ...ically machined to fit a T slot on the compound unlike the PM 1228 5 Install the threaded QCTP center post in the compound securing it with light weight breakable thread locking fluid 6 Secure the sel...

Page 13: ...speed relative to spindle speed Figure 3 19 Additional ly the overall ratio is determined by the choice of upper gear 30T 35T 49T 50T and 60T The resulting 75 ratios give a wide selection of feed rat...

Page 14: ...ading only Figure 3 21 Shifter assembly This assembly transfers drive from the spindle gear not shown to the upper change gear typi cally 30T To reverse the gearbox input the shifter assembly is pivot...

Page 15: ...s described above To reconfigure the other gears the procedure is 1 Remove the M8 socket head screw and washers from the gearbox input shaft grip the Vee belt pulley to stop the gear rotating 2 Remove...

Page 16: ...rates are about 5 slower with the metric setup 30T upper gear Figure 3 35 FEED RATES FOR NON THREAD CUTTING OPERATIONS Figure 3 27 Saddle feed engaged To select saddle feed pull the power feed lever...

Page 17: ...ed the tool into the workpiece at an angle so it cuts mostly on the left flank of the thread Figure 3 31 The correct angle relative to the cross slide zero degrees is debatable should it be 29 29 1 2...

Page 18: ...reading dial Figure 3 32 Threading dial US threads only For most TPI numbers every engagement including the first must at the point where a specific line on the threading dial comes into alignment wit...

Page 19: ...Threads 30T upper gear 49T upper gear 60T upper gear TPI Gearbox TPI Gearbox TPI Gearbox 10 C5 11 C1 5 C5 12 C4 22 B1 6 C4 14 C3 44 A1 7 C3 16 C2 8 C2 18 C1 9 C1 20 B5 10 B5 24 B4 12 B4 28 B3 14 B3 32...

Page 20: ...w cuts metric threads This is done by translating the leadscrew drive running it slower than for US threads by the factor 86T 91T 0 945 To see how this works compare the US setup for 8 TPI 0 125 pitch...

Page 21: ...ed then mount the workpiece in a chuck or between centers others set up the workpiece first then install the steady rest on the lathe bed Either way the region of the workpiece under the steady rest f...

Page 22: ...slide is moved inward In this diagram the pointer is shown turning clockwise 8 Pre load the indicator by a few thousandths then traverse the saddle from 1 to 2 If the pointer turns clockwise as you go...

Page 23: ...rs light general purpose grease NLGI No 2 or equivalent Leadscrews ISO 68 way oil such as Mobil Vactra No 2 or equivalent BALL OILERS Use a pump type oil can preferably with a flexible spout tipped wi...

Page 24: ...aft oilers Figure 4 6 Shifter assembly oilers The two Zerk fittings are intended for oil not grease They may be difficult to get to in which case one alternative is to remove the fittings altogether a...

Page 25: ...ide table stays put Cross slide lost motion is due to two factors 1 Handwheel attachment to the leadscrew is too loose and 2 Wear in the leadscrew nut item 548 in the Saddle parts diagram This is a sp...

Page 26: ...degrees then check spindle rotation again 9 Re loosen and re tighten a few times to achieve the best compromise then re compress the locknut with the two flat head screws 10 Re attach the Vee belt Run...

Page 27: ...likely to be needed in upcoming projects the cross slide DRO scale has to be installed on the right hand side of the cross slide In the following example installation the scale is on the right side a...

Page 28: ...t plate The outface of the scale support plate should be perfectly aligned with the reading head support plate Figure F In the example installation the temporary standoffs one at each end of the scale...

Page 29: ...ft to right placement of the scale is important If the read ing head is allowed to travel beyond its designed end stop at either end the scale and or reading head will be damaged End stop markings are...

Page 30: ...LAY Switch off the display before connecting cables Plug the cross slide X axis cable into the upper port on the display unit Plug the longitudinal Y axis cable into the lower port on the display unit...

Page 31: ...Z2210 9001 Motor pulley Z2211 9105 Screw M4 x 8 Z2212 9106 Back cover Z2213 9112 Flat washer 4 Z2214 9115 Main enclosure Z2215 9116 Screw M6 x 12 Z2216 9126 Rear enclosure Z2217 9127A Support plate Z2...

Page 32: ...230 108 Flat washer 12 Z2231 109 Leadscrew support Z2232 110 Protective cap Z2233 Ref Description Part 111 Screw M4 x 8 Z2234 112 Feed shaft Z2235 113 Flat washer 10 Z2236 114 Round pin 8 x 30 Z2237 1...

Page 33: ...33 PM 1228VF v3 2020 10 Copyright 2020 Quality Machine Tools LLC HEADSTOCK Fig 3 There may be detail differences between this representative drawing and the machine as supplied...

Page 34: ...panel label Z2323 275 Cam stud Z2280 276 Screw M6x 10 Z2281 277 Three jaw chuck Z2282 281 Spindle locknut Z2283 283 Spindle spacer bush Z2284 Ref Description Part 284 Spindle gear Z2285 285 Spindle sp...

Page 35: ...ew M5 x 12 Z2335 817 Spindle end cover Z2336 818 Screw M6 x 14 Z2337 819 Washer Z2338 820 Key 4 x 4 x 22 Z2339 Ref Description Part 821 Upper gear 30T Z2340 823 Spacer bush Z2341 824 Flanged sleeve Z2...

Page 36: ...36 Copyright 2020 Quality Machine Tools LLC PM 1228VF v3 2020 10 GEARBOX Fig 5 There may be detail differences between this representative drawing and the machine as supplied...

Page 37: ...734 Leadscrew coupler Z2403 735 Oil plug M16 x 1 5 Z2404 736 O ring 16 x 2 65 Z2405 737 Compression spring 0 7 x 4 x 25 Z2406 Ref Description Part 738 Gear assembly 13T 40T Z2407 739 O ring 12 5 x 1...

Page 38: ...ere may be detail differences between this representative drawing and the machine as supplied One instance gib screws 535 and lock screw 534 are shown on the opposite side of the cross slide casting 5...

Page 39: ...er clamp plate Z2461 521 Flat washer 6 Z2462 522 Felt wiper Z2463 523 Saddle front gib right Z2464 524 Saddle clamp plate Z2465 525 Cross slide leadscrew Z2466 Ref Description Part 526 Screw M8 x 45 Z...

Page 40: ...2510 621 Screw M6 x 30 Z2511 622 External circlip 15 Z2512 623 Spacer bush Z2513 624 Drive transfer shaft Z2514 625 Pin 5 x 12 Z2515 626 Pin 6 x 18 Z2516 627 Split nut actuator Z2517 628 Split nut lev...

Page 41: ...553 407 Compound casting Z2554 408 Screw M6 x 12 Z2555 409 Leadscrew nut Z2556 410 Leadscrew Z2557 Ref Description Part 411 Knob M10 Z2558 412 Support flange Z2559 413 Screw M6 x 16 Z2560 414 Graduate...

Page 42: ...334 Quill clamp nut Z2594 335 MT3 dead center Z2595 336 Quill Z2596 Ref Description Part 301 Quill clamp handle Z2577 303 Tailstock clamp handle Z2578 304 Knob M10 Z2579 305 Clamp bolt Z2580 306 Clam...

Reviews: