background image

11

Ÿ

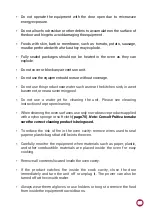
Some products such as whole eggs and sealed containers – for example, 
closed glass jars – are able to explode and should not be heated in this 
oven.

Ÿ

Do not use paper appliances when 

 is operated in the toaster 

equipment

mode.

Ÿ

Do  not  store  any  materials,  other  than  manufacturer's  recommended 
accessories in this oven when not in use.

Ÿ

Do not cover racks or any other part of the oven with metal foil. This will 
cause overheating of the oven.

Ÿ

It  is  necessary  to  remove  and  clean  the  air  filter  frequently.  For  more 
details go to 

4

 of the manual.

page 7

Ÿ

Daily cleaning is required to remove fat grease from equipment. For more 
details, see 

70

 of the manual.

page 

Ÿ

Clean  Only  Parts  Listed  in  Manual.  Other  than  that,  please  contact  the 
manufacturer for instructions.

Ÿ

Use this equipment only for the functions described in this manual.

RESTRICTIONS OF USE 

Ÿ

WARNING: Do not use corrosive chemicals or vapours in this device. This 
type of oven is specifically designed to heat, regenerate, gratin or finish 
food that has already undergone some cooking process. Not suitable for 
cooking food or products in general. It is not designed for industrial or 
laboratory use.

Ÿ

Use only utensils suitable for use in microwave combo ovens on 

page 14

.

Ÿ

Never use the device to heat alcohol, cognac, rum, etc.

Ÿ

Alcohol can catch fire more easily if overheated. Be careful and do not 
leave the device unattended.

Summary of Contents for Copa Express

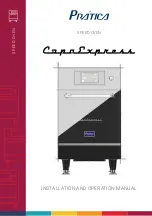
Page 1: ...S P E E D OV E N SPEED OVEN INSTALLATION AND OPERATION MANUAL ...

Page 2: ......

Page 3: ...ironment OurCommitment Ÿ Toknowandmeettheneedsofourcustomers Ÿ Offerreliable high performance andenergy efficientproducts Ÿ Always looking for improvements of processes products and cost to offermorevaluetoourcustomerseverysingleday Ÿ Treatourcustomerswithcompletehonestyandrespect Ÿ PráticaInc donatesaportionofitsprofittocharitablecauses This manual contains all the information for you to install and...

Page 4: ......

Page 5: ...OLSUSEDINTHISMANUAL WARRANTYTERM Termsanddetailing Warrantyexclusions Notesandrecommendations INSTALLATIONINSTRUCTIONS Electricalinstallation Generalinstructions Dimensions Generalrecommendations COPAEXPRESSTECHNOLOGY PRINCIPLESOFOPERATION RECIPESCREATION OPERATINGINSTRUCTIONS Preheating Executingarecipe Accessingoptions Usersettings Ÿ Editgroups Ÿ Editname Ÿ Editgroupimage Ÿ Deletinggrouprecipes ...

Page 6: ...nternetofkitchen Ÿ Systemupdate Ÿ Techsupport System Ÿ Language Ÿ Date Timeadjustment Ÿ Volume Ÿ Changepassword Ÿ Restorefactorysettings Ÿ Editaccess Ÿ Manufacturer sinformation Favorites Soundalarms Manualmode CLEANING Dailyprocedureguide Catalyticconvertercleaningguide Airfiltercleaningguide ALERTSANDERRORS POSSIBLESSOLUTIONS Alerts Errors Alertsanderrostable 40 40 42 43 44 47 48 49 50 52 53 54 ...

Page 7: ......

Page 8: ... the unit Check if the container used is under specification for temperature and microwaves providedbytheunit Donotuseplasticutensils Ÿ Donotallowchildrentouseoroperatethisequipment Ÿ Do not use the equipment if it is damaged specially if its door is not closingproperly Ÿ Do not place any object between the inner cavity and the oven door obstructingthedoorfromclosing Ÿ Donotletthepowercordhangover...

Page 9: ...e unit Please see cleaning instructionsforpropercleaning Ÿ When cleaning the oven surfaces use only non abrasive products applied with a nylon sponge or soft cloth page 70 Note Consult Prática to make surethecorrectcleaningproductisbeingused Ÿ To reduce the risk of fire in the oven cavity remove wires used to seal paperorplasticbagsthatwillbeintotheoven Ÿ Carefully monitor the equipment when materi...

Page 10: ...um height of free space above the microwave should be of 5 9in 150mm Ÿ Onlyuseutensilssuitableforuseinmicrowaveovens Ÿ When heating food in microwave safe container check the oven frequentlyduetothepossibilityofignition Ÿ Theovenshouldbecleaneddailyandanyfoodremainsmustberemoved Ÿ Failure to maintain the oven in a clean condition may lead to deterioration of the surface that could adversely affect...

Page 11: ...d to remove fat grease from equipment For more details see 70ofthemanual page Ÿ Clean Only Parts Listed in Manual Other than that please contact the manufacturerforinstructions Ÿ Usethisequipmentonlyforthefunctionsdescribedinthismanual RESTRICTIONSOFUSE Ÿ WARNING Do not use corrosive chemicals or vapours in this device This type of oven is specifically designed to heat regenerate gratin or finish fo...

Page 12: ...TION Risk of chemical burns or irritation of the skin eyes and respiratory system due to contact with cleaning chemicals andtheirfumes Forallcleaningactions Ÿ Do not let cleaning chemicals come into contact with your skin or eyes Ÿ Do not heat the appliance if there arecleaningchemicalsinside Ÿ Don t breathe in the chemical spray Ÿ U s e p e r s o n a l p r o t e c t i v e equipment PPE s When cor...

Page 13: ... Before preparing the equipment for use make sure that the equipment is connected to a equipotential compensation system UE If the equipments on wheeled supports start to move accidentally andthepowersupplyisswitchedoff Ÿ When operating the equipments always engage the safety lock on thewheels Ÿ Check daily that the wheel locks are activated before starting the operation Risk of electrical shock c...

Page 14: ...ASTIC CONTAINERS Plastic containers DISPOSABLE Fuels paper cardboard etc Use only disposables compatible with the temperatures reached by the oven 280 C OTHER UTENSILS METAL AND FOIL TRAYS Temperature probes During the cooking process no utensil such as probes cutlery straps and labels must be inside the oven Tethers and labels Cutlery NO YES NO Teflón accessories It affects the performance of the ...

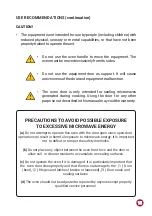
Page 15: ...nualmayvoidthewarranty PRECAUTIONS TO AVOID POSSIBLE EXPOSURE TO EXCESSIVE MICROWAVE ENERGY a Do not attempt to operate this oven with the door open since open door operation can result in harmful exposure to microwave energy It is important not to defeat or tamper the safety interlocks b Do not place any object between the oven front face and the door or allow soil or cleaner residue to accumulat...

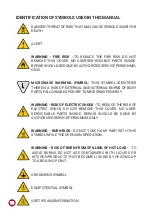
Page 16: ...AL BURNS OF BODY PARTSFOLLOWINGEXPOSURETOMICROWAVEENERGY WARNING RISK OF ELECTRIC SHOCK TO REDUCE THE RISK OF ELECTRIC SHOCK DO NOT REMOVE THIS COVER NO USER SERVICEABLE PARTS INSIDE REPAIR SHOULD BE DONE BY AUTHORIZEDSERVICEPERSONNELONLY WARNING BURN RISK DO NOT TOUCH ANY PART WITH THIS SYMBOLWHILETHEOVENISINOPERATION WARNING RISK OF BURN FROM SPILLING OF HOT LOAD TO AVOID BURNS DO NOT USE CONTAI...

Page 17: ...blueprint The customer willalsoberesponsiblefortransportingtheequipmenttotheinstallationsite d The warranty only covers manufacturing and component failures damages caused by lack of heeding label warnings on the product will not be covered e The warranty will cover adjustments and replacement of defective parts It is the responsibility of the authorized service technician to return the defective ...

Page 18: ...cessories or equipment components h Occurrences from electrical discharges arising from acts of nature or voltagepeakscausedbygeneratorsorpowersupplycompanies i Damage to the equipment or its accessories caused by accidents improper operation improper handling or installation as described by the Operation Manualincludedwiththisproduct j Repair attempts by unauthorized third parties or use of non O...

Page 19: ...dback suggestions or get assistance troubleshooting during normal business hours at 1 214 584 6269or 1469 583 4643 EQUIPMENT IDENTIFICATION Fill in to make technical support calls easier MODEL VOLTAGE SERIAL NUMBER RESELLER INVOICE NUMBER PURCHASE DATE 19 ...

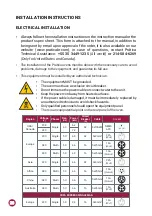
Page 20: ... Ÿ Theovenmusthaveaexclusivecircuitbreaker Ÿ Donotimmersethepowercableorconnectwatertotheunit Ÿ Keepthepowercordawayfromheatedsurfaces Ÿ If the power cable is damaged it must be immediately replaced by anauthorizedtechniciantoavoidshockhazards Ÿ Onlyqualifiedpersonnelshouldopentheequipmentpanel Ÿ Thereisanequipotentialpointontherearpaneloftheoven 20 NEMA 6 30 3x10AWG 32 6 2 7 2 60 Single 208 240 US...

Page 21: ...over of the unit The power grid is a customer sresponsibility Ÿ This unit must be properly grounded to avoid electricalshock Ÿ The circuit braker should be located no more than 70 8in 6ft 1 8mawayfromtheunit GENERAL INSTRUCTIONS Ÿ The oven must be installed on a surface or counter that supports its weightofapproximately 179lb 79 Kg Ÿ Donotobstructtheairinletsandoutletsattheovenbottom Ÿ The oven mu...

Page 22: ... SIDE VIEW WITH DOOR OPEN SIDE VIEW FRONT VIEW 12 310 mm 26 680 mm 39 990 mm 1 30 mm 29 750 mm 21 544 mm 1 30 mm 16 405 mm 14 357 mm 23 592 mm 4 102 mm 27 694 mm Capacity Height Width Depth 17 5L 0 61 cu 183mm 7 336mm 13 287mm 11 Chamber Dimension 22 ...

Page 23: ...oventodryortostoreclothes Ÿ If the oven door is damaged it must not be operated until it getsrepairedbyaqualifiedtechnician Ÿ In case of voltage loss or error during a recipe the progress will be lost Recipeswillkeepintactiftheissueregardingpowergrid Ÿ Donotcoverorblockanyairinletandoutletoftheunit Ÿ Donotusetheovenoutdoors Ÿ Donotstorefoodinsidetheovenwhenitisnotinoperation Ÿ When enabling the ov...

Page 24: ...erate energy through the microwaves which uniformly heat thewatermoleculesofthefood 2 Internalheatingelementtransfersheatenergytothecirculatingair 3 TheStirrerdistributesthemicrowavesevenly 4 Impingedairisdirectedtowardsthefood 5 Bottomheatingelementheatsthechamberfrombelowtheoventray 6 The Catalytic Converter converts the volatile organic compounds into carbondioxideandwater CO2andH2O 7 Theblower...

Page 25: ...wo to seven centimeters heating the molecules of water and fat by making them vibrate The heat is transmitted to the interior of the food by thermal conduction demystifyingtheideathatthemicrowavescookfoodfromtheinsideout The Copa Express works through the association between microwaves and hotairdirectedtowardsthefood Thevariablesintheoperationconsistsof a Operationtime b Chambertemperature c Micr...

Page 26: ... C 536 F andbeingmicrowavable Operation Time The food heated by microwaves occur from the outside in and the penetration level will vary depending on the type of food Therefore the preparing time has to be related to the meal composition the quantity of food processed as well as its density and thickness The larger the food amount quantity or density the greater the time or percentage will be need...

Page 27: ...of theprocessthecolourandcrispnessareobtained Later combine the air speed variations to reach the desired crispness and color Remember the air also transmits heat to the food so keep that in mind when setting blower percentage The food s weight size and shape are criticalwhensettingthetotalcooktime Thefollowinginformationiscriticalwhencreatinganewrecipe a The initial temperature of the product wil...

Page 28: ... oven preheating process after turning on the equipment choosebetween PreheatingTemperature 1 and PreheatingTemperature 2 b The following screen will present the CURRENT PROGRAMMED temperature and the bar indicating the remaining time to utilize the equipment Note The timer is only initiated when the CURRENT temperature reaches to the PROGRAMMED that occurs so that the oven temperature enters in u...

Page 29: ...cted group will be displayed select the recipe desired Ÿ Toreturntothe GROUPS screen pushthebutton Ÿ To access the next recipes page slide for right the screen and for the left to TEC return Ÿ Note Before starting a recipe make sure there is food inside of the cook cavity otherwiseitmaycausedamagestotheunit c Therecipewillenterinexecutionimmediately IN PROGRESS 1 min 33s SUBS 1 SUB 15cm MEAL FINIS...

Page 30: ...ofarecipe pushthe button TECL e If the equipment door is opened the operation will be paused once the doorisclosedagain pressthe toresumetheoperation TECL f If the Operator desires to add an information between steps for example ADD TOMATOES the recipe will be paused and the description of the informationwillbepresentedbesidethe PLAY button asinthenextimage IN PROGRESS 1 min 33s SUBS 1 SUB 15cm TO...

Page 31: ...wave during a predetermined time Repeat Recipe Repeats the same recipe chosen by the user i In Cook Brown More Brown More and Cook More the time will be definedatthemomentofcreatingtherecipe j The four options mentioned above may be disabled so that they do not appear in any recipe Learn more in the User s Settings Edit Accesses see page 64 IN PROGRESS 1 min 33s SUBS 1 SUB 15cm ADD TOMATOES SUBS 1 ...

Page 32: ...e 67 Daily Procedure Guide seepage 70 and Settings below Note Manual Mode and Favorites will only be shown if enabled by the administrator seepage 64 c Touchingontheicon oncemorewillreturnto Groups Screen TEC d Touching on the icon will return to the Preheating Temperature TEC selectionscreen IN PROGRESS 10s SUBS 1 SUB 15cm HEAT MORE Heat more exemple IR 250 C TEMPERATURE 250 C CHAMBER MANUAL MODE...

Page 33: ...he User Settings screen is composed by eleven items Use the gridview sliding on the touch screen to access the next options screen TEC Understandeachitemindetailinthefollowingpages IR 250 C TEMPERATURE 250 C CHAMBER MANUAL MODE SETTINGS FAVORITES DAILY CLEANING GUIDE ENTER PASSWORD TO ACCESS SETTINGS 456789 1 2 3 4 5 6 7 8 9 0 USB EDIT RECIPES EDIT GROUPS PREHEAT CELSIUS FAHRENHEIT CURRENT TEMPERA...

Page 34: ...n will be TEC presented However in the first position will be the icon in which it is possible to Create New Group b Choose between creating a new group or select the group you desire to edit Slide the screens to the left and right in order to transit between the TEC groupscreens USB EDIT RECIPES EDIT GROUPS PREHEAT CELSIUS FAHRENHEIT CURRENT TEMPERATURE SETTINGS page 1 WI FI WEB APP GROUPS CURRENT...

Page 35: ...s Delete Recipes deletesaselectedrecipe Order ordersthelocationdesiredforaselectedgroup Change Group Temperature changes the group preheating temperature Note Recipes set in group 1 will only be available when running Preheating 1 andthesameappliestogroup 2 EDIT NAME a Byselectingthe Edit Nameoption thefollowingscreenwillbepresented GROUP SNACKS EDIT IMAGE EDIT NAME DELETING RECIPES DELETE GROUP O...

Page 36: ...e presented browse through the images and select the image desired It is also possible instead of adding an image to maintain the first letter of the group name as the group icon just click on the ABC icon Slide the screens to the left and right in order to TEC transitbetweenallimages 123 ABC Saves the name and returns to the options Deletes a character CHOOSE AN IMAGE FOR THE RECIPE FIRST CHARACTE...

Page 37: ...up Press the button On the next screen it will TEC bepossibletodeleteaselectionofrecipes oralltherecipes b Select the recipes desired recipes to be deleted the will indicate TEC TEC theselectedones andthenclickonthetrashcanofthefixedbar TEC DELETING RECIPES SELECT RECIPES DELETE ALL x SELECT RECIPES FOR DELETION x x x GROUPS CURRENT 210 C PIZZA BAKERY SUBS BREAKFAST SANDWICH CHICKEN WINGS TEX MEX M...

Page 38: ...eturnclickon DELETE GROUP a ATTENTION When choosing the option of deleting the group all the information referring to the group will be lost recipes steps and other information And in case the user does not perform a Backup see page 53 USB Options itwillnotbepossibletorecoverthisinformation b Press the button to confirm your choice or to return to the options TEC TEC screen ALL THE RECIPES WILL BE ...

Page 39: ...ps screentochoosethelocationdesired b To change the position of a group just click on the group to select and slide TEC TEC tothedesiredposition Press tosavethechange c If the substitution is done vertically 1 2 3 4 5 6 and 7 8 the two groups in question will change position without changing the order of the other groups asshownintheimagebelow CHANGE ORDER PLACE AT THE LIST START PLACE AT THE LIST...

Page 40: ...estogroup 2 USER S SETTINGS EDIT RECIPES a To edit the recipes click on the icon The groups screen will be TEC displayed Choose in which group you wish to change the recipes Use the gridview sliding onthetouchscreentoseeallrecipes TEC CHANGE GROUP TEMPERATURE CURRENT GROUP TEMPERATURE 250 C PREHEATING 1 PREHEATING 2 SELECT THE GROUP MEAL FINISHING TEX MEX CHICKEN WINGS GRATIN BREAKFAST SANDWICH PI...

Page 41: ... of the selectedrecipe Delete Recipe deletes all the information of the selected recipe includingthesteps Order orders the location in which the recipe appears among the otherrecipesofthegroup Cook Brown More Changesthetimeof Cook Brown Morefunction Add Remove from Favorites Adds or removes the recipe in the Favoriteslist 2 SUB 15cm or 2 SUB 30cm 3 SUB 15cm 2 SUB 30cm 1 SUB 15cm 2 SUB 15cm 1 SUB 3...

Page 42: ...9 0 ABC 1 2 1 2 EDIT NAME a When selecting the Edit Name option the following screen will be presented b Clicking on and 1 2 and 2 2 the screen will toggle TECLA TECLAS betweenlettersandnumbers specialcharacters ABCDE GROUP NAME Q W E R T Y U I O P A S D F G H J K L Z X C V B N M 123 123 42 ...

Page 43: ...he desired icon or pressthebutton to transform the first letter of the recipe name into an TEC icon asshownintheadjacentexample c Use to return to the recipe editing options TEC CHOOSE AN IMAGE FOR THE RECIPE FIRST CHARACTER OF RECIPE NAME 2 SUB 15cm or 2 SUB 30cm MIXED 2 SUB 15cm 1 SUB 30cm 3 SUB 15cm 3 SUB 15cm 2 SUB 30cm SUBS pag 1 4 SUB 15cm 2 SUB 30cm 3 SUB 15cm or 1 SUB 15cm and 1 SUB 30cm 4 ...

Page 44: ...ansparent Clickonasteptoeditit b For each step it is necessary to set Ÿ 1 Impingedairspeed Ÿ 2 ofmicrowaves Ÿ 3 ofthebottomheatingelementwattage Ÿ 4 Temperature Ÿ 5 Time EDIT STEPS SNACK 1 SUB 15cm 30 100 20 00 05 40 C 70 50 60 80 C 00 20 10 90 100 20 C 00 15 0 10 20 30 40 50 60 70 80 90 100 0 0 0 250 C GROUP1 1 2 3 4 5 44 ...

Page 45: ...ick on the icon A keyboard will appear on the TECL oppositeside etthedesiredvalueandclickon TE e To definethetemperatureclickon theicon A keyboard willappear on TECL theoppositeside setthedesiredvalueandclickon TE 250 C GROUP1 0 10 20 30 40 50 60 70 80 90 100 0 0 40 250 C GROUP1 0 10 20 30 40 50 60 70 80 90 100 0 0 0 250 C GROUP1 0 10 20 30 40 50 60 70 80 90 100 70 20 40 250 C GROUP1 45 ...

Page 46: ...C h Enableanddisablethestep Ÿ The recipe only executes active steps When a step is deactivated it is not deleted itonlyremainshidden Ÿ To delete the step it is necessary to inform the 00 00 value to the time parameter i After concludingthe edition of a step use to save and return to the steps screentoedit createnewstep ortesttheactivesteps ADD INFORMATION ACTIVATE DEACTIVATE STEP 1 SAVE ACTIVE INA...

Page 47: ...eturntotherecipeeditingoptions TEC DELETINGRECIPE a Press to delete the recipe press the button to confirm the TEC TEC exclusion or toreturntotheoptionsforrecipeedition TEC EDIT STEPS SNACK 1 SUB 15cm 30 100 20 00 05 40 C 70 50 60 80 C 00 20 10 90 100 20 C 00 15 BEFORE PROCEEDING MAKE SURE THERE IS FOOD INSIDE THE OVEN THE RECIPE 1 SUB 15cm WILL BE REMOVED BACK DELETE 47 ...

Page 48: ...he position of a recipe just press on the recipe to select and slide tothedesiredposition Press tosavethechange TEC TEC c If the substitution is done vertically 1 2 3 4 5 6 and 7 8 the two recipes in question will change position without changing the order of the other recipes asshownintheimagebelow 2 SUB 15cm 2 SUB 30cm 1 SUB 15cm 2 SUB 15cm 1 SUB 30cm 3 SUB 15cm 3 SUB 15cm 2 SUB 30cm 4 SUB 15cm ...

Page 49: ...ue for all of them the user may set the time he she wishes for each one of theoptions Rememberthat Ÿ BrownMore OnlyactivatesHOTAIR Ÿ CookMore ActivatesonlytheMICROWAVE Ÿ Cook BrownMore Mergesbothelements 2 SUB 15cm 2 SUB 30cm 1 SUB 15cm 2 SUB 15cm 1 SUB 30cm 3 SUB 15cm 3 SUB 15cm 2 SUB 30cm 4 SUB 15cm 2 SUB 30cm 3 SUB 15cm or 1 SUB 15cm an 1 SUB 30cm 4 SUB 15cm 1 SUB 30cm SELECT THE RECIPE 1 3 4 5...

Page 50: ...tions TEC ADD REMOVEFROMFAVORITES a The Favorites function may be accessed through the options screen in the fixedbar However itwillbeexplainedindetailon 5 page6 b To add the recipe to the favorites click on the icon A small label TEC TEC willbeaddedintheupperleftcorneroftherecipeicon EDIT COOK BROWN 00s BROWN MORE 00s COOK BROWN MORE 00s COOK MORE EDIT COOK BROWN 1 2 3 4 5 6 7 8 9 0 30s BROWN MORE...

Page 51: ...ipewillberemovedfromtheFavoriteslist d Use toreturntothepreviousscreen DELTE RECIPE EDIT STEPS ADD TO FAVORITES SNACKS 1 SUB 15cm EDIT IMAGE EDIT NAME ORDER EDIT COOK BROWN MORE 2 SUB 15cm or 2 SUB 30cm 3 SUB 15cm 2 SUB 30cm 1 SUB 15cm 2 SUB 15cm 1 SUB 30cm 3 SUB 15cm CREATE NEW RECIPE SELECT THE RECIPE page 1 RELETE RECIPE EDIT STEPS REMOVE FROM FAVORITES SNACKS 1 SUB 15cm EDIT IMAGE EDIT NAME OR...

Page 52: ...creen b The button enables disables Preheat 2 When disabled all BUTT o BUTT settingsrelatedtoPreheat2arehidden c To edit the values click on the icons and to change the value TECL TECL usingthenumberpadbeside d Use toreturntotheusereditingoptions TEC PREHEAT TEMPERATURE PREHEAT 1 TEMPERATURE PREHEAT 2 PREHEAT TIME PREHEAT TEMPERATURE PREHEAT 1 PREHEAT TIME 52 ...

Page 53: ...user will be taken to the function options previously chosen Ÿ Import All MenusorSettings Ÿ Export All MenusorSettings c In case of error the displayed message will be There was an error during theImport Export PleaseremoveUSBdiskandrestartprocess d Use toreturntotheusereditingoptions EXPORT IMPORT USB SELECT THE DESIRED OPTION INSERT THE PEN DRIVE AND WAIT FOR RECOGNITION IMPORT MENUS IMPORT ALL ...

Page 54: ...oftopandbottomheatingelements b Use toreturntotheusereditingoptions USER SSETTINGS CELSIUS FAHRENHEIT a Change the temperature format displayed in the oven between Celsius and Fahrenheit Click on the icon among the User s Settings and set the TEC temperatureformatyouwish ACCESS TO THE USB PORT TOP HEATER CURRENT TEMPERATURE BOTTOM HEATER 54 ...

Page 55: ...n to view TEC the available networks Use the gridview sliding on the touch screen to TEC seeallnetworks b Click on the network you want to connect and then click on ENTER PASSWORD CELSIUS FAHRENHEIT ADJUSTMENT CELSIUS FAHRENHEIT CONNECT CONNECT NETWORK MY NETWORK ENTER PASSWORD CONNECT INCORRECT PASSWORD WI FI NETWORK SETTINGS NETWORK 6 CONNECT MY NETWORK NETWORK 2 NETWORK 3 NETWORK 4 NETWORK 5 CO...

Page 56: ...me the preheating menu is automatically displayed In the future if the user wants to change network he must do so through the WI FI icon in the settings menu TEC WI FI NETWORK SETTINGS NETWORK 6 CONNECT MY NETWORK NETWORK 2 NETWORK 3 NETWORK 4 NETWORK 5 CONNECT CONNECT CONNECT CONNECT CONNECT WI FI NETWORK SETTINGS NETWORK 6 CONNECT MY NETWORK NETWORK 2 NETWORK 3 NETWORK 4 NETWORK 5 DISCONNECT CON...

Page 57: ...wn below Ÿ Wait for the update bar to be complete c When you are connected to IOK the following screen will be shown Ÿ To disconnect from IOK press the button TECLA DISCONNECT REGISTER YOUR EQUIPMENT IN THE WEB APP NEW PRATICAIOK COM USING THIS PIN CODE YOUR PIN CODE WEB APP SEARCH UPDATE NAME NEW RECIPE CURRENT MENU MY RECIPES WEB APP DESCONNECT THERE IS A NEW UPDATE FOR YOUR EQUIPMENT DO YOU WIS...

Page 58: ...wnload is done in the background and the user returns to the previousscreen Returnstothesettingsmenu c While the download is being performed the green bar will blink if you press the icon the download status screen will be displayed By pressing TE the icon the previous screen will be displayed and the download will TEC continueinthebackground USB SYSTEM UPDATE WI FI CHOOSE HOW YOU WANT TO UPDATE Y...

Page 59: ...le for your device When there is the symbol below will be displayed in the upper right corner SYSTEM UPDATE DOWNLOAD IN PROGRESS PLEASE WAIT DO NOT INTERRUPT THE NETWORK CONNECTION OR TURN OFF THE EQUIPMENT SYSTEM UPDATE TO COMPLETE THE UPDATE YOUR EQUIPMENT MUST BE RESTARTED DO YOU WANT TO RESTART IT NOW YES NO ATTENTION IF YOU DO NOT RESTART NOW THE UPDATE WILL BE COMPILED THE NEXT TIME THE EQUI...

Page 60: ...u will find all the necessary TEC data to contact Prática to clear out questions request repairs or technical visits b Use toreturntotheusereditingoptions NO SYSTEM UPDATE AN ERROR OCCURRED WHILE UPDATING THE SYSTEM DO YOU WANT TO RESTART THE PROCESS YES YES NO CUSTOMER SUPPORT Manufacturer Address Prática Klimaqui Ind e Com S A Rodovia BR 459 km 101 Pouso Alegre MG Brazil Zip Code 37550 140 info p...

Page 61: ...thefollowingpages b Use to return to the user editing options TEC SYSTEM LANGUAGE a To change the language just click on the icon and choose the desired TEC language We currently have the main languages around the world Use the gridview sliding onthetouchscreentoseealllanguages TEC b Use toreturntotheusereditingoptions TEC 61 VOLUME LANGUAGE DATE TIME CHANGE PASSWORD RESTORE ORIGINAL SETTINGS EDIT...

Page 62: ...EC c Press to change the date time format The following screen will be TEC displayed Choose the date and time format and click on to confirm and TEC returntotheoptions d Use toreturntotheusereditingoptions EUROPEAN DD MM YYYY AMERICAN MM DD YYYY ISO YYYY MM DD TIME 24H FORMAT 12H FORMAT DATE TIME SETTINGS CHANGE FORMAT 05 07 21 DD MM YYYY 24H FORMAT 13 57 1 2 3 4 5 6 7 8 9 0 MM DD YYYY DD MM YYYY Y...

Page 63: ...theusereditingoptions SYSTEM CHANGEPASSWORD a To change the user s password just type the new password and then TEC confirmitjustclickingon TECLA b Incaseyouforgetthepassword contactTechnicalSupport c Use toreturntotheusereditingoptions TEC VOLUME SETTINGS sound 2 sound 3 sound 4 sound 1 Minimum Maximum NEW PASSWORD 1 2 3 4 5 6 7 8 9 0 CONFIRM PASSWORD OK OK 63 ...

Page 64: ...ESS a Edit Access corresponds to the function in which you may block TEC functionstotheoperator For example If you desire that the Favorites and Manual Mode functions are never accessed by the operators just click on both of them which will turn dark gray indicating that they are locked until the moment you desire to unlock them b Tounlock justclickonthedesiredfunctionsoncemore THIS ACTION WILL DE...

Page 65: ...FACTURER SINFORMATION a Information on Firmware Version Serial and Manufacturing Date of TEC theCopaExpressarecontained c Use toreturntotheusereditingoptions TEC FAVORITES a The Favorites functionality works as a shortcut in which you may allocate the main and most used recipes To access it just press the Options button TECinthefixedmenubar MANUFACTURER S INFORMATION EDIT ACCESSES FAVORITES MANUAL ...

Page 66: ...creen touchtheicon TEC c Browse through the recipes use the gridview sliding on the touch TEC screen d SeehowtoAddorRemovearecipefromtheFavoriteslistonpage50 SOUNDALARMS Ÿ At the end of a recipe the alarm will sound indicating the end oftheoperation Ÿ If the oven door is open for more than 30s the alarm will soundalertingtheuser Ÿ Caution If the alarm signal sounds continuous the equipment is malf...

Page 67: ...tions icon In the Options TEC screen touch the icon TEC c Set the parameters of Time Temperature Speed of Hot Air Microwaves andbottomheatingelement Infra red d Presstheicon tostarttheoperationofManualMode TEC e After the conclusion of the operation the Copy Parameters icon will be enabled TEC IR 250 C TEMPERATURE 250 C CHAMBER MANUAL MODE SETTINGS FAVORITES DAILY CLEANING GUIDE 0 10 20 30 40 50 6...

Page 68: ...esspasswordbefore TEC g After informing the user s password choose between creating a new group or allocating the transported parameters in a new recipe in an already existent group OPERATING IN MANUAL MODE COPY PARAMETERS READY ENTER PASSWORD TO ACCESS SETTINGS 1 2 3 4 5 6 7 8 9 0 68 GROUPS CURRENT 210 C PIZZA BAKERY SUBS BREAKFAST SANDWICH CHICKEN WINGS TEX MEX MEAL FINISHING NEW GROUP ...

Page 69: ...et the name of the New Recipe the Image and choose in which position step theuserwishestoallocatethetransportedinformation g Tofinish ifdesiredsettheotherstepsoftherecipe EDIT STEPS 50 90 20 00 15 150 C 69 ...

Page 70: ...een TEC st 1 Open the door and wait for the temperature to get down to 122 F Proceed clickingonthearrow nd 2 Remove the rack the back of the oven chamber and the catalytic and placethemonthesink Proceedclickingonthearrow LET S BEGIN THE CLEANING PROCEDURE CURRENT TEMPERATURE 200 F 122 F VIDEO OPEN THE DOOR AND WAIT FOR THE TEMPERATURE TO GET DOWN TO 122 F CLEANING PROCEDURE GUIDE REMOVE TE RACK TH...

Page 71: ... Proceed TEC clickingonthearrow VIDEO DAILY CLEANING GUIDE REMOVE THE COOK RACK AND BOTTOM JET PLAT AND PLACE IN THE SINK PROCEED CLICKING ON THE ARROW APPLY THE OVEN CLEANER ON THE RACK AND ON THE BACK OF THE OVEN CHAMBER AND LEAVE IT FOR 2 MINUTES BEFORE THE NEXT STEP VIDEO CLEANING PROCEDURE GUIDE PPEs NEEDED VIDEO DAILY CLEANING GUIDE REMOVE THE COOK RACK AND BOTTOM JET PLAT AND PLACE IN THE S...

Page 72: ... GUIDES PPEs NEEDED SOME MODELS DO NOT HAVE GLASS IN THE WAVE GUIDES VIDEO VIDEO START TIMER VIDEO DAILY CLEANING GUIDE VIDEO CLEANING PROCEDURE GUIDE PPEs NEEDED VIDEO DAILY CLEANING GUIDE VIDEO CLEANING PROCEDURE GUIDE CLEAN RINSE THE CHAMBER WITH A WET TISSUE TO REMOVE THE EXCESS AND DRY IT WITH A NEW CLEAN TISSUE PPEs NEEDED At the end of the 5 minutes the alarm will sound and releases the scr...

Page 73: ... Finishbyclickingthearrow VIDEO DAILY CLEANING GUIDE VIDEO CLEANING PROCEDURE GUIDE ALWAYS USE A NON SCRATCH SPONGE TO SCRUB ANY PERSISTENT DIRTY IN THE RACK AND BACK OF THE OVEN CHAMBER PPEs NEEDED VIDEO DAILY CLEANING GUIDE VIDEO CLEANING PROCEDURE GUIDE RINSE THE RACK AND THE CATALYTIC CONVERTER AFTER APPLYING CLEANER OR AFTER SOAKING IT IN SOAP WATER 2 2 VIDEO DAILY CLEANING GUIDE VIDEO CLEANI...

Page 74: ...emove stubborn debris apply Pratica Oven Cleaner allowtosetfor10minutes thenrinsewithwater d Before installing back the converter to the oven remove any water excess Ifnecessary shakeortaponahardsurfacetoconfirm AIRFILTERCLEANINGGUIDE a AccesstheCavityAirFilterfromtheovenbottom b Pullthefilterforwardtoremoveit c Inspectandcleanifnecessary withneutraldetergentsandwater d Rinse well with clean water a...

Page 75: ...c Seehowtoproceedineachcasebelow ALERTS a ClickontheOptionsicon TEC b The Options screen will bring instead of the top and bottom heaters temperatures adescriptionofthealert Intheadjacentexample ALERT CHAMBER SENSOR FAILURE c Follow the orientation as described on the screen In this case turn off and turnontheovenagainusingthepanelbutton SETTINGS FAVORITES MANUAL MODE ALERT CHAMBER SENSOR FAILURE ...

Page 76: ...sts calltheTechnicalService ERRORS a In case of several unsuccessful reset attempts the alert will become an error anditwillbenecessarytocontactTechnicalSupport b Refertothetableonthenextscreentoverifythepossibleerrorsandalerts CONFIRM SHUTDOWN CONFIRM CANCEL SETTINGS FAVORITES MANUAL MODE ERRO CAN NETWORK COMMUNICATION FAILURE TURN THE EQUIPMENT OFF AND ON DAILY CLEANING GUIDE 76 ...

Page 77: ...dCanada Inverter more than ten reset a empts Chamber Sensor and IR only one inactive Panel temperature from 65 C to 80 C exceeding 80 C for 10 minutes Component Becomes Alert when Becomes Error when both inactive Can Network Communication CLMG Low Magnetron Current fifteen seconds without reaching the standard performance cables disconnected or faulty Error Sound Alarm On On On On On Inverter lost ...

Page 78: ...COPA EXRESS CODE 742593 INSTALLATION AND OPERATIONAL MANUAL APRIL 2022 REVISION 02 ...

Page 79: ......

Page 80: ...t Church Street Lewisville TX 75057 Phone 1 214 584 6269 www praticausa com info praticausa com PRÁTICA KLIMAQUIP IND E COM S A BRAZIL Rodovia BR 459 Km 101 S N 37 556 140 Pouso Alegre MG Telefone 55 35 3449 1235 pratica praticabr com ...

Reviews: