background image


www.powermaxfitness.net 

10 

Step 5. 


1.


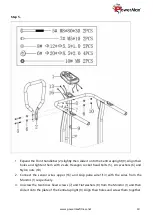
Expand the Front handlebar (2) slightly then slide it onto the Central upright (9). Align their 
holes and tighten them with 2 sets Hexagon socket head bolts (5), Arc washers (6) and 
Nylon nuts (10)  

2.


Connect the sensor wires upper (16) and Grip pulse wire1(13) with the wires from the 
Monitor (1) respectively.  

3.


Unscrew the two Cross head screws (7) and Flat washers (8) from the Monitor (1) and then 
slide it onto the plate of the Central upright (9). Align their holes and screw them together. 


Summary of Contents for MFT-410

Page 1: ...NCTION TREADMILL OWNER S MANUAL Read all instructions carefully before using this product Retain this owner s manual for the future s reference Product may be slightly different with photos it is subj...

Page 2: ...repairing free of charge any parts which may prove to be defective under normal home use This warranty does not include any damage caused by improper operation misuse or commercial application From th...

Page 3: ...hen exercising Running or aerobic exercising shoes are also required 7 DO NOT place any sharp objects around the treadmill 8 Handicapped or disabled person should not use the treadmill without presenc...

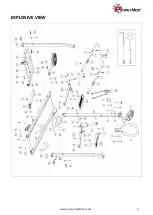
Page 4: ...www powermaxfitness net 4 EXPLOSIVE VIEW...

Page 5: ...012 05 5 1 0 2 29 Pulling pin 1 9 Central upright 1 30 Hexagon socket head bolt M8 50 25 10 Nylon nut M8 18 31 Body twister set 1 11 Hexagon socket head bolt M8 35 20 2 32 Adjustment tube 1 12 U shap...

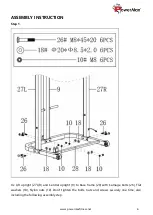
Page 6: ...INSTRUCTION Step 1 Fix L R upright 27L R and Central upright 9 to Base frame 28 with Carriage bolts 26 Flat washers 18 Nylon nuts 10 Don t tighten the bolts nuts and screws securely one time also inc...

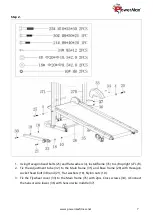
Page 7: ...5 to L R upright 27L R 2 Fix the Adjustment tube 32 to the Main frame 35 and Base frame 28 with Hexagon socket head bolt 30 and 21 Flat washers 18 Nylon nuts 10 3 Fix the Flywheel cover 33 to the Main...

Page 8: ...ect the Grip pulse wire1 13 with Grip pulse wire2 14 Push the Grip pulse post 15 into the U shape bracket 12 with the connected wires hiding the inside of posts Align the holes of the three parts 27R...

Page 9: ...cylinders 19 to the Central upright 9 and tighten them with 2 sets Hexagon socket head bolts 17 and Flat washers 18 3 Insert the hook of Pulley set 20 into the hole of the Central upright 9 first Then...

Page 10: ...th 2 sets Hexagon socket head bolts 5 Arc washers 6 and Nylon nuts 10 2 Connect the sensor wires upper 16 and Grip pulse wire1 13 with the wires from the Monitor 1 respectively 3 Unscrew the two Cross...

Page 11: ...e 35 to the folded position 2 Fix the Body twister set 31 to the Central upright 9 with 1 pcs Hexagon socket head bolt 30 Nylon nut 10 flat washer 18 Then insert the pull pin 29 3 Install the Push up...

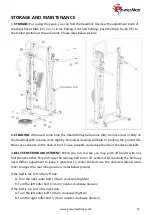
Page 12: ...or belt To use solvents can reduce the life of the deck and belt 3 BELT CENTERING ADJUSTMENT When you run or walk you may push off harder with one foot than the other This will cause the running belt...

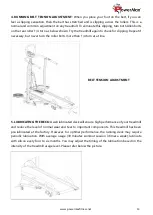
Page 13: ...never turn the roller bolts more than 1 4 turn at a time 5 LUBRICATING THE DECK A well lubricated deck will ensure high performance of your treadmill and reduce the level of normal wear and tear to im...

Reviews: