5 - ENG
Spraying Instructions
Risk of fire or explosion. Never spray flammable liquids in a confined area.
Do not smoke while spraying. Do not spray where sparks or flames are present.
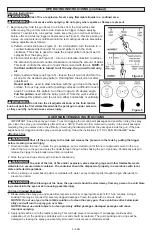
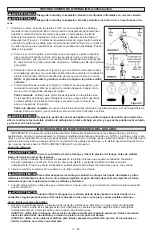
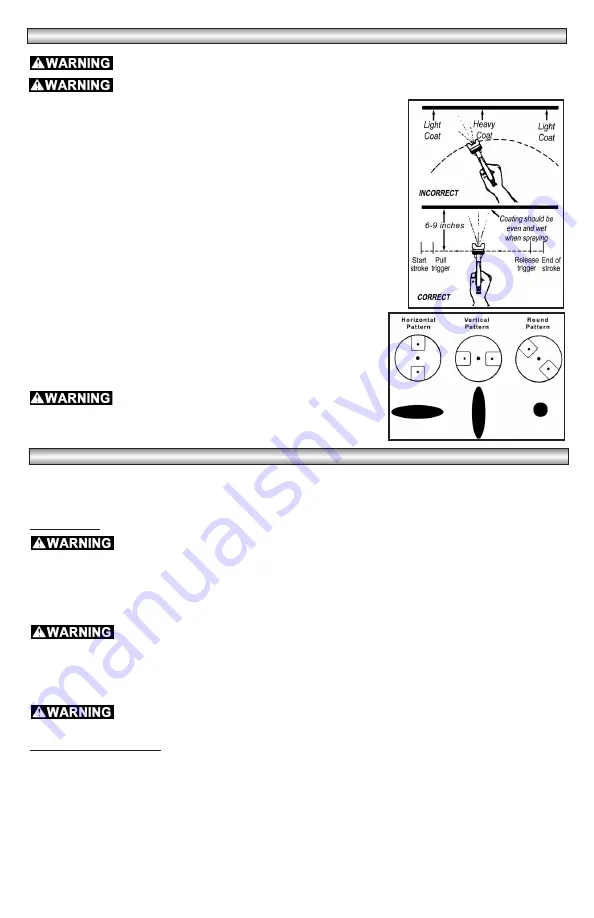
7. Begin spraying. Hold the gun about 6 to 9 inches from the work surface and
Figure 4
Figure 5
while moving the gun from side to side, depress the trigger to begin applying
material. To avoid blobs, runs and lap marks, keep the gun in motion at all times
before, after and while the trigger is depressed (see Figure 4). Practice painting on
a piece of scrap material or cardboard until the test coating results are acceptable,
making adjustments as follows:
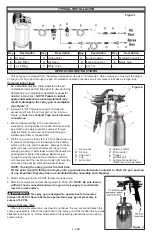
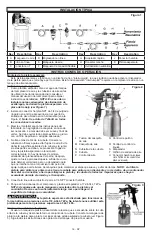
a. Pattern control knob (see Figure 2) - for a full pattern, turn the knob in a
counterclockwise direction and for a round pattern, turn the knob
clockwise. This knob is used to create the proper pattern of paint as it is
sprayed from the spray gun.
b. Fluid control knob (see Figure 2) - turn in a clockwise direction to reduce
the amount of paint and counter clockwise to increase the amount of paint.
This knob controls the amount of paint that is mixed with the air.
NOTE: If
the fluid control knob is turned in all the way, the gun will emit only
air.
c. Spray pattern shape (see Figure 5) - loosen the air cap nut and turn the
air cap for the desired spray pattern. Hand tighten the air cap nut after
adjustment.
Round pattern
used to draw fine lines with the gun close to the work
surface, for touch up work and for painting surfaces in difficult to reach
areas. To achieve this pattern, turn the air cap at a 45 degree angle.
Full fan pattern
used with the spray gun 6-9” from the work surface.
To achieve this pattern, turn the air cap either horizontally or vertically.
Do not turn the air adjustment knob or the fluid control
knob out past the first visible thread while the paint gun is under pressure
or they could fly out and cause serious injury.
OPERATING INSTRUCTIONS (continued)
USER MAINTENANCE INSTRUCTIONS
IMPORTANT: Keep the spray gun clean. To avoid clogging the air and paint passages and possibly ruining the spray
gun, clean the spray gun immediately after each use.
NOTE: Paint and other material dry quickly in the small passages
rendering the gun useless due to the difficulty of removing hardened paint from the passages inside the gun.
If the pas-
sages become clogged and the spray gun stops working, follow the instructions in “TO CLEAN PASSAGES” below.
After Each Use
Shut off the air supply to the tank and release the pressure in the tank by pulling the trigger
before cleaning to avoid injury.
1. Drain and clean the cup. To clean the gun passages, put a small amount of thinner or approved solvent in the cup.
Attach the cup to the gun and spray the liquid through the gun while shaking the gun vigorously. Periodically pull and
release the trigger to help break loose dried-on material.
2. Wipe the gun and cup exterior with a solvent soaked rag.
To avoid of the risk of fire and/or explosion, place cleaning rags and other flammable waste
materials in a secured metal container. The container should be disposed of properly in accordance with local,
state and federal regulations.
3. When cleaning out water based paints or materials with water, spray mineral spirits through the gun afterwards to
prevent corrosion.
When blowing out the hose, the open end should be aimed away from any person to avoid blow-
ing solvent into the eyes or skin causing possible injury.
To Clean Clogged Passages
1. Disassemble the spray gun and soak all metal parts in thinner or appropriate solvent for 15-30 minutes. A longer
soaking time may be required for severely clogged passages. Clean the parts with a soft wire brush.
NOTICE: Do not use lye or other alkalis solutions to clean the spray gun. These solutions attack aluminum
alloys and will ruin the spray gun over time.
NOTICE: Never use metal objects to clean precisely drilled passages. Damaged passages will cause
improper spraying.
2. Apply light machine oil to the leather packing. This will help prevent air leakage. If air leakage continues after
application of oil, the packing is probably worn out and should be replaced. The gun’s packing and o-rings will be
damaged by leaving the spray gun assembly immersed in solvent over extended periods.


