background image


11 

5.


Pull the trigger. 

      -If the nail drove into the wood for enough, continue with your intended operations. 
      -If the nail either went too far or not far enough, then refer to Adjusting Depth subsection. 

 
WANRNING: 

During operation, this nailer can propel objects into the air and exhaust 

concentrated bursts of air, causing immediate


eye damage. To reduce your risk from these 

hazards, always wear


ANSI approved safety galsses or a face shield.


WARNING: 

Never point this nalier at yourself or another person! Always pay attention to 

the direction this nailer is pointed to reduce the risk of serious injury. 


Adjusting Depth 
 

A depth adjustment device is attached to the nose for setting the nail depth. 
 
To adjust the depth: 
1.


Disconnect nailer from the air supply! 

2.


Loosen the cap screw on the depth adjustment device(Figure 3), 
and move the safety nose backward to increase the nail depth or 
forward to decrease the nail depth. 

3.


Connect nailer to the air supply, test the nail depth, and repeat 
this entire procedure if necessary until the nail depth is 
satisfactory. 

 
Clearing Jammed Nails 
 

A jammed nail must be cleared before using the nailer again. 
 
To clear a jammed nail from the discharge area: 
1.


Disconnect nailer from the air supply! 

2.


Pull the magazine handle all the way back until it latches. 

3.


Remove the nail stick from the magazine. 

4.


Locate the opening in the underside of the nailer nose (Figure 4). 

5.


Dislodge the jammed nail with a tool that will fit in the slot on 
the underside of the nose, such as needle nose pliers. 

6.


Throw the damaged nail away and insert a new nail stick that 
only contains clean, undamaged nails. DO NOT use dirty or damaged nails! 

 
Cleaning 
 

Use a good solvent to clean the nose assembly of the nailer. Always be sure that the nailer is dry before 
using it again. 
Do not allow dust, chips, sand, etc. into the air connectors or into the body of the nailer; this may result 
in leaks and damage to the nailer and the air couplings. 


WANRNING: 

Never use gasoline or other flammable liquids to clean this tool. Vapors in the 

tool may ignite, causing the tool to explode. Ignoring this warning may lead to serious 
personal injury or even death! 

Air supply 


1.


Use clean, Dry and regulated compressed air at 80-120 PSI (5.5-8bar). 

Fig.3 

Fig.4 

Summary of Contents for PS6120

Page 1: ...umatic 21ºRound Head Framing Nailer Model PS6120 Have product questions or need technical support Please feel free to contact us Website www Amerisuninc com Toll free 1 800 791 9458 M F 9 5 EST Email support amerisuninc com ...

Page 2: ...2 ...

Page 3: ...lb Warning We strongly recommend that this item not be modified and or used for any application other than that for which it was designed If you have any questions relative to its application do not use the equipment until you have consulted us and we have advised you Contact PowerSmart at 800 791 9458 M F 9am 5pm EST Thank you for purchasing PowerSmart products Please register online at www Ameri...

Page 4: ...or can rust and damage the internal workings of the tool Regulate air pressure Use air pressure compatible with ratings on the nameplate of the tool Not to exceed 120 psi 8 3 bar Do not connect the tool to a compressor rated at over 200 psi The tool operating pressure must never exceed 200 psi even in the event of regulator failure Only use air hose that is rated for a maximum working pressure of ...

Page 5: ...should be repaired or replaced before use Do not alter or modify the tool in any way Always assume that the tool contains fasteners Do not point the tool at co workers or yourself at any time No horseplay Work safe Respect the tool as a working implement Keep bystanders children and visitors away while operating a power tool Distractions can cause you to lose control When tool is not in use it sho...

Page 6: ...rm Be sure the workpiece is properly secured before pressing the nailer against the material The contact trip may cause the work material to shift unexpectedly Do not use tool in the presence of flammable dust gases or fumes The tool may produce a spark that could ignite gases causing a fire Driving a nail into another nail may also cause a spark Keep face and body parts away from back of the tool...

Page 7: ... safety equipment such as those dust masks that are specially designed to filter out microscopic particles WARNING ALWAYS USE SAFETY GLASSES Everyday eyeglasses are NOT safety glasses Also use face or dust mask if operation is dusty ALWAYS WEAR CERTIFIED SAFETY EQUIPMENT ANSI Z87 1 eye protection CAN CSA Z94 3 ANSI S12 6 S3 19 hearing protection NIOSH OSHA MSHA respiratory protection ...

Page 8: ...800 791 91458 or E mail us at support amerisuninc com if any parts are damaged or missing Including 1 Framing nailer one of Hex wrenches 2mm 3mm 4mm 5mm 1 Safety glasses 1 User manual 1 bottle of oil 1 1 4 Air inlet assembled on product and 1 Carrying case A Magazine C Trigger B E G Safety contact trip 1 4 Air quick coupler Magazine latch D F Exhaust deflector Magazine handle E A C B F G ...

Page 9: ... thoroughly understand all instructions and safety information before operating this framing nailer Failure to do so may cause serious injury or death Do not allow anyone to operate this framing nailer who has not read this manual a framing nailer can be dangerous if assembled or used improperly Do not operate this framing nailer if you have doubts or questions concerning safe operation Call our c...

Page 10: ...the nailer To operate your nailer If you have not read the safety instructions in this manual do not operate the nailer Before you operate your nailer place five to six drops of the included oil the quick connect fitting where the nailer connects to the air supply 1 Connect the air supply to the quick connect coupler 2 To test for proper nail penetration hold the nailer perpendicular to the surfac...

Page 11: ...til the nail depth is satisfactory Clearing Jammed Nails A jammed nail must be cleared before using the nailer again To clear a jammed nail from the discharge area 1 Disconnect nailer from the air supply 2 Pull the magazine handle all the way back until it latches 3 Remove the nail stick from the magazine 4 Locate the opening in the underside of the nailer nose Figure 4 5 Dislodge the jammed nail ...

Page 12: ...regulator installation order WARNING Exceeding the maximum permissible operating pressure may cause the nailer to explode blowing metal fragments in all directions To protect yourself from serious personal injury DO NOT allow your air compressor to exceed the recommended pressure when connected to this nailer MAINTENANCE WARNING Disconnect the tool from the air compressor before adjusting clearing...

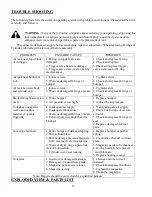
Page 13: ...O rings or seals 1 Tighten screw 2 Check and replace O rings or bumper Blade driving fastener too deep 1 Worn bumper 2 Air pressure is too high 1 Replace bumper 2 Adjust the air pressure Tool does not operate well can not drive fastener or operate sluggishly 1 Inadequate air supply 2 Inadequate lubrication 3 Worn or damaged O rings or seals 4 Exhaust port in cylinder head is blocked 1 Verify adequ...

Page 14: ...14 ...

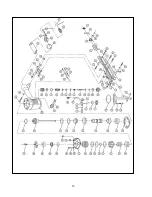
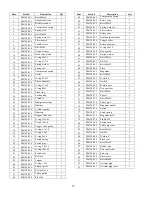
Page 15: ...pin 1 43 PS6120 043 Trigger 1 44 PS6120 044 O ring 1 7x2 1 45 PS6120 045 Safety spacer 1 46 PS6120 046 Roll pin 3x16 1 47 PS6120 047 Safety guide 1 48 PS6120 048 Pin 3x26 2 Item Stock Description Qty 49 PS6120 049 Compression spring 1 50 PS6120 050 Safety yoke 1 51 PS6120 051 Bolt M5x10 1 52 PS6120 052 Spring washer 5 4 53 PS6120 053 Flat washer 5 3 54 PS6120 054 Safety nose 1 55 PS6120 055 Depth ...

Page 16: ... original receipt which lists the date of purchase month and year and the name of the company purchased from THIS LIMITED WARRANTY DOES NOT APPLY TO ANY ACCESSORY ITEMS INCLUDED WITH THE TOOL SUCH AS CIRCULAR SAW BLADES OTHER RELATED ITEMS OR TO ANY REPLACEMENT PARTS LISTED UNDER MAINTENANCE ANY IMPLIED WARRANTIES SHALL BE LIMITED IN DURATION TO TWO 2 YEARS FROM DATE OF PURCHASE SOME STATES IN THE...

Reviews: