


10
Loading
WARNING:
Keep the tool pointed away from yourself and others. Serious personal injury
may result.
WARNING:
Never load nails with the contact trip or trigger activated. Personal injury may
result.
When replacing nails in your model PS6120, follow these guidelines:
Nail Type: 21 degree round head framing nail
Length: 2"-3 1/2"
Diameter: 0.113" – 0.130"
Capacity: 60 pcs
To load your nailer
:
1.
Disconnect nailer from the air supply!
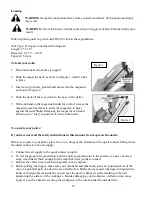
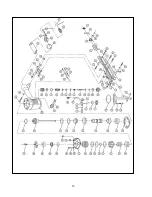
2.
Slide the magazine back, as shown in Figure 1, until it locks
in place.
3.
Insert a strip of nails, pointed-end down, into the magazine
as shown in Figure 2.
4.
Slide the nails all the way down to the nose of the nailer.
5.
With one hand on the magazine handle for control, release the
magazine catch and slowly allow the magazine to press
against the nails.
Note:
Releasing the magazine catch and
allowing it to “snap” in position is hard on the nailer.
To operate your nailer:
If you have not read the safety instructions in this manual, do not operate the nailer.
Before you operate your nailer, place five to six drops of the included oil the quick connect fitting where
the nailer connects to the air supply.
1.
Connect the air supply to the quick connect coupler.
2.
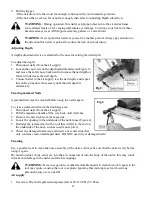
To test for proper nail penetration, hold the nailer perpendicular to the surface of a piece of clean
scrap wood that is thick enough for the length of nails you have loaded.
3.
Depress the safety nose mechanism against your workpiece.
4.
Before pulling the trigger, make sure your free hand and other body parts are positioned out of the
way of a potential path of a nail in case of deflection. Deflection is caused when grain irregularities,
knots or foreign objects inside the wood cause the nail to change its path, resulting in the nail
puncturing the surface of the workpiece. Besides damaging your workpiece, deflection can cause
injury if your free hand is securing the workpiece in the location that the nail deflects.
Figure 1
Figure 2