background image

flammable surface and away from flammable materials when re-charging
the battery.

3.

Do not place any object on top of the charger or place the charger on a
soft surface that may result in excessive internal heat. Place the charger
in a position away from any heat source.

4.

Do not use the charger with an extension cord. This can cause a low
voltage outage during charging.

5.

Do not charge leaking batteries. A compromised casing will release
volatile chemicals and gases. Charging a leaking battery can cause a fire
or explosion.

6.

Do not operate the charger if it has received a sharp blow, been dropped
or otherwise damaged in any way. Have it serviced or replaced.

POWER TOOL PRECAUTIONS

1.

Do not use any power tool with a malfunctioning power switch or control.
A power tool that fails to respond to the controls is dangerous and can
cause an injury. A qualified technician must repair and verify the power
tool is operating correctly, before it can be used.

2.

Disconnect the power source before installing or servicing the rotary tool.

3.

Never force the rotary tool. Excessive pressure could break the tool,
resulting in damage to your workpiece or serious personal injury.
Excessive pressure is the cause if your tool runs smoothly under no load,
but roughly under load.

4.

Keep hands and fingers away from the work area. Any part of body
contacting the rotary tool's working parts could cause an injury.
a.

Always be aware of the position of your hands relative to the rotary
bit. Avoid awkward hand positions where a sudden slip could cause a
hand to move into the rotary bit. Never reach behind or beneath the
rotary tool.

5.

Only use accessories that are specifically designed for use with the rotary
tool. Ensure the rotary bit is tightly installed.

6.

Only use the rotary bit that exceeds the Speed rating (see Specifications).

7.

Before using the rotary tool on a workpiece, test the rotary tool by
running it at the highest speed rating for at least 30 seconds in a safe
position. Stop immediately if there is any abnormal vibration or wobbling.
Check the tool to determine the cause.

9011438

CORDLESS ROTARY TOOL KIT, 40 PC

V1.0

www.princessauto.com / 1-800-665-8685

Page 6

Summary of Contents for 9011438

Page 1: ...V1 0 9011438 Please read and understand all instructions before use Retain this manual for future reference...

Page 2: ...This page is intentionally left blank...

Page 3: ...here is a possibility of property damage injury or death if certain instructions are not followed DANGER This notice indicates an immediate and specific hazard that will result in severe personal inju...

Page 4: ...ag the material and pull the hand into the tool 3 Wear the appropriate rated dust mask or respirator Wear a NIOSH approved respirator when working on materials that produce hazardous fumes dust or par...

Page 5: ...ll parts and accessories are designed with built in safety features that may be compromised if altered 3 Protect yourself against electric shocks when working on electrical equipment Avoid body contac...

Page 6: ...ource before installing or servicing the rotary tool 3 Never force the rotary tool Excessive pressure could break the tool resulting in damage to your workpiece or serious personal injury Excessive pr...

Page 7: ...and before connecting it to any air source 15 After making adjustments make sure that any adjustment devices are securely tightened 16 Never point the rotary tool towards yourself It could inflict an...

Page 8: ...e likely to slip from the workpiece VIBRATION PRECAUTIONS 1 This tool vibrates during use Repeated or long term exposure to vibration may cause temporary or permanent physical injury Take frequent bre...

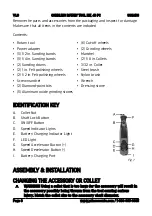
Page 9: ...Collet Steel brush Nylon brush Wrench Dressing stone IDENTIFICATION KEY A Collet Nut B Shaft Lock Button C ON OFF Button D Speed Indicator Lights E Battery Charging Indicator Light F LED Light G Spee...

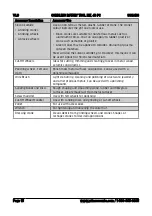
Page 10: ...spindle b Installing an Accessory Leave the collet nut on the spindle Pull the accessory from the spindle and set aside Slide the replacement accessory s shaft into the spindle at least 3 4 of an inch...

Page 11: ...000 RPM for wire brush accessories to prevent wires from being excessively worn or ejected during use ROTARY TOOL USE CAUTION Do not change the rotary tool s speed while in contact with the workpiece...

Page 12: ...shes periodically Replace brushes when they have about 1 4 in remaining or the brush displays signs of breakage crumbling or burning Check that the new brushes can move freely in the brush holder Run...

Page 13: ...ut 2 Collet 3 LED Light Cover 4 LED Light 5 Driver Shaft 6 Bearing 7 Spindle Lock Button 8 Spindle Lock Spring 9 Spindle Lock Pin 10 Sleeve 11 Screw 12 Motor 13 Screw 14 Left Housing 15 Right Housing...

Page 14: ...ORY DESCRIPTION Accessory Description Accessory Use Aluminum oxide Grinding stones Grinding wheels Abrasive wheels Use on metals castings welded joints rivets and rust Ideal for sharpening de burring...

Page 15: ...al wood ceramics and plastics Polishing wheel Felt and cloth Polish most metal surfaces and plastics Can be used with a polishing compound Wire Brush Light de burring cleaning and polishing of silverw...

Page 16: ...This page is intentionally left blank...

Page 17: ...V1 0 9011438 Vous devez lire et comprendre toutes les instructions avant d utiliser l appareil Conservez ce manuel afin de pouvoir le consulter plus tard...

Page 18: ...Cette page a t laiss e blanche intentionnellement...

Page 19: ...ou de dommage l quipement D FINITIONS DE DANGER Veuillez vous familiariser avec les avis de danger qui sont pr sent s dans ce manuel Un avis est une alerte indiquant qu il existe un risque de dommage...

Page 20: ...T DE PROTECTION INDIVIDUELLE 1 Portez toujours des lunettes antiprojections qui offrent une protection frontale et lat rale pour les yeux L quipement de protection des yeux devrait tre conforme la nor...

Page 21: ...z les composants de l outil r guli rement R parez ou remplacez les composants endommag s ou us s Utilisez seulement des pi ces de rechange identiques lors de l entretien S CURIT EN LECTRICIT AVERTISSE...

Page 22: ...en a r et n obstruez jamais les orifices de ventilation sur le dessus et le dessous du chargeur Placez le chargeur sur une surface plane ininflammable et l cart des mati res inflammables afin de charg...

Page 23: ...ssayez jamais d atteindre l arri re ou le dessous l outil rotatif 5 Utilisez uniquement des accessoires qui ont t sp cifiquement con us pour une utilisation avec l outil rotatif Assurez vous aussi que...

Page 24: ...s laquelle de l outil rotatif risque de toucher un c ble lectrique dissimul Les surfaces m talliques expos es l outil rotatif peuvent provoquer un choc chez l op rateur en raison d un fil sous tension...

Page 25: ...util endommageant ainsi l embout rotatif 6 Entretenez l ar te tranchante de l outil Une ar te mouss e glissera plus facilement de la pi ce travailler PR CAUTIONS RELATIVES AUX VIBRATIONS 1 Cet outil v...

Page 26: ...sont pr sents Contenu Outil rotatif Adaptateur d alimentation 5 bandes de pon age de 1 2 po 5 bandes de pon age de 1 4 po 2 tambours de pon age 2 meules de polissage en feutre de 1 po 2 meules de pol...

Page 27: ...es graves Faites correspondre la taille de la pince de serrage au diam tre de l arbre de l accessoire AVIS Ne serrez pas l crou de pince de serrage si aucun accessoire n est install l int rieur de la...

Page 28: ...nc le bouton de commande de verrouillage de l arbre et serrez bien l crou de pince de serrage en le faisant tourner la main Utilisez la petite cl pour serrer FONCTIONNEMENT BOUTON MARCHE ARR T 1 Tenez...

Page 29: ...op rations de polissage au moyen d accessoires de polissage en feutre Ils peuvent tre pr f rables galement pour des projets d licats comme la sculpture du bois et les pi ces fragiles des mod les r du...

Page 30: ...pour remplacer les accessoires 4 Gardez les poign es des outils ou les surfaces de prise propres et s ches 5 Veillez ce que les tiquettes et plaques d identification demeurent intactes sur l outil Ell...

Page 31: ...ISE AU REBUT Recyclez tout outil endommag et impossible r parer dans une installation pr vue cet effet Communiquez avec votre municipalit locale afin de conna tre la liste des sites de mise au rebut o...

Page 32: ...oche 8 Ressort de verrouillage de la broche 9 Goupille de s curit de broche 10 Manchon 11 Vis 12 Moteur 13 Vis 14 Bo tier gauche 15 Bo tier droit 16 Tableau de commande 17 Bouton MARCHE ARR T 18 Bouto...

Page 33: ...accessoires Utilisation des accessoires Oxyde d aluminium Pierres aiguiser Meules Meules abrasives Utilisez sur les m taux les pi ces coul es les joints soud s les rivets et la rouille Id ale pour l...

Page 34: ...al le bois la c ramique et le plastique Disque polir feutre et tissu Polissez la plupart des surfaces m talliques et des plastiques Peut tre utilis avec une p te polir Brosse m tallique bavurage l ger...

Page 35: ...Cette page a t laiss e blanche intentionnellement...

Page 36: ...Cette page a t laiss e blanche intentionnellement...

Reviews: