background image

Belt Sander/Bench Grinder with Light

6

For technical questions call: 1-800-665-8685

8359697

V 1.51

3.  Remove adjusting keys and wrenches. Check that keys and adjusting wrenches are removed from the tool or 

machine before connecting it. A wrench or key that is left attached to a rotating part of the tool increases the 

risk of personal injury.

4.  Avoid unintentional starts. Be sure that the switch is in the OFF position when not in use and before 

connecting it to any power source. 

5.  When not in use for an extended period, apply a thin coat of lubricant to the steel parts to avoid rust.

6.  Maintain label and name plate on the tool. These carry important information. If unreadable or missing, 

contact Princess Auto for a replacement.

COMMON TERMS

Arbor - The shaft that the grinding wheel is mounted too.

RPM -   Number of revolutions that the wheel makes per minute of operation.

Eye Shield -  Transparent adjustable guard positioned between the grinding wheel 

and operator’s face during operation.

Free Hand -  Performing a grinding operation without using the tool rest, work clamp, 

vise, fixture, etc, to keep the work piece secure during grinding.

Kick-Back -  Term used to describe the throwing of a workpiece from the grinding wheel. This is usually caused by 

the work piece not being in contact with the tool rest or making unintentional contact with wheel while 

unsupported.

Tool Rest -  Adjustable work surface used to support workpiece while grinding.

Workpiece - The item in which the grinding operation is being applied too.

LUBRICATION

All of the bearings in this tool are lubricated with a sufficient amount of high grade lubricant for the life of the unit 

under normal conditions. Therefore, no further lubrication is required.

UNPACKING

1.  Carefully remove the parts and accessories from the box.

2.  Make sure that all items listed in the parts lists are included.

3.  Inspect the parts carefully to make sure no breakage or damage occurred during shipping.

4.  Do not discard the packaging material until you have carefully inspected and satisfactorily operated the tool.

WARNING!  If any part is missing, do not operate the tool until the missing parts are replaced. Failure to do so 

could result in serious personal injury.

KNOW YOUR BENCH GRINDER

1. Work Lamp

2. Safety Eye Shield

3. Tool Rest

4. Base Mounting Plate

5. Right Safety Guard Fixing Knob

6. Belt Tracking Knob

OPERATING INSTRUCTIONS

Summary of Contents for 8359697

Page 1: ...User Manual 8359697 V 1 51 Belt Sander Bench Grinder Please read and understand all instructions before use Retain this manual for future reference ...

Page 2: ......

Page 3: ...fers to the parts list included WORK AREA 1 Keep your work area clean and well lit Cluttered and dark areas invite accidents 2 Operate in a safe work environment Do not use in damp or wet locations Do not expose to rain Do not use in the presence of flammable gases or liquids 3 Keep children bystanders and visitors away from the work area Distraction can cause you to lose control Do not let them h...

Page 4: ...nstall a polarized outlet Do not change the plug in any way Double insulation eliminates the need for a three wire grounded power cord and grounded power supply system 4 Grounded tools must be plugged into an outlet properly installed and grounded in accordance with all codes and ordinances Never remove the grounding prong or modify the plug in any way Do not use any adapter plugs Check with a qua...

Page 5: ... grinding area Plan the way you hold the workpiece Avoid awkward operations and hand positions where a sudden slip could cause fingers or hand to move into grinding surface 8 Use an appropriate dust respirator when working for an extended period of time This will help prevent breathing in the fine dust created while grinding CAUTION Some surfaces contain materials that can be toxic When working on...

Page 6: ...c to keep the work piece secure during grinding Kick Back Term used to describe the throwing of a workpiece from the grinding wheel This is usually caused by the work piece not being in contact with the tool rest or making unintentional contact with wheel while unsupported Tool Rest Adjustable work surface used to support workpiece while grinding Workpiece The item in which the grinding operation ...

Page 7: ...rol knob counterclockwise to make the belt move to the left or turn the tracking control knob clockwise to make the belt move to the right 5 After the belt is centered spin the grinding wheel approximately ten times to ensure that the belt continues to track properly ANGLE ADJUSTMENT Loosen the two inner hex head screws to move the sanding arm to the desired position Then tighten the two inner hex...

Page 8: ...dition on surface of workpiece 1 Machine vibrating 2 Workpiece not being held firmly 3 Wheel face uneven 4 Wheel is too hard 1 Make sure machines is securely mounted on a solid surface 2 Use a holding device to firmly retain the workpiece 3 Dress the grinding wheel 4 Use softer wheel or reduce the feed rate Lines on surface of workpiece 1 Impurity on wheel surface 2 Workpiece not being held tightl...

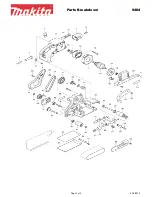
Page 9: ...Belt Sander Bench Grinder with Light 9 For technical questions call 1 800 665 8685 8359697 V 1 51 PARTS BREAKDOWN ...

Page 10: ... Sanding belt 1 37 Right wheel guard cover 1 38 Lock washer 1 39 Philips head screw 4 40 Right wheel cover 1 41 Cord bushing 1 42 Capacitor 1 43 Capacitor support 1 44 Standard spring ring 1 45 Lamp support 1 46 Cord and plug 1 47 Cord collar 1 48 Standard spring ring 1 49 Switch plate 1 50 Switch 1 51 Hex nut 1 52 Flat washer 1 53 Rubber foot 4 54 Coolant tray 1 55 Plate 1 56 Standard spring ring...

Page 11: ...iétaire 8359697 V 1 51 Vous devez lire et comprendre toutes les instructions avant d utiliser l appareil Conservez ce manuel afin de pouvoir le consulter plus tard Ponceuse à courroie Meuleuse d établi avec éclairage ...

Page 12: ......

Page 13: ...t toujours être propre et bien éclairé Des établis encombrés et des zones obscures invitent les accidents 2 Servez vous de cet outil dans un endroit sécuritaire N utilisez pas d outils mécaniques dans des endroits humides ou mouillés N exposez pas cet outil à la pluie Ne vous servez pas de cet outil dans une atmosphère explosive comme par exemple en présence d un liquide d un gaz ou de poussières ...

Page 14: ...roduite que d une seule façon dans une prise de courant polarisée S il vous est impossible de l introduire complètement tournez la à l envers Si c est encore impossible de la brancher demandez à un électricien professionnel d installer une prise de courant polarisée Ne modifiez jamais la fiche elle même L isolement double élimine la nécessité d utiliser un cordon mis à terre à trois fils et un sys...

Page 15: ...fer et prenez des pauses fréquentes 6 Une grande quantité d étincelles peut se produire lorsque vous travaillez avec le touret d établi Tenez l outil de manière à ce que les étincelles s envolent loin des personnes et des matières inflammables 7 Lorsque l appareil est en cours de fonctionnement n approchez pas les mains de la zone de meulage Prévoyez la manière dont vous allez tenir la pièce à tra...

Page 16: ...ndommagées contactez Princess Auto pour obtenir des étiquettes de remplacement LUBRIFICATION Tous les paliers de cet outil sont lubrifiés d une quantité suffisante de lubrifiant de haute qualité pour toute la durée de service de l outil en conditions normales d utilisation Par conséquent aucune autre lubrification n est requise GLOSSAIRE DES TERMES Axe L arbre sur lequel la meule est montée Tr min...

Page 17: ... qu elle n entre pas en contact avec les côtés du couvercle de la courroie Pour centrer la courroie abrasive 1 DÉCONNECTEZ L APPAREIL DE L ALIMENTATION ÉLECTRIQUE 2 Tournez la meule 3 À mesure que vous tournez la meule observez comment la courroie abrasive se déplace sur le rouleau supérieur Si la courroie est correctement centrée elle devrait être centrée entre les côtés du couvercle de la courro...

Page 18: ...égime à vide marqué sur la plaque des données de la meule pour assurer la conformité à ANSI B7 1 Pour remplacer la meule déposez le couvercle de la meule en desserrant les vis Desserrez l écrou de la meule dans le sens horaire pour le côté gauche et dans le sens antihoraire pour le côté droit Retirez la bride extérieure et la meule Pour installer une nouvelle meule inversez la procédure ci dessus ...

Page 19: ...vail 1 L appareil vibre 2 La pièce de travail n est pas saisie fermement 3 Face de roue inégale 4 La meule est trop dure 1 Assurez vous que l appareil est monté sur une surface solide en toute sécurité 2 Utilisez un dispositif de saisie pour retenir fermement la pièce de travail 3 Dressez la meule 4 Utilisez une meule plus douce ou réduisez la vitesse d alimentation Rayures sur la surface de la pi...

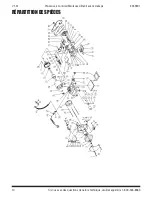
Page 20: ...Ponceuse à courroie Meuleuse d établi avec éclairage 10 Si vous avez des questions de nature technique veuillez appeler le 1 800 665 8685 8359697 V 1 51 RÉPARTITION DES PIÈCES ...

Page 21: ... 1 37 Couvercle de protection de roue droite 1 38 Rondelle frein 1 39 Vis cruciforme 4 40 Couvercle de roue droite 1 41 Manchon du cordon 1 42 Condensateur 1 43 Support de condensateur 1 No Description Qté 44 Anneau élastique standard 1 45 Support de lampe 1 46 Cordon et prise 1 47 Collier de cordon 1 48 Anneau élastique standard 1 49 Plaque d interrupteur 1 50 Interrupteur 1 51 Écrou hexagonal 1 ...

Page 22: ......

Reviews: