Power Fist 8359697 User Manual Download Page 5

Belt Sander/Bench Grinder with Light

5

For technical questions call: 1-800-665-8685

8359697

V 1.51

Rating

Total Length of cord 

Amp

Volts

25 ft

50 ft

100 ft

150 ft

AWG

1 to 5

120V

18

16

16

14

6 to 10

120V

16

16

14

12

11 to 12

120V

14

14

14

12

12 to 16

120V

14

12

Not Recommended

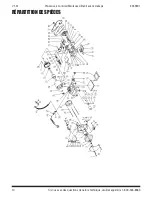
SPECIFIC SAFETY PRECAUTIONS FOR GRINDERS

1.  Do not start the tool if the grinding wheel is in contact with the work piece.

2.  Always ensure the safety guards are attached correctly and do not operate the bench grinder without 

the guards attached. Adjust the distance between the wheel and the tool rest to maintain a 1/16” or less 

separation as the diameter of the wheel decreases with use.

3.  Only use grinding or cutting wheels with the correct bore size for the spindle of the grinder.

4.  Before beginning work on your project check if the grinding disc is in safe working condition. Before using 

the tool on an actual work piece, make a test run of the tool at the highest no-load speed for at least  

30 seconds in a safe position. Stop immediately if there is any vibration or wobbling that could indicate poor 

installation or a poorly balanced wheel. You can find out if a disc is defective or cracked by letting it run at 

no load in a safe environment with the guard between you and the disk. After a minute, if the disk has not 

broken apart, it is considered in good working condition.

5.  During long work periods do not allow the motor to overload and/or overheat, take frequent breaks.

6.  A large amount of sparks will be created when working with the bench grinder. Hold the tool so that sparks 

fly away from you and other persons or flammable materials.

7.  When the machine is in operation, keep hands away from the grinding area. Plan the way you hold the 

workpiece. Avoid awkward operations and hand positions where a sudden slip could cause fingers or hand 

to move into grinding surface.

8.  Use an appropriate dust respirator when working for an extended period of time. This will help prevent 

breathing in the fine dust created while grinding.


CAUTION:  Some surfaces contain materials that can be toxic. When working on materials that may 

contain lead, asbestos, copper chromium arsenate or other toxic materials, extra care should 

be taken to avoid inhalation and minimize skin contact.

9.  The disc will not stop immediately when the machine is turned off. Exercise caution.

10. Do not touch the grinding surface immediately after use. The surface will be hot and you could  

injure yourself.

11. Never stand on the tool. Serious injury could occur if the tool is tipped or if the wheel is  

unintentionally contacted.

12. When replacing a wheel, make sure it is suited for the highest possible speed achievable by the grinder. 

Wheels that are not rated for the tool’s no load speed may fly apart when used. After installing any wheel, let 

it run freely for a minute before proceeding with the task to perform. Cracked, damaged or unsuitable wheels 

will have flown apart by this time.

13. Do not grind on the sides of grinding wheels unless they are specifically designed for that purpose.

TOOL USE AND CARE

1.  Use the right tool for the job. Do not attempt to force a small tool or attachment to do the work of a larger 

industrial tool. The tool will perform better and more safely at the task for which it was intended. Do not 

modify this tool or use for a purpose for which it was not designed.

2.  Maintain tools with care. Keep tools clean, and in good condition for a better and safer performance. Follow 

instructions for changing accessories. Applying excessive force can lead to slips and damage to your work 

or personal injury.

Summary of Contents for 8359697

Page 1: ...User Manual 8359697 V 1 51 Belt Sander Bench Grinder Please read and understand all instructions before use Retain this manual for future reference ...

Page 2: ......

Page 3: ...fers to the parts list included WORK AREA 1 Keep your work area clean and well lit Cluttered and dark areas invite accidents 2 Operate in a safe work environment Do not use in damp or wet locations Do not expose to rain Do not use in the presence of flammable gases or liquids 3 Keep children bystanders and visitors away from the work area Distraction can cause you to lose control Do not let them h...

Page 4: ...nstall a polarized outlet Do not change the plug in any way Double insulation eliminates the need for a three wire grounded power cord and grounded power supply system 4 Grounded tools must be plugged into an outlet properly installed and grounded in accordance with all codes and ordinances Never remove the grounding prong or modify the plug in any way Do not use any adapter plugs Check with a qua...

Page 5: ... grinding area Plan the way you hold the workpiece Avoid awkward operations and hand positions where a sudden slip could cause fingers or hand to move into grinding surface 8 Use an appropriate dust respirator when working for an extended period of time This will help prevent breathing in the fine dust created while grinding CAUTION Some surfaces contain materials that can be toxic When working on...

Page 6: ...c to keep the work piece secure during grinding Kick Back Term used to describe the throwing of a workpiece from the grinding wheel This is usually caused by the work piece not being in contact with the tool rest or making unintentional contact with wheel while unsupported Tool Rest Adjustable work surface used to support workpiece while grinding Workpiece The item in which the grinding operation ...

Page 7: ...rol knob counterclockwise to make the belt move to the left or turn the tracking control knob clockwise to make the belt move to the right 5 After the belt is centered spin the grinding wheel approximately ten times to ensure that the belt continues to track properly ANGLE ADJUSTMENT Loosen the two inner hex head screws to move the sanding arm to the desired position Then tighten the two inner hex...

Page 8: ...dition on surface of workpiece 1 Machine vibrating 2 Workpiece not being held firmly 3 Wheel face uneven 4 Wheel is too hard 1 Make sure machines is securely mounted on a solid surface 2 Use a holding device to firmly retain the workpiece 3 Dress the grinding wheel 4 Use softer wheel or reduce the feed rate Lines on surface of workpiece 1 Impurity on wheel surface 2 Workpiece not being held tightl...

Page 9: ...Belt Sander Bench Grinder with Light 9 For technical questions call 1 800 665 8685 8359697 V 1 51 PARTS BREAKDOWN ...

Page 10: ... Sanding belt 1 37 Right wheel guard cover 1 38 Lock washer 1 39 Philips head screw 4 40 Right wheel cover 1 41 Cord bushing 1 42 Capacitor 1 43 Capacitor support 1 44 Standard spring ring 1 45 Lamp support 1 46 Cord and plug 1 47 Cord collar 1 48 Standard spring ring 1 49 Switch plate 1 50 Switch 1 51 Hex nut 1 52 Flat washer 1 53 Rubber foot 4 54 Coolant tray 1 55 Plate 1 56 Standard spring ring...

Page 11: ...iétaire 8359697 V 1 51 Vous devez lire et comprendre toutes les instructions avant d utiliser l appareil Conservez ce manuel afin de pouvoir le consulter plus tard Ponceuse à courroie Meuleuse d établi avec éclairage ...

Page 12: ......

Page 13: ...t toujours être propre et bien éclairé Des établis encombrés et des zones obscures invitent les accidents 2 Servez vous de cet outil dans un endroit sécuritaire N utilisez pas d outils mécaniques dans des endroits humides ou mouillés N exposez pas cet outil à la pluie Ne vous servez pas de cet outil dans une atmosphère explosive comme par exemple en présence d un liquide d un gaz ou de poussières ...

Page 14: ...roduite que d une seule façon dans une prise de courant polarisée S il vous est impossible de l introduire complètement tournez la à l envers Si c est encore impossible de la brancher demandez à un électricien professionnel d installer une prise de courant polarisée Ne modifiez jamais la fiche elle même L isolement double élimine la nécessité d utiliser un cordon mis à terre à trois fils et un sys...

Page 15: ...fer et prenez des pauses fréquentes 6 Une grande quantité d étincelles peut se produire lorsque vous travaillez avec le touret d établi Tenez l outil de manière à ce que les étincelles s envolent loin des personnes et des matières inflammables 7 Lorsque l appareil est en cours de fonctionnement n approchez pas les mains de la zone de meulage Prévoyez la manière dont vous allez tenir la pièce à tra...

Page 16: ...ndommagées contactez Princess Auto pour obtenir des étiquettes de remplacement LUBRIFICATION Tous les paliers de cet outil sont lubrifiés d une quantité suffisante de lubrifiant de haute qualité pour toute la durée de service de l outil en conditions normales d utilisation Par conséquent aucune autre lubrification n est requise GLOSSAIRE DES TERMES Axe L arbre sur lequel la meule est montée Tr min...

Page 17: ... qu elle n entre pas en contact avec les côtés du couvercle de la courroie Pour centrer la courroie abrasive 1 DÉCONNECTEZ L APPAREIL DE L ALIMENTATION ÉLECTRIQUE 2 Tournez la meule 3 À mesure que vous tournez la meule observez comment la courroie abrasive se déplace sur le rouleau supérieur Si la courroie est correctement centrée elle devrait être centrée entre les côtés du couvercle de la courro...

Page 18: ...égime à vide marqué sur la plaque des données de la meule pour assurer la conformité à ANSI B7 1 Pour remplacer la meule déposez le couvercle de la meule en desserrant les vis Desserrez l écrou de la meule dans le sens horaire pour le côté gauche et dans le sens antihoraire pour le côté droit Retirez la bride extérieure et la meule Pour installer une nouvelle meule inversez la procédure ci dessus ...

Page 19: ...vail 1 L appareil vibre 2 La pièce de travail n est pas saisie fermement 3 Face de roue inégale 4 La meule est trop dure 1 Assurez vous que l appareil est monté sur une surface solide en toute sécurité 2 Utilisez un dispositif de saisie pour retenir fermement la pièce de travail 3 Dressez la meule 4 Utilisez une meule plus douce ou réduisez la vitesse d alimentation Rayures sur la surface de la pi...

Page 20: ...Ponceuse à courroie Meuleuse d établi avec éclairage 10 Si vous avez des questions de nature technique veuillez appeler le 1 800 665 8685 8359697 V 1 51 RÉPARTITION DES PIÈCES ...

Page 21: ... 1 37 Couvercle de protection de roue droite 1 38 Rondelle frein 1 39 Vis cruciforme 4 40 Couvercle de roue droite 1 41 Manchon du cordon 1 42 Condensateur 1 43 Support de condensateur 1 No Description Qté 44 Anneau élastique standard 1 45 Support de lampe 1 46 Cordon et prise 1 47 Collier de cordon 1 48 Anneau élastique standard 1 49 Plaque d interrupteur 1 50 Interrupteur 1 51 Écrou hexagonal 1 ...

Page 22: ......

Reviews: