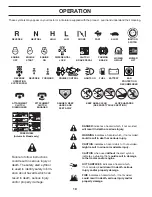
background image

3

III. SLOPE OPERATION

WARNING! When loading or unloading 

this machine, do not exceed the maximum 

recommended operation angle of 15°.

Slopes are a major factor related to loss of control and tip-over 

accidents, which can result in severe injury or death.  Operation 

on all slopes requires extreme caution.  If you cannot back up 

the slope or if you feel uneasy on it, do not mow it.
• 

Mow up and down slopes, not across.

• 

Watch for holes, ruts, bumps, rocks, or other hidden ob-

jects.  Uneven terrain could overturn the machine.  Tall 

grass can hide obstacles.

• 

Choose a low ground speed so that you will not have to 

stop or shift while on the slope.

• 

Do not mow on wet grass. Tires may lose traction. Always 

keep the machine in gear when going down slopes.

• 

Do not shift to neutral and coast downhill.

• 

Avoid starting, stopping, or turning on a slope.  If the tires 

lose traction, disengage the blades and proceed slowly 

straight down the slope.

• 

Keep all movement on the slopes slow and gradual.  Do 

not make sudden changes in speed or direction, which 

could cause the machine to roll over.

• 

Use extreme caution while operating machine with grass 

catchers or other at tach ments; they can affect the stability 

of the machine. Do no use on steep slopes.

• 

Do not try to stabilize the machine by putting your foot on 

the ground.

•  Do not mow near drop-offs, ditches, or embankments.  

The machine could suddenly roll over if a wheel is over 

the edge or if the edge caves in.

•  If machine stops while going uphill, disengage blades, 

shift into reverse and back down slowly.

• 

Do not turn on slopes unless necessary, and then, turn 

slowly and gradually downhill, if possible.

SAFETY RULES

Safe Operation Practices for Ride-On Mowers

IV. TOWING

•  Tow only with a machine that has a hitch designed for 

towing. Do not attach towed equipment except at the hitch 

point.

•  Follow the manufacturer's recommendation for weight 

limits for towed equipment and towing on slopes.

• 

Never allow children or others in or on towed equipment.

• 

On slopes, the weight of the towed equipment may cause 

loss of traction and loss of control.

• 

Travel slowly and allow extra distance to stop. 

V. SERVICE

SAFE HANDLING OF GASOLINE

To avoid personal injury or property damage, use extreme 

care in handling gasoline. Gasoline is extremely flammable 

and the vapors are explosive.
• 

Extinguish all cigarettes, cigars, pipes, and other sources 

of ignition.

• 

Use only approved gasoline container.

• 

Never remove gas cap or add fuel with the engine running.

• 

Allow engine to cool before refueling.

• 

Never fuel the machine indoors.

•  Never store the machine or fuel container where there 

is an open flame, spark, or pilot light such as on a water 

heater or other appliances.

•  Never fill containers inside a vehicle or on a truck or 

trailer bed with plastic liner. Always place containers on 

the ground away from your vehicle when filling.

• 

Remove gas-powered equipment from the truck or trailer 

and refuel it on the ground. If this is not possible, then 

refuel such equipment with a portable container, rather 

than from a gasoline dispenser nozzle.

• 

Keep the nozzle in contact with the rim of the fuel tank or 

container opening at all times until fueling is complete. 

Do not use a nozzle lock-open device.

• 

If fuel is spilled on clothing, change clothing immediately.

•  Never overfill fuel tank. Replace gas cap and tighten 

securely.

GENERAL SERVICE

• 

Never operate machine in a closed area.

• 

Keep all nuts and bolts tight to ensure the equipment is 

in safe working condition.

•  Never tamper with safety devices. Never interfere with 

the intended function of a safety device or reduce the 

protection provided by a safety device. Check there proper 

operation regularly. NEVER operate a machine with a 

safety device that does not function properly.

• 

Keep machine free of grass, leaves, or other debris build-

up.  Clean oil or fuel spillage and remove any fuel-soaked 

debris.  Allow machine to cool before storing.

• 

If you strike a foreign object, stop and inspect the machine. 

Repair, if necessary, before restarting.

• 

Never make any adjustments or repairs with the engine 

run ning.

• 

Check grass catcher components and the discharge chute  

frequently and replace with manufacturer's recommended 

parts, when necessary.

• 

Mower blades are sharp.  Wrap the blade or wear gloves, 

and use extreme caution when servicing them.

• 

Check brake operation frequently.  Adjust and service as 

required.

• 

Maintain or replace safety and instruction labels, as nec-

essary.

 Use ear protectors to avoid damage to hearing.

  Always wear eye protection when operating machine.

Summary of Contents for PBLGT2654

Page 1: ...is Manual and follow all Warnings and Safety Instructions Failure to do so can result in serious injury IMPORTANT MANUAL DO NOT THROW AWAY Gasoline containing up to 10 ethanol E10 is acceptable for us...

Page 2: ...operate the machine while under the influence of alcohol or drugs Watchfortrafficwhenoperatingnearorcrossingroadways Use extreme caution when loading or unloading the ma chine into a trailer or truck...

Page 3: ...OF GASOLINE To avoid personal injury or property damage use extreme care in handling gasoline Gasoline is extremely flammable and the vapors are explosive Extinguish all cigarettes cigars pipes and o...

Page 4: ...PPE while operating this machine including at a minimum sturdyfootwear eyeprotection andhearingprotection Do not mow in shorts and or open toed footwear Always let someone know you are outside mowing...

Page 5: ...eration of your tractor all parts and hardware you assemble must be tightened securely Use the correct tools as necessary to ensure proper tightness TOOLS REQUIRED FOR ASSEMBLY A socket wrench set wil...

Page 6: ...2 LABEL ADJUST SEAT See Fig 2 Raiseseatandloosenadjustmentbolts Donotremove adjustment bolts Lower seat into operating position and sit on seat Slide seat until a comfortable position is reached which...

Page 7: ...R BRACKET W FRONT GAUGE WHEEL X SHOULDER BOLT Y 1 1 4 O D WASHER Z 3 8 16 LOCKNUT Fig 5 Y Z W H X Fig 7 3 TURN STEERING WHEEL LEFT AND POSITION MOWER See Fig 6 Turn steering wheel to the left as far a...

Page 8: ...on bracket F Insert other end of link E into hole in front mower bracket H and secure with washer and small retainer spring J NOTE Requires deck lifting Fig 14 FRONT LINK LOCATION E G F M E FRONT LIFT...

Page 9: ...arnhowtooperateyourtractor checktoseethat the brake is operating properly See TO CHECK BRAKE in the Service and Adjustments section of this manual CHECKLIST BEFORE YOU OPERATE YOUR NEW TRACTOR WE WISH...

Page 10: ...rty damage DANGER indicates a hazard which if not avoided will result in death or serious injury WARNING indicates a hazard which if not avoided could result in death or serious injury CAUTION indicat...

Page 11: ...he engine C PARKING BRAKE Locks clutch brake pedal into the brake position D THROTTLECONTROL Usedtocontrolenginespeed E ATTACHMENTCLUTCHSWITCH Usedtoengagethe mowerbladesorotherattachmentsmountedtoyou...

Page 12: ...erating efficiency Full speed fast offers the best mower performance B C ATTACHMENT CLUTCH SWITCH ENGAGED ATTACHMENT CLUTCH SWITCH DISENGAGED D F GROUND DRIVE To stop ground drive depress brake pedal...

Page 13: ...e average lawn should be cut to approximately 2 1 2 63 5 mm during the cool season and to over 3 76 2 mm during hot months For healthier and better looking lawns mow often and after moderate growth Fo...

Page 14: ...ross any slope Choose the slowest speed before starting up or down hills Avoid stopping or changing speed on hills If stopping is absolutely necessary push brake pedal quickly to brake position and en...

Page 15: ...easier starting See OIL VISCOSITY CHART in the Maintenance section of this manual To change engine oil see the Maintenance section in this manual TO START ENGINE See Fig 16 When starting the engine fo...

Page 16: ...ed that the transmission be purged before operating tractor for the first time This procedure will remove any trapped air inside the transmission which may have devel oped during shipping of your trac...

Page 17: ...CATED USE ONLY A DRY POWDERED GRAPHITE TYPE LUBRICANT SPARINGLY 1 Change more often when operating under a heavy load or in high ambient temperatures 2 Service more often when operating in dirty or du...

Page 18: ...s running with the ignition switch in the ROS ON position and the attachment clutch engaged any attempt by the operator to shift into reverse should NOT shut off the engine BLADE CARE Forbestresultsmo...

Page 19: ...not to allow dirt to enter the engine when changing oil Remove yellow cap from end of drain valve and install the drain tube onto the fitting 02463 CLOSED AND LOCKED POSITION DRAIN TUBE OIL DRAIN VALV...

Page 20: ...tor replacement is required Withenginecool removefilterandplugfuellinesections Place new fuel filter in position in fuel line with arrow pointing towards carburetor Be sure there are no fuel line leak...

Page 21: ...n the water on 6 While sitting in the operator s position on the tractor re start the engine and place the throttle lever in the Fast position IMPORTANT Recheck the area to ensure the area is clear En...

Page 22: ...ht rear mower bracket D remove retainer spring and washer and pull mower toward you until the bar falls from the hole in bracket Turn tractor steering wheel to the left as far as it will go Slide mowe...

Page 23: ...y checking the appearance Readjust if neces sary until you are satisfied with the results A TURN NUT LEFT TO LOWER MOWER TURN NUT RIGHT TO RAISE MOWER Fig 36 Fig 37 PRECISION SIDE TO SIDE ADJUSTMENT S...

Page 24: ...e tractor forward If the rear wheels rotate then the brake needs to be serviced Contact a qualified service center TO REPLACE MOTION DRIVE BELT See Fig 40 Park the tractor on level surface Engage park...

Page 25: ...RED cable last from both batteries WEAK OR DEAD BATTERY FULLY CHARGED BATTERY Fig 43 SERVICE AND ADJUSTMENTS TRANSAXLE MOTION CONTROL LEVER NEUTRAL ADJUSTMENT See Fig 42 The motion control lever has b...

Page 26: ...ENGINE TO ADJUST THROTTLE CONTROL CABLE The throttle control has been preset at the factory and adjustment should not be necessary If adjustment is nec essary see engine manual TO ADJUST CHOKE CONTRO...

Page 27: ...Plastic cannot breathe which allows condensation to form and will cause your tractor to rust IMPORTANT NEVER COVER TRACTOR WHILE ENGINE AND EXHAUST AREAS ARE STILL WARM Immediately prepare your tracto...

Page 28: ...eck replace ignition switch 8 Faulty solenoid or starter 8 Check replace solenoid or starter 9 Faulty operator presence switch es 9 Contact an authorized service center department Engine clicks but wi...

Page 29: ...mower drive belt 9 Blades improperly installed 9 Reinstall blades sharp edge down 10 Improper blades used 10 Replace with blades listed in parts manual 11 Cloggedmowerdeckventholesfrombuildup of gras...

Page 30: ...never across the face Do not mow slopes greater than 15 degrees Make turns gradually to prevent tipping or loss of control Exercise extreme caution when changing direction on slopes 1 Fold this page a...

Page 31: ...entender y seguir todas las instruc ciones sobre la m quina y en el manual antes de empezar Si no se observan las instrucciones de seguridad siguientes se pueden producir lesiones graves o la muerte E...

Page 32: ...bajo de la m quina Mantener siempre limpia la abertura de descarga Permitir el funcionamiento de la m quina s lo a adultos que tengan familiaridad con las instrucciones Limpiar el rea de objetos como...

Page 33: ...oconregularidad NUNCA utilice una m quina con un dispositivo de seguridad que no est funcionando correctamente Mantener la m quina libre de hierba hojas u otros re siduos acumulados Limpiar las salpic...

Page 34: ...A Este tractor viene equipado con un motor de combusti n interna y no se debe usar sobre o cerca de un terreno no desarrollado cubierto de bosques de arbustos o de c sped o menos que el sistema de esc...

Page 35: ...gura Use las herramientas correctas seg n sea necesario para asegurarse de que est n apretados en forma segura HERRAMIENTAS NECESARIAS PARA EL MONTAJE Un juego de llaves de tubo facilitar el montaje A...

Page 36: ...anual ETIQUETA Fig 1 Fig 2 AJUSTE DEL ASIENTO Vea Fig 2 Levante el asiento y afloje los pernos de ajuste No quitar los pernos de ajuste Baje el asiento a la posici n de operaci n y si ntese Deslice el...

Page 37: ...t n orientados hacia adelante antes de deslizar la cortadora de c sped debajo del tractor Deslice la cortadora de c sped debajo del tractor hasta que se encuentre centrada debajo del tractor 2 ARME LA...

Page 38: ...uadra derecha de la cortadora de c sped H y asegure con una arandela y un resorte de retenci n peque o J AVISO Requiere levantar la plataforma Fig 13 7 INSTALE LOS ESLABONES DE LEVANTAMIENTO TRA SEROS...

Page 39: ...del motor M M POLEA DEL EMBRAGUE DEL MOTOR M Fig 15 LISTA DE REVISI N ANTES DE OPERAR Y DE DISFRUTAR DE SU TRACTOR NUEVO LE DESEAMOS QUE RECIBA EL MEJOR RENDIMIENTO Y LA MAYOR SATISFACCION DE ESTE PR...

Page 40: ...ue pueden provocar la muerte heridas graves y o da os a la m quina PELIGRO indica un peligro que si no se evita provoca muerte o lesiones graves ADVERTENCIA indica un peligro que si no se evita puede...

Page 41: ...INTERRUPTOR DE IGNICI N Se usa para hacer arrancar o hacer parar el motor G SISTEMA DE FUNCIONAMIENTO HACIA ATR S ROS EN POSICI N ON Permite la operaci n del conjunto segador o otro accesorio accionad...

Page 42: ...damos gafas de seguridad o una m scara de visi n amplia de seguridad usada sobre las gafas B C INTERRUPTOR EMBRAGUE DEL ACCESORIO DESENGANCHADO INTERRUPTOR EMBRAGUE DEL ACCESORIO ENGANCHAR PARADA Vea...

Page 43: ...reno disparejo spero o en cerros Elija a qu altura cortar el c sped Vea PARA AJUS TAR LA ALTURA DE CORTE DE LA SEGADORA Haga arrancar las cuchillas de la segadora enganchando el control del embrague d...

Page 44: ...o cambiar la velocidad en cerros Si es absolutamente necesario el parar empuje el pedal de freno r pidamente a la posici n de freno y enganche el freno de estacionamiento Para volver a empezar con el...

Page 45: ...e Viscosidad Del Aceite en la secci n de Mantenimento de este manual Para cambiar el aceite del motor vea la secci n de Manten imiento en este manual PARAHACERARRANCARELMOTOR VeaFig 16 Al hacer arranc...

Page 46: ...erar el tractor paralaprimeravez Esteprocesoremover cualquieraireadentro de la transmisi n que se halla formado durante el transporte de su tractor IMPORTANTE SI POR ACASO SU TRANSMISI N DEBE SER REMO...

Page 47: ...EMP ORADA ALMACEN AMIENTO CADA 50 HORAS Limpiar el filtro de aire Cambiar el aceite del motor Modelos con filtro de aceite Limpiar las aletas de enfriamiento Limpiar la rejilla de aire Cambiar el filt...

Page 48: ...del operador de viajar marcha atr s NO apagar el motor 02828 POSICI N ROS ON MOTOR EN POSICI N ON OPERACI N NORMAL REMOCI N DE LA CUCHILLA Vea Fig 28 Levante la segadora a su posici n m s alta para pe...

Page 49: ...adaproxi mada vea las Especificaciones del Producto secci n de este manual Use un medidor en la tapa varilla indicadora del nivel para relleno del aceite para revisar el nivel Mantenga el aceite en la...

Page 50: ...externas seg n sea necesario Aseg rese que se vuelvan a instalar las tapas de enfriamiento AVISO Si se opera la m quina con una rejilla del c sped blo queada sucia o con las aletas de enfriamiento tap...

Page 51: ...Fig 33 La plataforma del tractor est equipada con un puerto de lavado como parte del sistema de lavado de la plataforma Se debe utilizar despu s de cada uso 1 Lleve el tractor a un lugar horizontal y...

Page 52: ...apalanca elevadora al cambiarla de posici n Por el lado derecho de la cortadora desconecte la barra anti balanceo S de la barra posterior derecha de la cortadora D retire el resorte de contenci n y la...

Page 53: ...o bien h gala girar hacia la derecha para subirla Fig 36 Fig 38 Fig 39 AJUSTE DE DELANTE A ATR S Vea Fig 38 y 39 IMPORTANTE El piso debe quedar bien nivelado de lado a lado Para que el c sped le qued...

Page 54: ...acia adelante el tractor manualmente Sustituir laszapatasdelfrenoocontactarotrocentrodeserviciocualificado PARA CAMBIAR LA CORREA DE IMPULSI N DE MOVIMIENTO Vea Fig 40 Estacione el tractor en una supe...

Page 55: ...mbas bater as REGULACI N DE LA PALANCA DE CONTROL DEL MOVIMIENTO NEUTRO DEL CAMBIO MEC NICO Vea Fig 42 La palanca de control del movimiento del cambio mec nico ya viene predefinida por la Casa constru...

Page 56: ...a Operaci n de este manual MOTOR PARA AJUSTAR EL CABLE DE CONTROL DE LA ACELERACI N El control de la aceleraci n ha sido preajustado en la f brica y no deber a necesitar ajustes Revise los ajustes que...

Page 57: ...ador conectado MOTOR SISTEMA DE COMBUSTIBLE IMPORTANTE Es important evitar que se forman depositos de goma en partes fundamentales del sistema de combus tible tales como el carburador el filtro del co...

Page 58: ...allados 8 Revise cambie el solenoide o arrancador 9 Interruptor es que exige n la presencia del operador fallado 9 P ngase en contacto con un centro de servicio cuali ficado El motor suena pero no arr...

Page 59: ...la cajade la segadora 8 La correa de impulsi n de la segadora est des gastada o desajustada 8 Cambie ajuste la correa de impulsi n de la segadora 9 Las cuchillas est n mal coninstaladas 9 Vuelva a in...

Page 60: ...nunca transversalmente con respecto a las pendientes No cortar pendientes mayores de 15 grados Haga los virajes gradualmente para evitar volcarse o la p rdida de control Tenga mucho cuidado cuando cam...

Reviews: