background image


Loading 2” or 3” Paper Rolls 

Before operating the printer, please follow the below steps to load a paper roll. 

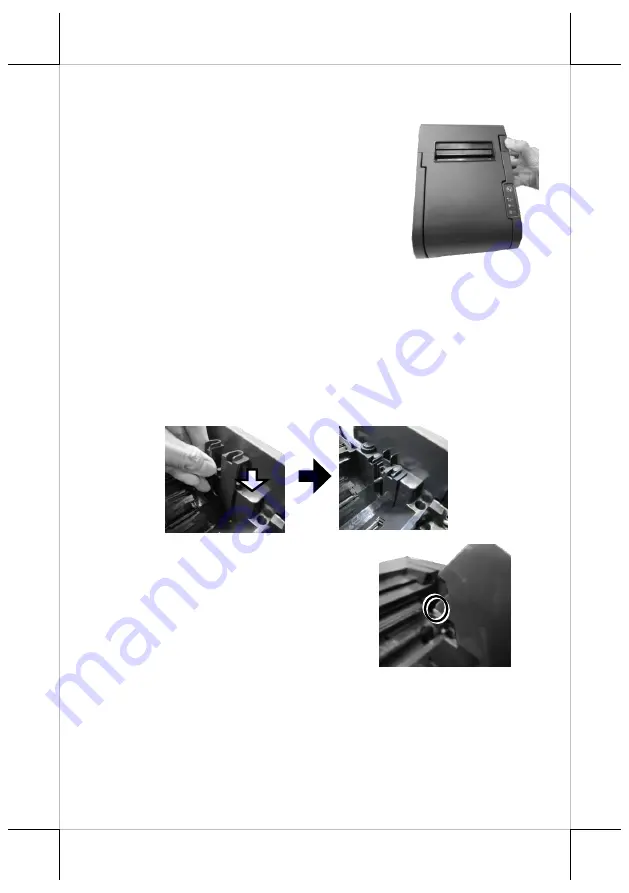
1.


Press down the hood release button to open 
the top cover.  


2.


Before installing

 2-inch paper roll

 in the thermal printer, follow the 

instructions below to properly install plastic pad spacer and the 
separator. If you are using 3” paper roll for the printer, please skip to 
next step. 

2.1.


To install palstic pad spacer, first find two bosses located on 
the right side of the printer compartment. Then, push down the 
plastic pad spacer until it is well hanged onto the bosses.  
If you need to remove it from printer compartment, pull it in 
the opposite direction.  


2.2.


Since the separator has to be 
installed in the correct direction, 
please first hold the separatorin as 
shown in the figure. 


Summary of Contents for PP-8900

Page 1: ... mm and 576 dots line 80 mm or 58 mm paper width support QR code and PDF417 printing support Wall mount ready for flexible deployment Drop and load action for easy paper roll replacement Control over 2 cash drawers through 1 CR port Interface USB True USB Virtual COM selectable Serial LAN Using poor quality thermal papers which contain impurity particles for instance sands or metals will scratch t...

Page 2: ...2 Views of PP 8900 Top View Left side View Power Switch Paper Exit Cover Release Button Power LED Error LED Paper Out LED FEED Switch ...

Page 3: ...3 Bottom View Views of I O Interface of PP 8900 Rubber Pad Rubber Pad Mounting Holes Serial Port RJ11 cash drawer CR port USB Type B Port RJ45 LAN port 24 VDC IN power jack t ...

Page 4: ...spacer and the separator If you are using 3 paper roll for the printer please skip to next step 2 1 To install palstic pad spacer first find two bosses located on the right side of the printer compartment Then push down the plastic pad spacer until it is well hanged onto the bosses If you need to remove it from printer compartment pull it in the opposite direction 2 2 Since the separator has to be...

Page 5: ...arator is well inserted 2 5 Carefully drop 2 inch paper roll inside the paper roll compartment 3 To load the thermal printer with the 3 inch paper roll make sure the plastic pad is removed from the printer compartment Then carefully drop the thermal paper roll inside the paper roll compartment of the printer as illustrated in the figure 4 Unroll the thermal paper and drag the loose end of the pape...

Page 6: ...r RS 232 cable or to the wired network with Ethernet cable 2 1 If you are installing USB interface cable plug Type B connector into Type B USB port of PP 8900 Then properly attach Type A connector to your POS terminal 2 2 If the interface cable you are using is RS 232 cable attach the male connector of RS 232 cable to PP 8900 and the other end to the POS terminal 2 3 If you are using an Ethernet c...

Page 7: ...t 1 Power OFF printer 2 Open the cover of the printer 3 Press Feed button three times after powering on the printer 4 Close the cover of the printer 5 The printer will emit one long beep sound and then print a test page displaying software switch setting 6 Afterwards the printer will restart by itself 7 Ensure that all the software switches are correctly set to factory default as follows Software ...

Page 8: ...inter 4 Close the cover of the printer 5 The printer will emit one long beep sound and then print a test page displaying LAN interface information 6 Afterwards the printer will restart by itself 7 Ensure that LAN information is correctly set to factory default as follows LAN Interface Information for Factory Default IP Address 192 168 192 168 MAC Address 00 19 17 00 02 03 NETMASK 255 255 255 0 GAT...

Page 9: ... After inserting two plastic anchors into the holes you drilled in Step 1 slightly tap the plastic anchors with a hammer until they are fully inserted into the drilled holes 3 Insert the screws into the plastic anchor screw them in but leave them sticking out from the wall surface to mount the printer 4 As shown in the figure locate two holes on bottom of PP 8900 Then carefully hang the printer on...

Page 10: ... through the paper roll To put the whole paper roll into place inside the printer compartment first rest one end of the shaft to the left side roll holder and then the other end to the right side roll holder 8 To remove the paper roll shaft from the printer compartment gently press down the plastic clip and then pull the shaft out of the compartment 9 After ensuring that paper roll with the shaft ...

Page 11: ...rtment find the adjustment wheel which mainly allows you to manually adjust the cutting position of the cutter 3 Keep turning the wheel in a clockwise direction until the cutter is completely moved back to its start position You may observe the cutter position through the gap between paper jams rescue compartment and the printer compartment 4 Push down cover release button to test whether the cove...

Page 12: ...ex com en global Download download In order to properly adjust the related settings for PP 8900 it is suggested to seek assistance from professional technicians To do more advanced settings on the printer contact directly the Posiflex technical service team 3 Once the configuration is completed disconnect USB cable and reboot the printer Cleaning Cleaning the Printer Case Before cleaning the print...

Page 13: ...test printing the printer is reset and switches to standard mode LED Indicators are On Flashing Off No lights is given by the LED indicators Check whether the power supply cable is correctly connected to the printer and the socket Error LED is on Check whether the paper cover is closed Check if paper jam occurs or foreign substance enters the paper cutter When paper jams occur refer to Troubleshoo...

Page 14: ... Green LED On Power Red LED Error and or Paper Out Sensors Cover Open head position sensor Out of paper Paper Near End for option Cash Drawer Port CR port 2 drivers CR port x1 Power Consumption Approx 1 5A mean Power Source AC adapter 24V DC Power Saving Yes Temperature Print quality assured 5 40 Operating 0 40 Non operating 0 50 storage Relative Humidity Operating 20 85 non condensing 35 Non oper...

Page 15: ...Bar 2D Symbol Support PDF417 QR code Media Handling Type Thermal roll paper Paper Feed Method Friction feed Print Width 72 mm Paper Width 80 0 1 mm Paper Loading Drop in Roll Diameter Max ɸ 83 or 58 0 1 mm Core Diameter Min ɸ 18 mm Paper Thickness 60 80 um Paper Guide Yes Auto Cutter Yes Connectivity Serial Interface RS 232 USB Interface Built in USB Ethernet Interface optional Ethernet 10 100Base...

Page 16: ...16 MEMO ...

Reviews: