background image


Part 10 

of the backpack into the cable cover area of main unit. 
 
The area required for wall mount application is determined by the main unit 
dimensions and is 375 mm in width and 315 mm in height. 


BASE MOUNT UPGRADE KIT 

On rear edge of the stand assembly for desktop mount application, there is a 
rear  connect  cover.  Either  a  2nd  LCD  display  panel  option  LM-6101  or  a 
customer  display  option  PD-2501  or  PD-2602  can  be  installed  here  after 
removing this cover. 
 
Please  note  that  there  could  be  certain  restrictions  to  the  tilt 
angle range for the main unit when the base mount upgrade kit 
is mounted. Investigation for the acceptability of such kind of 
restrictions  must  be  taken  before  decision  to  install  a  base 
mount upgrade kit. 
 

12”/15” 2

nd

 LCD Panel or Customer Display 

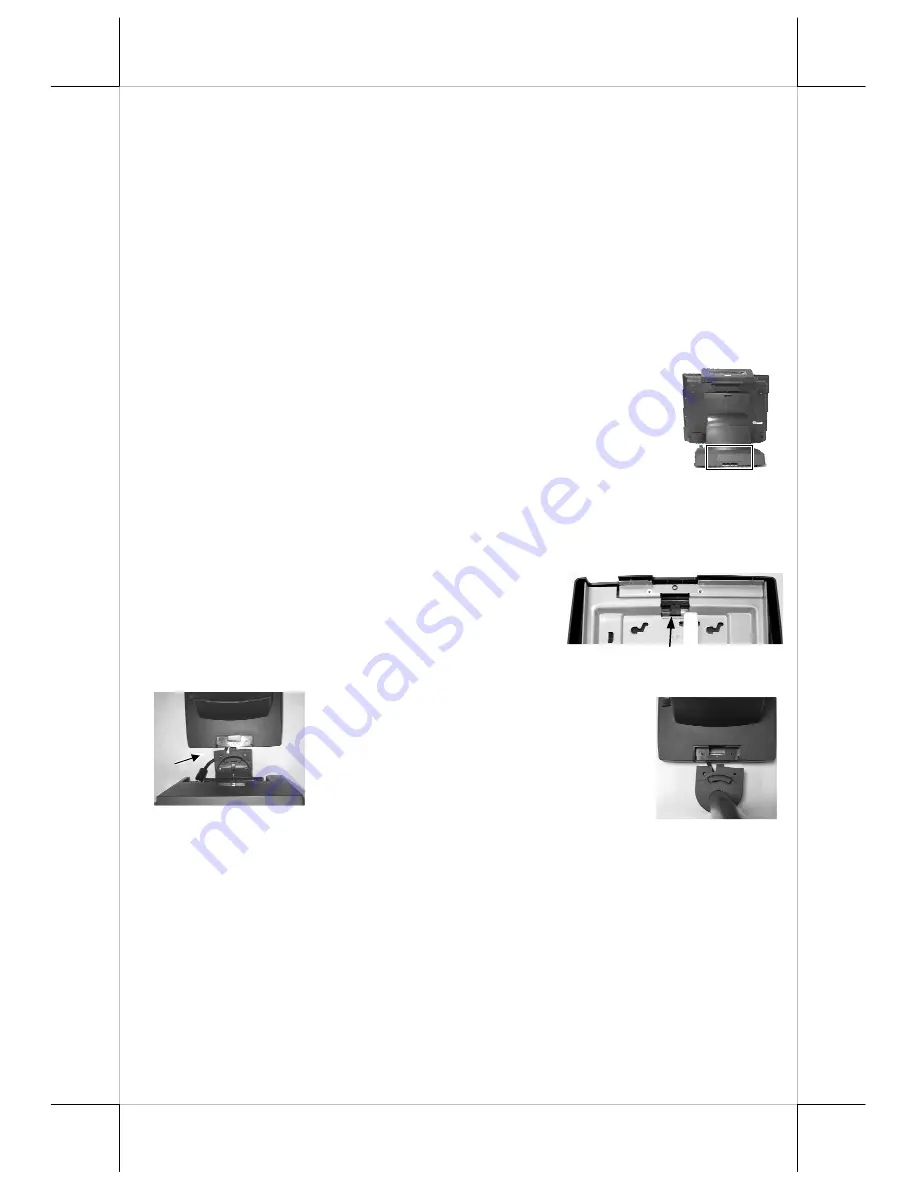
To remove the rear connect cover in slim base please refer to the inside view 
of  the  base  unit  after  removal  of  UPS  battery  as 
in picture at right and use a flat head screwdriver 
to pick the plastic hook plate of the rear connect 
cover from inside. 
 

Fit the joint base of PD-2501, PD-2602, 
PD-305 and LM-6101, LM-6501 to the 
rear connect cover opening. Then make 
the  cable  go  through  the  normal  cable 
exit  (under  the  joint  base)  as  in  these 
pictures.  Fit  2  screws  with  washers  to 

hold the joint tight. For low profile customer display PD-305, the installation 
procedure  is  same.  Remember  to  enable  the  +5  V  DC  supply  in  the  COM 
port of the main unit for PD-2501, PD-2602 and PD-305 or the +12 V DC in 
VGA port for LM-6101. 
 
Please  follow  the  installation  instruction  that  come  alone  with  the  15”  2

nd


LCD  monitor  LM-6501  to  mount  the  interface  bracket  kit  onto  the  LCD 
panel. Fit the interface bracket the same way as joint base of LM-6101 to the 
rear  connect  opening  and  fix  with  2  screws  with  washers.  Route  the  VGA 

Summary of Contents for Jiva - E

Page 1: ...ing performance or use of this material This information is provided as is and Posiflex Technology Inc expressly disclaims any warranties expressed implied or statutory including without limitation implied warranties of merchantability or fitness for particular purpose good title and against infringement The information in this manual contains only essential hardware concerns for general user and ...

Page 2: ...m the system if the system is to be left OFF for more than 72 hours to prevent possible damage Only connect the UPS battery back right before you are going to re power on the system Replace the battery as soon as the monitoring software indicates the battery is out of service Attempt to recharge a dead battery is dangerous A separate battery monitor is not required for this series DAILY MAINTENANC...

Page 3: ...t 3 INTRODUCTION PRODUCT PICTURES 4 1 3 6 5 7 2 Front Views 8 9 9 7 10 8 Side Views 5 Gen 5 base 4 11 9 12 Rear Views Gen 4 base 12 18 13 20 12 21 12 22 22 16 Gen 4 base 15 19 17 14 Gen 5 base Bottom Views ...

Page 4: ...D bracket fixing screw 21 Cable holder 22 Cable passage in bottom plate PRODUCT FEATURES Standard Features a a a a CPU Intel 575 2 0 GHz or Intel T3100 1 9GHz b b b b A base design supporting HDD and optional UPS battery storage c c c c Support Win XP pro WEPOS POSReady and Linux environment d d d d High quality 15 TFT active matrix LCD panel e e e e Vertical type LCD panel with easy tilt angle ad...

Page 5: ... sockets supports maximum memory size 8GB for Jiva TP 8300E m m m m Integrated structure for optional security devices KP 100 SD 100 or BC 100U n n n n Software programmable MSR parameters for Win XP pro WEPOS and POSReady Optional Items a DDR 2 SDRAM memory expansion up to 4GB For Jiva TP 8300 DDR 3 1066 MHz SDRAM memory expansion up to 8GB For Jiva TP 8300E b SSD HDD c 2nd SATA HDD in base stand...

Page 6: ...n that the system is turned off and the external power source to the set is removed to prevent electric hazard Never touch any metal pin in the connectors or circuits to avoid high voltage hazard or electrostatic discharge damage unless the operator is well grounded Failure to do the above will void the product warranty OPENING CABLE COVER Please follow steps A to C sequentially with reference to ...

Page 7: ...arranty SEPARATING MAIN UNIT In order to settle the terminal properly in a point of service system all the cable connections have to be routed through its base either slim or universal Therefore please observe the procedures from A to C below to separate the main unit from both slim and universal base stand assembly after all cables in cable cover disconnected OPENING STAND ASSEMBLY Take the adjus...

Page 8: ...when cable connection through a hole on desktop underneath the system is required please slide open the auxiliary cable exit on bottom plate and route all external connections through this auxiliary exit Then fix back the bottom plate if there is no option unit to install 3 6 8 4 2 7 1 Inside Gen 4 base 5 Fixing Screws Gen 5 base bottom 1 2nd Cable Exit 2 Cable Exit 3 Rear Connect Cover Hook Plate...

Page 9: ...ollow the installation guide delivered with WB 6000 for its installation For WB 6300 WB 6600 and WB 6800 please separate the back cover of the wall mount bracket kit and fix it to wall at the 3 arrowed small holes as in the right pictures with proper materials and proper preparations Install required optional device kits with their mechanical fixation parts in the wall mount bracket and hang the b...

Page 10: ...ear connect cover in slim base please refer to the inside view of the base unit after removal of UPS battery as in picture at right and use a flat head screwdriver to pick the plastic hook plate of the rear connect cover from inside Fit the joint base of PD 2501 PD 2602 PD 305 and LM 6101 LM 6501 to the rear connect cover opening Then make the cable go through the normal cable exit under the joint...

Page 11: ...dow lock screw to find several jumpers The jumpers in this window are designated for USB Touch setting clear CMOS COM1 DCD and RAID card reset Optional functions Please consult your dealer for technical support on setup of these jumpers Please note that only those qualified technicians may adjust in the service window with information from Posiflex and the contents in the service window may change...

Page 12: ...it itself is 375 mm wide and can take maximum total height of 373 mm for slim base models and 400 mm for universal base models if no upgrade kit installed CONNECTING CABLES To re assemble the main unit with stand assembly for operation please connect all required cables to the appropriate connectors Please make sure that each connector is connected to the correct port with the correct orientation ...

Page 13: ...he preloaded operating system The System Integrator shall take care of software restoration after OS recovered A Posiflex supplied USB interface CD DVDROM COMBO drive will be required for such action Other brand CD DVDROM drive may require its specific driver different from what supported in the recovery CD or DVD Please use the recovery CD or DVD in rescue operation only Using it otherwise may wi...

Page 14: ...s every 3 months every month for temperature lower than over 30 C Temperature above 40 C must be strictly avoided as it could cause termination of battery life and unexpected result even if the battery is not in work The UPS battery can support basically the data preservation and smooth operation during intermittent or up to 30 minutes Battery replacement In the preloaded OS for Jiva system there ...

Page 15: ...sfully Power Status LED Indicator There is an LED under the printed logo that serves for several purposes The relationship between LED status and other conditions is summarized in following table LED Status System Status External Power UPS Battery Powering Up Off Off Off Not present Not possible Off Off Off Present Not allowed Green Off On No influence Allowed Blue On On No influence Not required ...

Page 16: ...n external or UPS battery power So the compatible software applications have the ability to change operating conditions when running on standard backup power The software programmer may take reference from the Jiva technical manual to apply such features Automatic Power On Control The system may also turn on according to some preset conditions such as Modem Ring Up or Alarm Clock Wake Up or LAN Wa...

Page 17: ...h the customer display PD 2501 or PD 2602 when it is installed SERIAL PORTS The serial ports in Jiva system can supply a 5 V DC through pin 9 on COM2 3 after correct BIOS setting change However they are set to standard RS232 serial ports as status at delivery COM1 serial port must always be occupied by a suitable serial device or COM1 terminator as supplied If this port is left vacant or connected...

Page 18: ...232 interface When the touch driver is properly installed this touch panel works exactly like a standard mouse except when the system is running under safe mode The mouse emulation functions include left button click click drag and drop left button double click right button click The only deviations are the system can give a beep or not to beep on each touch a right click sticky button is provided...

Page 19: ...age this utility However with this touch controller driver certain display mode like full screen display of Windows DOS box should be avoided Posiflex Touch Terminal Manager A program named Posiflex Touch Terminal Manager and a right click sticky button tool in the program group Posiflex Tools is installed in the preloaded Windows system in TP 8300 E This program can also be obtained by download f...

Reviews: