background image

Maintenance

I

nformation

This system has a function which informs you of the time
to replace certain parts of components on your vehicle.
When the navigation system begins to operate and the
vehicle has reached either the information item’s
replacement date or the appropriate driving distance, the
Information screen will automatically be displayed. You
can turn off the Information screen by selecting “Do not
display this message again.”

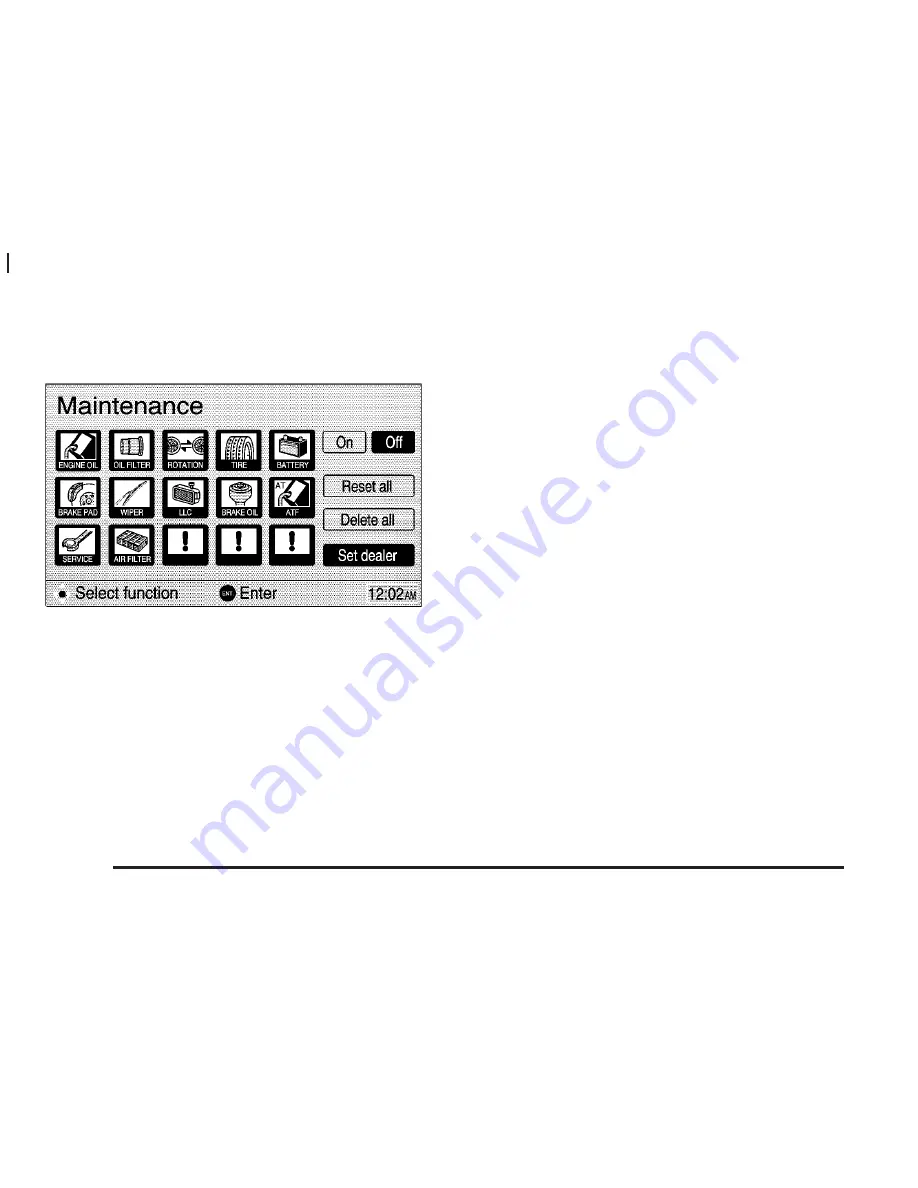
To access this screen, press the SETUP key and select
the Maintenance button to display the Maintenance
screen. Select your desired icon from the screen and
input the next maintenance date and driving distance until
the next check.

You can also choose Set dealer from the Maintenance
screen. This allows you to register your dealer’s
name and address. After you enter your dealer’s name
and address, the screen changes and displays the
map location of the dealer.

You can also edit your dealer’s name, location and
phone number if you have already registered the dealer.
After you select the Set dealer button on the
Maintenance screen the Edit dealer screen appears.
Select the Change button to edit the dealer’s
information. Select the Delete dealer button on the Edit
dealer screen to delete a dealer’s information.

English/Metric Units

You can select either English or metric measurements
to appear for distances on the map.

To change between English and metric measurements,
do the following:

1. Press the MENU key.
2. Press Setup on the menu display.
3. Choose from the measurement options listed.
4. Use the control pad to move to the measurement

option you desire. Press the ENT button in the
center of the control pad to choose it.

5. Press the Back key to return to the previous

screen.

1-6

Summary of Contents for 2004 Vibe Navigation System

Page 1: ...Overview 1 1 Overview 1 2 Features and Controls 2 1 Features and Controls 2 2 Navigation Audio System 3 1 Navigation Audio System 3 2 Index 1 2004 Pontiac Vibe Navigation System M...

Page 2: ...We reserve the right to make changes in the product after that time without notice Litho in U S A Part No 22722499 A First Edition Copyright General Motors Corporation 05 05 03 All Rights Reserved Pl...

Page 3: ...Overview 1 2 Introduction 1 2 Screen Setup 1 3 Section 1 Overview 1 1...

Page 4: ...oice prompts Select a destination from various areas and choices i e street addresses intersections marked points points of interest etc Receive broadcast announcements on traffic and emergency alert...

Page 5: ...g in the daytime At night the screen will go to a darker background You can select Auto for automatic adjustment You can also select day or night mode regardless of the lighting conditions The Day set...

Page 6: ...o the map display If the language is changed from English the menu screens will not match word for word as they appear in this supplement If you accidentally set a language and you do not understand t...

Page 7: ...e The time will be updated with the GPS time when the ignition is turned to ACC or ON Daylight Savings Use the control pad to toggle between Daylight Savings Time On or Off Time Zone This menu allows...

Page 8: ...dealer s name and address After you enter your dealer s name and address the screen changes and displays the map location of the dealer You can also edit your dealer s name location and phone number...

Page 9: ...Screen 2 5 Maps 2 6 Symbols 2 7 Navigation Menu 2 8 Global Positioning System GPS 2 20 Vehicle Positioning 2 21 Problems with Route Guidance 2 22 If the System Needs Service 2 22 Ordering Map DVDs 2...

Page 10: ...o operate the system Use the left and right arrows on the control pad to move horizontally on the screen and the up and down arrows on the control pad to move vertically on the screen Use the ENT ente...

Page 11: ...T MENU V Zoom In U Zoom Out BACK These keys allow you to do the following Press Zoom In to get a closer look at the map you are traveling on Locate a destination easily by zooming in to see a smaller...

Page 12: ...if you enter Z you wouldn t be allowed to follow it with T The system will highlight the available characters and darken the unavailable characters If you select an incorrect character press the back...

Page 13: ...e you to the map that shows the vehicle s current position If no route has been planned the first press of the NAV key will show the map screen and also the following information The north or heading...

Page 14: ...vered from the factory When your vehicle is delivered from the factory the dealer may have installed the map DVD If the DVD was not installed in your vehicle when first purchased use the following dir...

Page 15: ...an range from 1 32 of a mile 0 05 km to 128 miles 206 km Symbols The following symbols are the most common that appear on a map screen Your vehicle is shown as this symbol It indicates the current pos...

Page 16: ...up The shaded triangle indicates North By selecting map orient while on the map screen you can see your vehicle always traveling in an up direction on the screen even though you are not traveling Nor...

Page 17: ...n menu Suspend Guidance Route Overview Map Appearance Volume DVD DVD Information Edit Route Route Preview Setup Marked Points These keys are also available MAP DEST Destination MENU Zoom In Zoom Out B...

Page 18: ...tion or other points where you need to maneuver the vehicle You can adjust the volume of the voice prompts or turn off voice guidance Press the MENU key to display the screen and select the Volume but...

Page 19: ...menu several options may be adjusted or turned on and off See Screen Setup on page 1 3 for more information Marked Points Selecting this function will display the Marked Points menu This menu contains...

Page 20: ...ond page of the Search area screen and select CAN to display region 11 The Destination menu screen will return automatically You may choose to enter a destination using one of the items from the list...

Page 21: ...ion menu the alpha bar will appear to allow you to input the name of the first street This should bring up a list of cities that have streets with that name Select the correct city and then the system...

Page 22: ...ting Police Station or Hospital will show a list The order of the list can be changed to alphabetical order or order of distance Freeway Entrance Exit Destination Entry This option allows you to selec...

Page 23: ...red destination simply press the Enter button and the route will be planned for you You will also hear a voice prompt directing you to Proceed to the highlighted route Use the Zoom Out key See Zoom Ou...

Page 24: ...nd then type in the city you wish to select a point of interest from Press the List button to see a list of cities and select the correct one from it While inputting a point of interest or city name t...

Page 25: ...Gas Station Golf Course Grocery Store Historical Monument Hospital Hotel Ice Skating Rink Library Marina Museums Park Ride Park Recreation Area Parking Garage Parking Lot Performing Arts Police Statio...

Page 26: ...ou have entered the city name the system will prompt you to enter the name of the street or will give you a list of street names to choose from Enter or select the desired street name As information i...

Page 27: ...lected route with a mileage value for each Press the Map button located to the right of each leg to see a map for that route 3 Routes This screen will display the map with three highlighted routes wit...

Page 28: ...other interferences such as the satellite condition road configuration the condition of the vehicle and or other circumstances can interfere with the system s ability to determine the accurate positio...

Page 29: ...transferred by a vehicle carrier or a ferry The current position calibration is set incorrectly The vehicle is being driven at high speeds The vehicle is repeating a change of directions by going forw...

Page 30: ...ay not be shown See Ordering Map DVDs on page 2 22 If the System Needs Service If you are still experiencing difficulty with your Navigation System after reading this information see your dealer for a...

Page 31: ...Navigation Audio System 3 2 Six Disc CD Changer 3 11 Section 3 Navigation Audio System 3 1...

Page 32: ...ind out what your audio system can do and how to operate all its features to be sure you re getting the most out of the advanced engineering that went into it The ignition must be in ACC or ON for you...

Page 33: ...on presets accessible Finding a Station TUNE Use the control pad in the lower left corner of the navigation system to select radio stations manually y SEEK z Press the up or the down arrow to go to th...

Page 34: ...hold one of the six reconfigurable keys located to the right of the navigation screen until you hear a beep Whenever you press that hard key while in the BAND menu the station you set will return 5 R...

Page 35: ...he CD screen and the EQ will be set to that screen until you decide to change it Radio Data Systems RDS Your audio system is equipped with a Radio Data System RDS Using RDS the radio can do the follow...

Page 36: ...SEEK up or down arrow to look for other stations with that criteria type If a station with the selected criteria is not found the radio will return to the original station RDS Criteria The RDS Criter...

Page 37: ...terrupt While in FM1 or FM2 mode pressing and holding the TA button for more than two seconds will cause the tuner to seek to the next RDS station capable of broadcasting traffic announcements Pressin...

Page 38: ...map DVD While playing a CD in the CD player the navigation system is not available A message will display if the NAV key is pressed To remove the navigation map DVD and load a music CD do the followi...

Page 39: ...n the disc will be played before advancing to the next track Pressing the SEEK key again will stop the scan at the track currently being played To switch between tracks on a disc use the arrows on the...

Page 40: ...seconds at which time a single chime is played to alert you that the CD changer has entered TRACK SCAN mode for the current CD While TRACK SCAN is active the first 10 seconds of each track on the cur...

Page 41: ...sc The disc numbers are listed on the front of the magazine Slide the button on the back of the magazine and pull gently on one of the trays Load the trays from top to bottom placing a disc in the tra...

Page 42: ...avigation system hard keys except for ejecting the magazine Whenever a CD magazine with discs is loaded in the changer the CD Changer screen will be available on the radio display by pressing the CD h...

Page 43: ...act Disc Changer Errors 3 12 D Database Coverage Explanations 2 22 Day and Night Screen Changes 1 3 DEST Destination 2 12 DVD Information 2 10 E Edit Route 2 10 English Metric Units 1 6 F Finding a St...

Page 44: ...Playing CDs 3 8 Playing the Radio 3 3 Problems with Route Guidance 2 22 PWR VOL Power Volume Knob 2 5 R Radio Data Systems RDS 3 5 Radio 3 2 Route Overview 2 10 Route Preview 2 11 S Screen Setup 1 3...

Reviews: