Page 5
ASSEMBLING OF CONNECTING PARTS
1. (PUMP
→
UV-C WATER CLARIFIER)
2. (UV-C WATER CLARIFIER
→
POND PUMP)
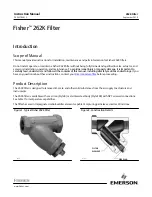
Cut the hose-tail adaptor(s) depending on the hose diameter you use (Fig. 8) and insert them into the corresponding screw ring.
Connect the end of one of the 2 pieces of the kink-free hose to the pump outlet intended for immersion into the pond.
Connect the other end of the same kink-free hose to one of the 2 hose-tail adaptor(s), previously cut- and installed, pressing it until the hose
adjoins the hose-tail adaptor(s) base. Fasten all components with a screw-clamp.
Install a gasket into the hose-tail adaptor(s) nut, ensuring it adjoins the bottom of the same nut.
Screw the assembled hose-tail adaptor(s) to one of screw nozzles located on the PondMAX® UV-C Water Clarifier body (Fig. 9).
For 24W/36W/60W models, the tubes can be connected in two different ways (Fig. 9). The unused outlet must be closed with the specific cap.
Connect the other hose-tail adaptor(s) previously cut and installed as mentioned above, to a free end of a second piece of kink-free hose, pressing
it until the hose adjoins the hose-tail adaptor(s) base. Fasten all components with a screw-clamp.
Install a gasket into the hose-tail adaptor(s) screw ring, ensuring it adjoins the bottom of the same nut.
Screw on the assembled tip to one of screw nozzles located on the canister of PondMAX® UV-C Water Clarifier (Fig. 9).
Immerse the free end of the kink-free hose into the pond.
•
•
•
•
•
•
•
•
•
•
Fig. 8
Ø 1-1/4” (32mm)
Ø 1” (25mm)
Ø 1-1/2” (38mm)
Ø 3/4” (20mm)
Ø 1/2” (13mm)
Ø 1” (25mm)
9W
18/24/36/60W
9/18W
24/36/60W
2 OUTLET POSITIONS
Fig. 9
To ensure proper functioning, install the device ONLY IN THE ALLOWED POSITIONS.
Prior to installation of PondMAX
® UV-C Water Clarifier, it is recommended to:
• Insert the UV-C lamp, included into the package, following the instructions on the lamp replacement.
• Take a kink-free hose with the desired diameter, taking into account that the hose-tail adaptor(s)
supplied in the package allow assembling hoses with diameter of 1/2”, 3/4”, & 1” (13, 20, & 25mm)
[UVC9W], or 1”, 1-1/4” & 1-1/2” (25, 32 & 38mm) [UVC18/24/36/60W]. It is also recommended to
place UV Water Clarifier at the minimum distance of 6ft (2m) from the pond edge and to divide the
kink-free hose into 2 parts of the same length.
MAINTENANCE
WARNING: The PondMAX® UV-C Water Clarifier is equipped with a safety switch that turns the lamp off if the ballast assembly is accidentally
opened without disconnecting it from the electrical socket. The device is activated by means of a pivot located on the main body basis. It is
recommended to pay utmost attention when performing maintenance, to avoid damages which may require replacement of the entire filter.
WARNING: Prior to maintenance of the appliance, you must disconnect the plug from the electrical socket.
To ensure optimum performance of the filter, it is recommended to replace the lamp every 5000-6000 hours, depending on the season, when
used in ponds, and every 8-10 months – when used in aquariums.
QUARTZ TUBE CLEANING:
To perform this operation properly, it is recommended to carefully follow the instructions below:
1. Follow instructions in clauses 1-3 of the following paragraph ASSEMBLING / REPLACEMENT OF UV-C LAMP on Page 6.
2. Put the ballast assembly (9) on a flat supporting surface, clean the quartz tube (2) with non-aggressive detergent for glass units.
WARNING: To avoid damage of the quartz tube during the cleaning operation, it is recommended to avoid using units or supports which may rub
against the tube or cleave it. It is also recommended to pay utmost attention when handling the quartz tube which might get broken and cause
incised wounds.
3. Assemble the PondMAX® UV-C Water Clarifier again, following the instructions in clauses 9-11 of the following paragraph ASSEMBLING /
REPLACEMENT OF UV-C LAMP on Page 6.
REPLACEMENT OF BALLAST ASSEMBLY O-RING:
To perform this operation properly, it is recommended to carefully follow the instructions below:
1. Follow instructions in clauses 1-3 of the following paragraph ASSEMBLING / REPLACEMENT OF UV-C LAMP on Page 6.
2. Remove the ballast assembly O-ring (10), first sliding it on the clamping ring and then on the quartz tube. Replace the ring with a new one,
proceeding in the reverse order. It is recommended to use only original spare parts, because thanks to the special materials these parts ensure
safe and long-term performance of the filter.
3. Assemble the PondMAX® UV-C Water Clarifier again, following the instructions in clauses 9-11 of the following paragraph ASSEMBLING /
REPLACEMENT OF UV-C LAMP on Page 6.
9-18W 24-36-60W
WAT E R G A R D E N I N G T O T H E M A X
WAT E R G A R D E N I N G T O T H E M A X
TM
UV-C
WATER CLARIFIER
Page 5