background image


I N S T A L L A T I O N  


IMPORTANT! 

Before  mounting  be  sure  there  is  sufficient  room  to 

accommodate the unit and that there is sufficient ventilation.   


Before  installing  the  unit,  connect  the  wiring  temporarily  making  sure 
the system works properly. 


Only use the parts included with the unit to ensure proper installation.   


Avoid installing the unit where it would be subject to high temperatures 
such as direct sunlight or hot air from heaters or the engine or where it 
would be subject to dust, dirt or excessive vibration. 


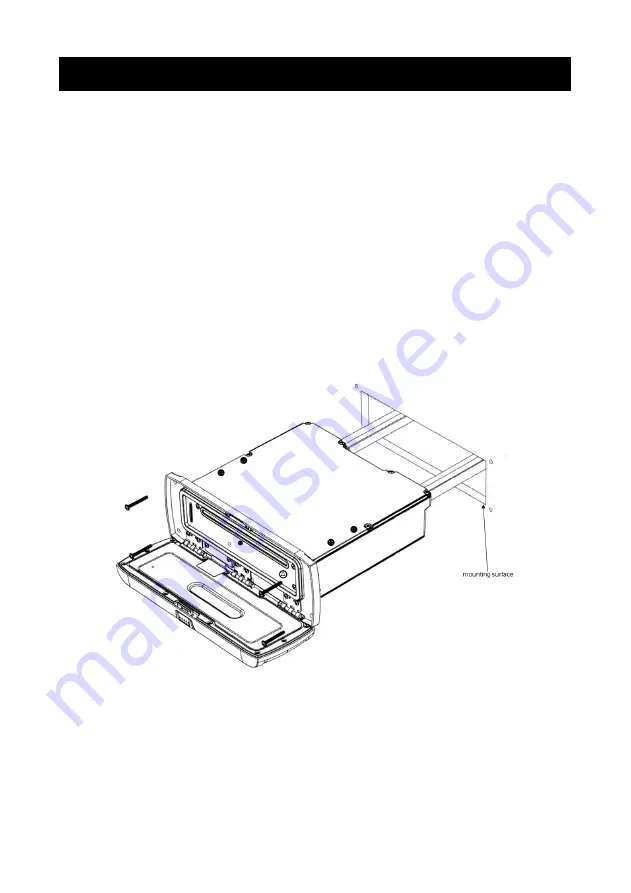
Use the template provided to make the cutout.     


With the front panel down insert the 4 provided screws.    Use the 5mm 

nut and bracket provided to stabilize the rear of the radio.   


Be sure to mount the unit to a strong, solid surface which will not give 

way under the stress of waves pounding the hull. 


Summary of Contents for MRD87i IPX6

Page 1: ...der AM FM digital tuner NOAA weather band USB and 3 5mm aux input inside drawer dock Front and rear RCA line out NMEA 2000 certified Remote control interface Disclaimer Sirius XM and all related marks and logos are trademarks of Sirius XM Radio Inc All rights reserved iPad iPhone iPod iPod classic iPod nano iPod touch and Retina are trademarks of Apple Inc registered in the U S and other countries...

Page 2: ...asic Operation 8 Radio Operation 10 SiriusXM Operation 10 iPod iPone Operation 21 Bluetooth Operation 21 Auxiliary Operation 22 USB Operation 22 SD Card Operation 24 Compatible Accessories 26 Troubleshooting 27 Technical Specifications 29 Warranty Information 30 Warranty Registration 33 ...

Page 3: ... installation Avoid installing the unit where it would be subject to high temperatures such as direct sunlight or hot air from heaters or the engine or where it would be subject to dust dirt or excessive vibration Use the template provided to make the cutout With the front panel down insert the 4 provided screws Use the 5mm nut and bracket provided to stabilize the rear of the radio Be sure to mou...

Page 4: ...4 Optional Mounting Techniques Optional gimbal mount bracket installation Model GM MRD80 Optional Overhead Under Dash mount installation Model RM 10 ...

Page 5: ...o make power and speaker connections according to the diagram below Using this connector will make it easy to disconnect the radio for adding additional features or service Removing the factory plug end will void warranty SiriusXM Tuner Tuner and Subscription sold separately MR45R Blue ...

Page 6: ...Rear Right Speaker Power Wire Specifications Yellow Wire Connect this wire to a constant 12V source Red Wire Connect this wire to a switched 12V source such as an ignition or accessory switch Must be connected to 12V source for unit to operate Black Wire Connect this wire to the negative battery terminal or other good power ground Blue Wire This wire outputs a 12V signal when the MRD87i turns on I...

Page 7: ...ectrical tape NEVER operate the unit without proper fusing Fuse holder must be located within 2 feet from the battery This fuse is to protect the vessel not the electronics In case of a short the fuse will blow instead of the wire burning up Using other than the recommended fuse ratings at the battery and at the unit may cause damage to the unit and will void your warranty Whenever possible use ca...

Page 8: ...uto Store and Preset Scan Button 20 SD Card Slot 21 DMD Drawer 23 RESET SWITCHING ON OFF THE UNIT Press button to turn on the unit Press and hold button for 4 sec to turn off the unit OPENING THE FRONT PANEL Place thumb on the front panel latch button Firmly depress the button while pulling the front panel open Keep door firmly closed except when accessing inside drawer ADJUSTING THE AUDIO LEVELS ...

Page 9: ...EQUALIZER setting please press volume knob repeatedly until EQUALIZER menu appears then rotate the volume knob to locate CUSTOM EQ then press the volume knob to enter your own setting You can set each EQ Band by rotating the volume knob left or right from 10 to 10 scale MODE SELECTION Press MODE button to choose desired listening mode e g Radio mode to USB mode to AUX IN mode etc MUTE Press MUTE b...

Page 10: ... BAND In radio mode press BAND button to locate the desired band The reception band will change in the following order FM1 FM2 FM3 AM1 AM2 WeatherBand SELECTING STATION Press button to select a station To do manual tuning use Function Select knob AUTOMATIC MEMORY STORING PRESET SCAN AS PS The PRESET buttons can be used to store 6 stations in each band FM 1 FM 2 FM 3 and AM1 AM2 for convenient acce...

Page 11: ...el tune to Channel 0 to find the Radio ID of your tuner In addition the Radio ID is located on the bottom of the SiriusXM Tuner and its packaging You will need this number to activate your subscription Write the number down for reference Note the SiriusXM Radio ID does not include the letters I O S or F In the USA you can activate online or by calling SiriusXM Listener care Visit www siriusxm com ...

Page 12: ...play change displaying info Ch Name Artist Track Content Category Scan push to scan all channels hold to scan channels in current category Band push to change band hold for Direct Tune But 1 6 Presets Push tune to preset hold save preset Mute Audio Mute Menu push to enter Menu hold to enter dimmer settings In menu navigate with right encoder select by pushing it Press menu again to return to main ...

Page 13: ...13 Press AS PS to change metadata to Artist Press AS PS to change metadata to Song Press AS PS to change metadata to Info Press AS PS to change metadata to Category ...

Page 14: ...n Select Knob to select the digits Press and hold AS PS to select category use Function Select Knob to navigate category then press Function Select Knob to enter in selected category and browse channels using Function Select Knob Press SCAN to scan all channels ...

Page 15: ... Press and hold SCAN to scan channels in current category Press MENU to enter then use Function Select Knob to navigate through the available 5 options New Password Lock Unlock All Ch and Signal Strength ...

Page 16: ...nter password rotate Function Select Knob to the left to change current digit then push to go to next digit If password is wrong there is a Wrong password warning ADVISORY MESSAGES Check tuner advisory message ...

Page 17: ...17 Check antenna advisory message No signal advisory message Subscription update advisory message Channel unavailable advisory message ...

Page 18: ...r Press and Hold or button to go faster HOW TO DIRECT TUNE Press and hold AS PS button Select 000 will show on the display Rotate FUNCTION SELECT knob to change current digit push to go to next digit When finished press FUNCTION SELECT knob to confirm and play Example If you want to search channel number 151 rotate left encoder to get 1 ...

Page 19: ... for convenient access to your favorite channels 1 Select the desired band 2 Select the channel you want to store in memory then press and hold one of the preset buttons for 3 seconds until the corresponding preset button number appears 3 Repeat steps 1 and 2 to program additional channels PARENTAL CONTROL You can lock any SiriusXM channels you do not want others to have access without your permis...

Page 20: ...n press FUNCTION SELECT knob to confirm New Code will show on the display Enter your new code then press FUNCTION SELECT knob again Repeat Code will show on the display Repeat the code and press FUNCTION SELECT knob to confirm TO RESET SIRIUS FACTORY DEFAULT SETTINGS Press Menu button and select Factory Default then enter parental control code to confirm If you forget parental control code please ...

Page 21: ...ss 2 button to start random song play REPEAT Press 3 button sequentially to repeat current playlist song or turn repeat SWITCHING TO BLUETOOTH MODE If a device is already paired Press MODE button to change to Bluetooth BT mode If there is no device paired the display will show Bluetooth Not Connected please follow instructions below on how to pair your device 1 Make sure you are close enough to MR...

Page 22: ...trols and functions must be controlled from your music device SWITCHING TO USB MODE If there is no USB inserted in the driver Insert a USB through the USB port located at the back of the unit then press MODE button to change to USB mode If a USB is already inserted in the driver Press MODE button to change to USB mode SELECTING SONGS Press or button or rotate Function Select knob to select a song ...

Page 23: ...stop intro function PLAYING ALL TRACKS IN RANDOM ORDER Press 2 button and select Random Track to play all tracks in random Press 2 button and select Random Off to cancel random function REPEAT FUNCTION Press 3 button and select Repeat ONE to repeat same song Press 3 button and select Repeat ALL to repeat all tracks or to stop repeat function PAUSE FUNCTION Press 4 button to pause player Press 4 bu...

Page 24: ...B can support USB2 0 but the speed is USB1 1 Capacity up to 2000 songs SWITCHING TO SD MODE If SD card is already inserted in the driver Press MODE button to change to SD Card mode If there is no SD card inserted in the driver the display will show No SD Card attached Insert SD card through the SD card port located in front of the unit Press MODE button to change to SD Card mode Warning Do not ove...

Page 25: ...e after plugging in If this happen try to remove the memory card and insert it again CAUTION Be sure to use only recommended SD cards 32GB Using non recommended SD cards could cause data loss and damage your device If there are important files in the memory card do not connect it to the main unit to play Any wrong operation may cause file loss Our company assumes no responsibility for lost files o...

Page 26: ...st be in line of site for the remote to operate ACX 11 USB AUX accessory extension cable provides easy access to your USB input and Aux input IC 3 5PM MP3 iPod Satellite Radio Panel Mount Adapter allows you to connect your MP3 player iPod or satellite radio to any audio device with RCA inputs IR 4050 IR Sensor with 9 cable connect this IR sensor to the IR port located at the back of the unit This ...

Page 27: ... Unit takes about 45 seconds to recognize some USB device or SD card This is normal The unit sometimes takes longer time to read all the files inside the USB device or SD Card Try to remove the USB device or memory card and insert it again Operations keys do not work Press the RESET button The unit picks up engine noise Check the ground wire The radio does not work The radio station automatic sele...

Page 28: ... SiriusXM products are available at your local car audio retailer or online at www shop siriusxm com Subscription Updated The radio has detected a change in your SiriusXM subscription status Visit www siriusxm com or call 866 635 2349 if you have questions about your subscription Channel Not Available The channel that you have requested is not a valid SiriusXM channel or the channel that you were ...

Page 29: ...ge 87 5 107 9 MHz Channel Step 200KHz Sensitivity 2 8 uV Stereo Separation 30dB Signal to Noise Ratio 50dB LINE OUT Output 5 Volt max Impedance 33 Ohm GENERAL Power Supply 12V DC 10 8 15 6V allowable Speaker Impedance 4 or 8 ohm Output Power 45W x 4CH Fuse 15A NOTE Specification design subject to change without notice for improvements ...

Page 30: ... number altered defaced or removed Poly Planar warranty does not cover damage incurred in transit accident abuse misuse negligence fire flood lightning or unauthorized service This warranty assumes no responsibility for damages incurred during installation of this equipment This warranty does not cover labor costs for removal of defective unit or reinstallation of replacement unit This warranty co...

Page 31: ...31 NOTES ...

Page 32: ...32 ...

Page 33: ...33 ...

Reviews: