background image

32

3. BCLO setting

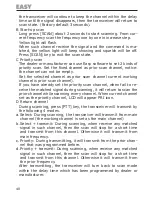
BCLO function will stop transmitter working to avoid disturbing oth

-

er’s communication by mistake, please set as followed steps:

Press [MENU] LCD shows “MENU”.

Press [UP] or [DOWN] LCD top right corner shows 03, main sceen 

shows BCLO

Press [MENU], go into the matching menu

Press [UP] or [DOWN] choose in ON/OFF

Press [MENU]after choosing to confirm or press PTT to save new 

setting and return to the normal operate pattern.

Note: ON means busy channel locked, LCD shows BCLO, OFF means 

close the BCLO function.

1 refers to the carrier mode, when the radio frequency signals re

-

ceived with the PTT is locked, and the speaker issued a “tick, tick” 

prompt, the screen displays a brief “BCLO” as a reminder.

2 refers to the signaling mode, when the radio receives the frequen

-

cy signals and the machine has the DCS or CTCSS, the added DCS or 

CTCSS code must be exactly the same, the BCLO will be active. 

4. Battery Save

The  radio  has  a  important  saving  function  which  can  make  radio 

be in a dormancy condition and wake up periodicity to check the 

received signal. When there is call in some channel, the radio will 

keep active and then get back to dormancy. This function can lower 

the consumption of the battery. 

The following is setting process:

Press  [MENU],  LCD  top  right  corner  shows  01,the  main  screen 

shows RX CODE.

Press  [UP]  or  [DOWN]  till  the  top  right  corner  shows  04,  main 

screen shows SAVE

Press [MENU] to go into the matching menu.

Press [UP] or [DOWN]  to choose in ON/OFF.

Press [MENU] to confirm or press PTT to save new setting and 

return to normal operate pattern.

Note: ON means open the saving function LCD shows S. 

5. FM Returning Setting

By this function, when you receive signal from same frequency dur

-

ing listening to FM, you can choose to stop the receiving or return 

to FM state after 5 seconds:

Press  [MENU],  LCD  top  right  corner  shows  01  the  main  screen 

1.

2.

3.

4.

5.

1.

2.

3.

4.

5.

1.

Summary of Contents for Mini PMR446

Page 1: ...EASY RICETRASMETTITORE PMR446 PMR446 TRANSCEIVER Manuale d uso User manual Importato e distribuito da Polmar srl ...

Page 2: ...uelch 18 4 Funzione radio FM 18 5 Avviso di batteria scarica 18 6 Funzione di clonazione dei dati tramite cavo 19 7 Funzione Battery save 20 8 Funzione disattivazione dei suoni di conferma 20 9 Modo di scansione e relativi parametri di impostazione 20 Ricerca ed analisi dei possibili malfunzionamenti 22 Specifiche tecniche 23 Elenco frequenze Codici CTCSS DCS 44 Elenco frequenze 44 Informazioni su...

Page 3: ...il pacco batteria questo per evitare di trovarlo scarico al momento dell uso Con l apparato commutato in trasmissione evitare che l antenna sia in prossimità o che venga in contatto della pelle della faccia o sugli occhi L apparato darà il maggior rendimento se mantenuto verticale con il microfono ad una distanza di 5 10 centimetri dalla bocca Danno all udito Nel caso la ricezione avvenga mediante...

Page 4: ...CALL Tasto MENU MIC 1 3 4 5 6 UP Chiusura vano batterie Vano batterie Tasto DOWN Tasto SCAN 7 8 9 10 11 Schermo LCD Presa MIC SP Indicatore Led Controllo PWR VOL Clip da cintura Foro per cinghiello 1 13 14 15 16 17 Descrizione dell apparato ...

Page 5: ...e VOX attiva Scansione su doppio canale Scansione attiva su canale prioritario Funzione APO Tastiera bloccata Funzione BEEP attiva Funzione CTCSS 1 3 4 5 6 7 8 9 Funzione DCS DCS positivo Codice DCS CTCSS Indicazione stato batteria DCS reverse Indicazione livello segnale Modo Menu Segnale canale occupato BCLO 10 11 1 13 14 15 16 17 ...

Page 6: ...e scivolare il pacco batterie nel senso indicato dalla freccia come mostrato nella figura seguente Installazione e rimozione della clip da cintura Per l installazione della clip da cintura fissare lo stesso in posizione tramite le due viti fornite in dotazione Nota Installare la clip da cintura unicamente tramite le viti fornite in dotazione evitare assolutamente l utilizzo di colla ...

Page 7: ...d una ricarica di mantenimento in maniera tale da evitare il danneggiamento degli elementi Per ottenere le massi me prestazioni dal pacco batterie sarà necessario eseguire almeno 4 5 cicli di scarica e ricarica Ricaricare il pacco batterie ad apparato spento al termine della ricarica il led rosso del controllo carica si spegnerà Come eseguire la ricarica del pacco batterie Collegare l adattatore n...

Page 8: ...u Premere il pulsante MENU quindi UP o DOWN per accedere alle varie funzioni del menu come mostrato nella tabella seguente N Menu Visualizzazione sul display e spiegazione Impostazione 1 RX CODE impostaz codice ricezione OFF CTCSS DCS 2 TX CODE impostaz codice trasmissione OFF CTCSS DCS 3 BCLO busy channel locked opzionale OFF ON 4 SAVE risparmio batteria OFF ON 5 FM RET FM return ON OFF 6 SCAN im...

Page 9: ...nte UP o DOWN si otterrà l avanzamento veloce in avanti od indietro dei codici visualizzati Dopo avere effettuato la scelta premere il pulsante MENU per confermare oppure premere il pulsante PTT per salvare le nuove impostazioni e fare ritorno al normale modo operativo Nel modo normale di funzionamento l utilizzatore può impostare lo stesso codice CTCSS e DTCS sia in trasmissione che in ricezione ...

Page 10: ...confermare oppure premere il pulsante PTT per salvare le nuove impostazioni e fare ritorno al normale modo operativo Nota ON indica che la funzione BCLO è attiva e sul display appare l indicazione BCLO OFF indica che la funzione BCLO è disattiva 1 si riferisce al modo della portante quando viene ricevuto un se gnale e si preme il pulsante PTT l altoparlante del ricetrasmettitore emetterà un segnal...

Page 11: ...5 secondi Premere il pulsante MENU nella parte superiore a destra del display LCD apparirà il numero 01 mentre sullo schermo LCD appare l indicazione RX CODE Premere i pulsanti UP o DOWN fino a fare apparire nell angolo in alto a destra il numero 05 mentre sul display LCD appare l indicazione FM RET Premere MENU per accedere al menu 4 Premere i pulsanti UP o DOWN per selezionare il modo ON oppure ...

Page 12: ...mere i pulsanti UP o DOWN fino a fare apparire nell angolo in alto a destra il numero 06 mentre sul display LCD appare l indicazione SCAN Premere MENU per accedere al menu Premere i pulsanti UP o DOWN per selezionare il modo TO CO SE Premere il pulsante MENU per confermare oppure premere il pulsante PTT per salvare l impostazione e fare ritorno al modo normale di funzionamento 7 Attesa su doppia f...

Page 13: ...ne SQL Premere MENU per accedere al menu Premere i pulsanti UP o DOWN per selezionare 0 1 2 3 4 normalmente viene utilizzato il livello 1 il quale garantisce la migliore sensibilità Premere il pulsante MENU per confermare oppure premere il pulsante PTT per salvare l impostazione e fare ritorno al modo normale di funzionamento 9 Attivazione Disattivazione retroilluminazione display Tramite questa f...

Page 14: ...e il pulsante PTT per salvare l impostazione e fare ritorno al modo normale di funzionamento Nota ON indica che la funzione K Tone è attiva sul display apparirà l indicazione Off invece indica che la funzione è disattiva 11 APO La funzione APO spegne automaticamente l apparato nel caso non venga effettuata alcuna operazione entro 30 minuti questo consen tirà di prolungare l autonomia della batteri...

Page 15: ...OT Premere MENU per accedere al menu Premere i pulsanti UP o DOWN per selezionare in OFF 15 30 45 60 75 90 600s Premere il pulsante MENU per confermare oppure premere il pulsante PTT per salvare l impostazione e fare ritorno al modo normale di funzionamento 13 Funzione VOX la funzione VOX consente di trasmettere a mani libere cioè senza dovere premere il pulsante PTT Grazie a questa funzione la tr...

Page 16: ...tiva sul display appare l indi cazione VOX 14 FM SEL L operatore può scegliere il modo di sintonizzazione per il sintoniz zatore FM agendo nel seguente modo Premere il pulsante MENU nella parte superiore a destra del display LCD apparirà il numero 01 mentre sullo schermo LCD appare l indicazione RX CODE Premere i pulsanti UP o DOWN fino a fare apparire nell angolo in alto a destra il numero 15 men...

Page 17: ...edere al modo di selezione del canale 5 Modo di funzionamento con selezione della frequenza o del canale Per selezionare il modo di funzionamento del ricetrasmettitore accendere l apparato e premere il pulsante MENU selezionare quindi il modo desiderato 6 Scansione Dal modo di standby premere il pulsante SCAN per 2 secondi il ricetrasmettitore si porterà nel modo di scansione eseguendo la scansion...

Page 18: ...R FM quan do l apparato emette un suono di il ricetrasmettitore inizia ad operare nel modo FM e sul display appare il simbolo FM Premere il pulsante UP o DOWN per sintonizzare la frequen za desiderata nella gamma dagli 88 108 MHz con spaziatura di 100kHz Tenendo premuto a lungo il pulsante UP o DOWN si ot tiene l avanzamento veloce della frequenza in avanti od indietro Per uscire dal modo di ricez...

Page 19: ...rà in lampeggio il led di colore giallo sul secon do apparato e sul display appare l indicazione PC ad indicare che la funzione di clonazione dati è in corso Al termine della funzione di clonazione sul display LCD del ricetrasmettitore host apparirà per un momento l indicazione End quindi apparirà la scritta CLONE allo stesso tempo si accenderà il led di colore arancio ad indicare che il ricetrasm...

Page 20: ...modulato la scansione si fermerà sul canale attivo per il tempo di ritardo programmato fino alla scomparsa del segnale Il tempo di ritardo impostato in fabbrica è di 3 secondi B Start up scan Premendo il pulsante SCAN per almeno 2 secondi viene attivata la scansione partendo dal canale corrente Il led di controllo giallo si accenderà in lampeggio Quando viene ricevuto un segnale la scansione si fe...

Page 21: ...i la trasmissione avverrà dalla frequenza principale Priority La trasmissione avviene solo sul canale prioritario impo stato in precedenza Priority transmit Durante la scansione quando viene ricevuto un segnale con un codice adeguato su di un canale la scansione si ferma per un breve tempo ed è possibile la trasmissione su questo canale Altrimenti la trasmissione avverrà sulla frequenza del canale...

Page 22: ...e Provare a cambiare frequenza Variare il canale ed il codice CTCSS DCS utilizzato dal vostro gruppo La batteria anche se ricaricata non ha autonomia sufficiente per il funzionamento del ricetrasmettitore La vita operativa della batteria è giunta al termine provvedere all acquisto di un nuovo pacco batterie Verificare che la batteria sia completa mente carica Trasmissioni incom prensibili o interm...

Page 23: ...M Batteria Ioni di Litio 7 4V 2300mAh 17Wh Tensione 7 4V Assorbimento corrente 15mAh Power Save Dimensioni H x L x P 100 x 58 x 36 mm Peso 205 g Transmettitore Potenza RF in uscita 500 mW Corrente in trasmissione 600 mA Deviazione massima 2 5 kHz Ricevitore Sensibilità in ricezione 122 dBm 12 dB SINAD Sensibilità Squelch 0 16 µV Potenza di uscita audio 500 mW Assorbimento in ricezione 140 mA ...

Page 24: ...D Screen 27 Preparation For Using 28 Menu contents 30 Menu help and setting 31 1 RX CODE Selection 31 2 TX CODE selection 31 3 BCLO setting 31 4 Battery Save 32 5 FM Returning Setting 32 6 Scan setting 33 7 Duel frequency waiting DW 33 8 SQL Function 34 9 Back Light On and Off 34 10 KTONE On Off 34 11 APO 35 12 TOT 35 13 VOX Function 35 14 FM SEL 36 Basic operation 36 Additional functions 37 Troub...

Page 25: ...ttery pack must be removed to prevent it running flat With the equipment switched to transmission avoid positioning the antenna near to or in contact with your face or eyes The equipment will perform best if kept vertical with the micro phone at a distance of 5 10 centimetres from your mouth Damage to hearing If reception is by means of earphones head sets etc the volume level must be kept down Pr...

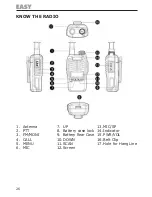
Page 26: ...ntenna PTT FM MONI CALL MENU MIC 1 2 3 4 5 6 UP Battery case lock Battery Rear Case DOWN SCAN Screen 7 8 9 10 11 12 MIC SP Indicator PWR VOL Belt Clip Hole for Hang Line 13 14 15 16 17 Know the radio 26 ...

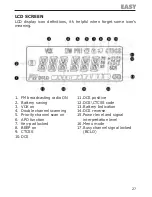
Page 27: ...ON Battery saving VOX on Double channel scanning Priority channel scan on APO function Key pad locked BEEP on CTCSS DCS 1 2 3 4 5 6 7 8 9 10 DCS positive DCS CTCSS code Battery Indication DCS reverse Power level and signal interpretation level Menu mode Busy channel signal locked BCLO 11 12 13 14 15 16 17 27 ...

Page 28: ...s show Take off the battery When taking off the battery please do the picture shows following the arrow Install and take off the belt clip If necessary tight the belt clip with two screws 3 6 as picture shows Note When installing the belt clip do not use any glue to fix crew or it will be bad for casing ...

Page 29: ...ed over two months the capacity of battery pack is less than normal However it will return normal after charged and discharged for five times Charge in power off mode the indicate red light is on and it is off when finish charging Charging steps below Insert the AC adaptor line to the charging hole of desk top Connect the power with AC adaptor Radio with battery on the desk top As following pictur...

Page 30: ...contents Press MENU then UP or DOWN to get into the matching func tion as followed Menu item Display explaination Setting content 1 RX CODE receive code setting OFF CTCSS DCS 2 TX CODE 8transmit code setting OFF CTCSS DCS 3 BCLO busy channel locked optional OFF ON 4 SAVE battery saving OFF ON 5 FM RET FM return ON OFF 6 SCAN scanning set TO CO SE 7 DW dual band waiting selection OFF ON 8 SQL squel...

Page 31: ...N key can be fast forward or rewind option Press MENU after choosing to confirm or press PTT to save new setting and back to normal operate pattern As in the normal state the general user set the same CTCSS and DCS codes to receive and transmit basically To facilitate the operation while the CTCSS and DCS codes have been set to receive it will automatically switch to Step 2 in TX CODE menu 2 TX CO...

Page 32: ...TCSS code must be exactly the same the BCLO will be active 4 Battery Save The radio has a important saving function which can make radio be in a dormancy condition and wake up periodicity to check the received signal When there is call in some channel the radio will keep active and then get back to dormancy This function can lower the consumption of the battery The following is setting process Pre...

Page 33: ...cy when it examine some signal till the signal disappeared Between resuming and sig nal disappeared there are two seconds extend to leave time for transmitting responds C Searching pattern SE When walkie talkie examines some signal it will stop scanning and keep in the same frequency as the signal s Operate steps as followed Press MENU LCD top right corner shows 01 main screen shows RX CODE Press ...

Page 34: ...et as 1 since the sensitivity is the best in this level After choosing press MENU to confirm or PTT to save the setting and get back to normal operate pattern 9 Back Light On and Off This function let back light keep on or auto off when it goes into dormancy Press MENU LCD right corner shows01 main screen shows RX CODE Press UP or DOWN till LCD top right corner shows 09 main screen shows LIGHT Pre...

Page 35: ...rt up the function LCD shows icon as NO 12 12 TOT The aim of TOT is to avoid damage caused by over heat and avoid the signal occupy the frequency in long time When signal keep transmitting over the set time the longest is 10 Min walkie talkie will stop transmitting and beeping alarm start lose the PTT and beeping stop TOT setting as followed Press MENU LCD top right corner shows 01 main screen sho...

Page 36: ...uation 1 Used in low sensitivity and high background noise Note ON start up the function LCD shows VOX 14 FM SEL User can manual auto with the FM SEL model The following is searching steps Press MENU it displays the 01 on the right top of screen Main screen would display RX CODE Press UP or DOWN it displays 15 on the right top of screen Main screen shows FMSEEK Then press MENU Press UP or DOWN to ...

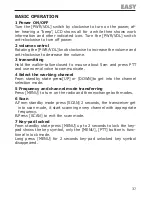
Page 37: ... and use normal voice to communicate 4 Select the working channel From standby state press UP or DOWN to get into the channel selection mode 5 Frequency and channel mode transferring Press MENU to turn on the radio and then exchange both modes 6 Scan From standby mode press SCAN 2 seconds the transceiver get into scan mode it start scanning every channel with appropriate frequency Press SCAN to ex...

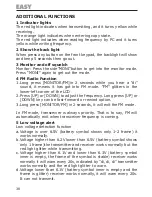
Page 38: ...ress UP or DOWN key can be fast forward or rewind option Long press MONITOR FM in 2 seconds it will exit the FM mode In FM mode transceiver is always priority That is to say FM will automatically exit when transceiver frequency is coming 5 Low voltage alert Low voltage detection function Voltage is over 6 5V battery symbol shows only 1 2 frame it works normally Voltage higher than 6 2V lower than ...

Page 39: ...litter abnormally the host transceiver shows ERR it means the replication is failed Please check if the line connection is fine if the subsidiary transceiver is power on wait for the orange light on in the host transceiver LCD shows CLONE please press PTT of host transceiver to renew the replication If many transceivers should be replicated please power off the subsidiary and change another one to...

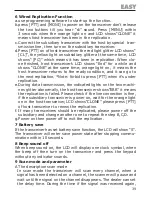
Page 40: ...he matched signal during scanning it will return to scan the prior channel while scanning every channel When current channel set as the priority channel LCD will appear PRI icon D Return channel During scanning press PTT key the transceiver will transmit by the following 4 modes Select During scanning the transceiver will transmit from main channel the working channel is set as the main channel Se...

Page 41: ...41 ...

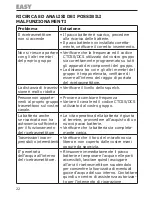
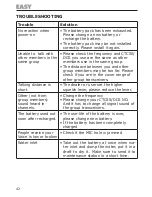
Page 42: ...ransceivers Talking distance is short The dealer or user set the higher squelch lever please reduce the lever Other not from group members sound heard in channels Change the frequency Please change your CTCSS DCS NO And it has to change all signal sound of the group transceivers The battery used out soon after recharged The use life of the battery is over please change new battery If the battery h...

Page 43: ...e Frequency Modulation FM Battery 7 4V 2300mAh 17Wh Voltage 7 4V Standby Current 15mAh Power Save Size H x W x D 100 x 58 x 36 mm Weight 205 g Transmitter Output power 500 mW Emission current 600 mA Maximum frequency deviation 2 5 kHz Receiver Reference sensitivity 122 dBm 12 dB SINAD Squelch sensitivity 0 16 µV Rated Audio Power 500 mW Receiving current 140 mA ...

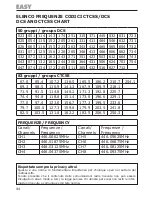
Page 44: ...0 97 4 123 0 156 7 177 3 199 5 233 6 79 7 100 0 127 3 159 8 179 9 203 5 241 8 82 5 103 5 131 8 162 2 183 5 206 5 250 3 Elenco frequenze codici CTCSS DCS DCS and CTCSS chart Frequenze Frequency Canali Channels Frequenze Frequency Canali Channels Frequenze Frequency CH1 446 00625MHz CH5 446 05625MHz CH2 446 01875MHz CH6 446 06875MHz CH3 446 03125MHz CH7 446 08125MHz CH4 446 04375MHz CH8 446 09375MHz...

Page 45: ...46 ...

Page 46: ... sich das Gerät Polmar Easy in Übereinstimmung mit den grundlegenden Anforderungen und den übrigen einschlägigen Bestimmungen der Richtlinie 1999 5EG befindet EN Hereby Polmar srl declares that this apparatus brand Polmar mod Easy is in compliance with the essential requirements and other relevant provisions of Directive 1999 5 CE ES Por medio de la presente Polmar srl declara que el Polmar Easy c...

Page 47: ...a quelli operanti in banda cittadina CB Art 145 ha effetto soltanto ai fini della determinazione dell entità del contributo Per la dichiarazione di cui all art 107 può essere utilizzato il modello allegato 19 indicando se trattasi di dichiarazione riferi bile al punto 2 3 o al punto 2 8 dello stesso art 104 comma1 lettera c Riportiamo l Art 37 allegato 25 che precisa quanto segue per le attività d...

Page 48: ...24 Dr Busca Alberto Tel 071 22709230 Fax 071 22709236 PIEMONTE VALLE D AOSTA Torino Via Arsenale 13 10121 Direttore Ufficio Dr Scibilia Mario Tindaro Tel 011 5763444 Fax 011 5763436 PUGLIA BASILICATA Bari Via Amendola 116 70126 Dr ssa Mangione Lilla Tel 080 5557201 Fax 080 5586395 SARDEGNA Cagliari Via Brenta 09122 Tel 070 20286201 Fax 070 286983 SICILIA Palermo via A De Gasperi 103 90146 Dr ssa M...

Page 49: ...che il sistema radioelettrico è ubicato in CAP località prov e presenta le seguenti caratteristiche PROG MARCA MODELLO MATRICOLA MARCHIO CE 1 F SI 2 F SI 3 F SI 4 F SI 5 F SI 6 F SI E SI IMPEGNA x a comunicare tempestivamente ogni modifica al contenuto della presente dichiarazione x a rispettare ogni norma in materia di sicurezza di protezione ambientale di salute pubblica ed urbanistiche x a vers...

Page 50: ...n e presenta le seguenti caratteristiche tipo numero di apparati dati di omologazione approvazione compatibilità elettromagnetica ecc E SI IMPEGNA x a comunicare tempestivamente ogni modifica al contenuto della presente dichiarazione x a rispettare ogni norma in materia di sicurezza di protezione ambientale di salute pubblica ed urbanistiche x a versare il contributo annuo di 12 00 per l attività ...

Page 51: ...o da parte dell utente comporta l applicazione delle sanzioni amministrative di cui al dlgs n 22 1997 articolo 50 e seguenti del dlgs n 22 1997 USER INFORMATION in accordance with art 13 of the Legislative Decree of 25th July 2005 no 15 Implementation of Directives 2002 95 EC 2002 96 EC and 2003 108 EC rela tive to reduction of the use of hazardous substances in electrical and electronic equipment...

Page 52: ...operante a condizione che l ap parecchiatura non sia stata manomessa o modificata e che l utilizzo del l apparecchiatura stessa sia avvenuta in modo conforme alle caratteristiche tecniche della stessa senza determinare dei danni Il rivenditore e la Polmar srl si riservano di verificare le condizioni di appli cabilità della garanzia al fine di applicare a termini di legge la normativa in materia Og...

Page 53: ...Importato e distribuito da Polmar srl polmar srl alice it www polmar biz ...

Reviews: