background image

18

Polaroid PDC 2030 Digital Camera User Guide

www.polaroid-digital.com

6 Transferring Pictures and Video Clips to a Computer

• Before Transferring Pictures

   IMPORTANT! (For Windows

®

 and Macintosh

®

 Users)

•  BEFORE  YOU  CONNECT  YOUR  DIGITAL  CAMERA  TO  THE  COMPUTER, 

MAKE  SURE  THAT  YOU  HAVE  INSTALLED  THE  SOFTWARE  FROM  THE 

ENCLOSED  CD.  PLEASE  REFER  TO  “5  Installing  the  Software  onto  a 

Computer.”

•  Default setting is the Mass Storage mode.

For Windows® and Macintosh® Users: 

PC MAC

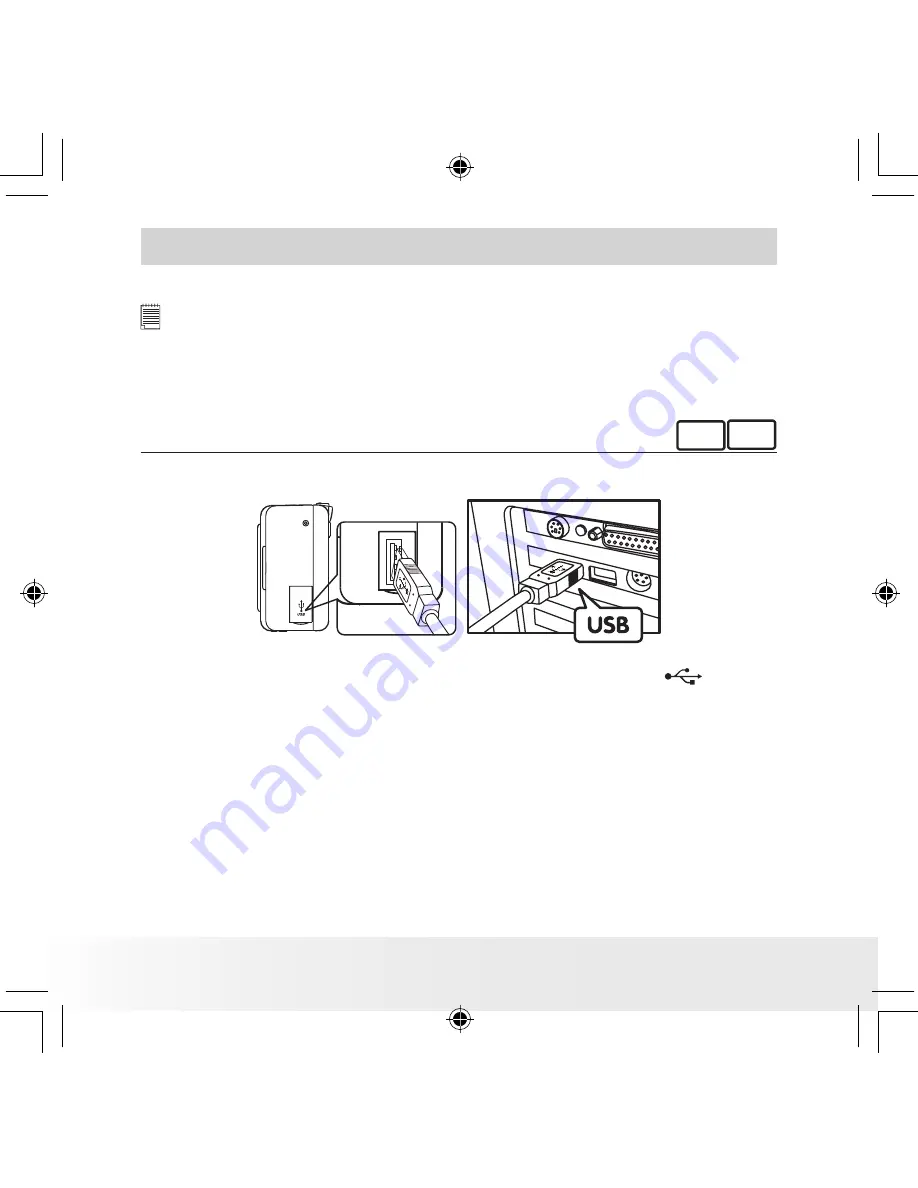
• Connecting to Your Computer

USB Series “A” Plug Connects to your Computer

1.  Plug one end of the USB cable into the socket marked 

 on your 

computer. 

2.  Plug  the  other  end  of  the  USB  cable  into  the  USB  port  on  your 

camera.

PDC 2030 US UM R1.indd

1/5/04, 4:41 PM

18

Summary of Contents for PDC 2030

Page 1: ...PDC 2030 Digital Camera User Guide www polaroid digital com PDC 2030 US UM R1 indd 1 5 04 4 40 PM 1...

Page 2: ...6 7 1 Shutter button 2 Flash 3 Power Self timer LED 4 USB port 5 Lens 6 Viewfinder 7 Status LCD 1 Select button 2 Mode button 3 Viewfinder 4 Power switch 5 Flash button Back View 1 2 3 4 5 Side View...

Page 3: ...tery Life 7 2 Camera Setting 8 Checking the Camera Status 8 3 Taking and Managing the Pictures 9 Taking a Picture 9 Using the Flash 10 Setting the Image Resolution 11 Setting Self timer 12 Deleting th...

Page 4: ...AC 19 7 Using your Camera as a Web Cam PC only 20 Change the driver type to the PC Camera mode 20 Setting up NetMeeting 20 Start NetMeeting 21 8 Troubleshooting Problems 22 9 Getting Help 24 Polaroid...

Page 5: ...pictures and video clips on a computer Send the pictures and video clips over the Internet to family and friends Camera Package Contents Pouch User s Guide Hand strap USB Cable 2 x AA Alkaline Batter...

Page 6: ...shown ensuring you follow the signs correctly 3 Close the battery door by pressing down and pushing it back in position 1 2 3 Turning the Camera on and off To turn on the camera slide the Power switch...

Page 7: ...will hear a beep sound and the camera is ready to take pictures Slide the Power switch again to turn the camera off 2 Check the battery status level that appears on the camera status LCD Batteries ha...

Page 8: ...rticular feature is not activated Picture Resolution Camera Status Full Exhausted Other Features Self timer Low High 1600x1200 Picture counter Number of pictures taken Video counter Length of video cl...

Page 9: ...camera off 2 Frame your subject using the Viewfinder 3 Press the Shutter button to take a picture When you press the shutter button a beep sounds Hold the camera steadily until another beep sounds Th...

Page 10: ...ard a reflective surface such as a window or mirror If there is not enough light when using this setting your pictures will be too dark A Auto Flash The flash fires automatically as needed Use this se...

Page 11: ...the status LCD 3 Press the Select button while HI is blinking and the MED icon blinks on the status LCD Press the Select button again and the LOW icon blinks on the status LCD 4 Press the shutter but...

Page 12: ...take a picture The camera starts countdown The camera beeps and the LED indicator blinks slowly for 5 seconds then quickly for 3 seconds and faster for the last 2 seconds before the picture is taken D...

Page 13: ...on the status LCD 3 Press the Select button to confirm and the icon will stop blinking 4 Press the Shutter button to delete all the pictures taken The icon Erasing all pictures will appear on the sta...

Page 14: ...the camera off 2 Press the Mode button repeatedly until the icon appears on the status LCD Then Press the Select button to confirm and it will remain solid 3 Frame your subjects using the viewfinder 4...

Page 15: ...MPORTANT For Windows ME 2000 XP Directly plug in the camera to transfer and play the pictures video clips or audio clips No need to install the driver But if you want to use NetMeeting function please...

Page 16: ...PDC 2030 Driver Plug Play removable disk Easy to use just plug the camera to a computer and use it as a removable disk Use the Arcsoft software to edit and print the Pictures ArcSoft PhotoImpression 4...

Page 17: ...equirements For Windows Users PC Compatible with Microsoft Windows 98SE Me 2000 or XP Pentium II 333MHz or equivalent processor 64MB RAM 128MB recommended USB Port 200MB free disk space Color monitor...

Page 18: ...SURE THAT YOU HAVE INSTALLED THE SOFTWARE FROM THE ENCLOSED CD PLEASE REFER TO 5 Installing the Software onto a Computer Default setting is the Mass Storage mode For Windows and Macintosh Users PC MAC...

Page 19: ...u can also create sub folders to group them or use the Arcsoft software to edit and manage the pictures For Macintosh Users MAC Transferring the Pictures and Video clips to MAC NOTE For MAC user direc...

Page 20: ...tton to confirm and the icon will stop blinking Setting up NetMeeting NOTE Set the camera to Capture mode before starting NetMeeting 1 Connect your PDC 2030 to the USB cable on one end 2 Connect the U...

Page 21: ...ion to set up NetMeeting 1 Double click the NetMeeting icon on the desktop or select the NetMeeting icon from the Windows Start Menu 2 If you need further help on how to use Microsoft NetMeeting selec...

Page 22: ...and it s driver completely from your system to avoid conflicting with your PDC 2030 or capture device I press the shutter button and get no response The PDC 2030 is processing the image or The flash...

Page 23: ...ick INSTALL E EXE file My PDC 2030 Camera hanged and all buttons do not work Take out all the batteries and disconnect the camera from the computer for 10 seconds Re insert the batteries again Your ca...

Page 24: ...arcsoft com toll free number Fax 1 510 440 1270 E mail support arcsoft com For China For Japan ArcSoft China Support Center Beijing ArcSoft Japan Support Center Tokyo Tel 8610 6849 1368 Tel 81 03 383...

Page 25: ...57 images approx Focal range 3 feet 0 9 meter to infinity approx Flash range Approx 3 feet 4 9 feet 0 9 meters 1 5 meters Video Clip Unlimited when connected to the computer via video capture software...

Page 26: ...types of batteries or new and used batteries Use recommended or equivalent type of batteries only Insert the batteries with the correct polarity Remove exhausted batteries from the camera immediately...

Page 27: ...r TV before cleaning it ALWAYS remove dust or stains with a soft cloth dampened with water or neutral detergent NEVER place hot items on the surface of the Camera NEVER attempt to open or disassemble...

Page 28: ...es and can radiate radio frequency energy and if not installed and used in accordance with the instructions may cause harmful interference to radio communications However there is no guarantee that in...

Page 29: ...US 0104 Part No OM3273US001 Printed in China PDC 2030 US UM R1 indd 1 5 04 4 41 PM 29...

Reviews: