background image

0000104750/210616/B MobilePro | MobilePro/PTFE 

EN - 4

Inlet pressure

5-10 bar (75-150 PSI)

Required pressure

5 bar (75 PSI) (by integrated pressure 

regulator)

Compressed air 

connection

G 3/8” (female)

Compressed air 

consumption

35 Nl (1.2 ft³) per pulse

Volume of compressed air 

tank

10 litres (2.6 gallon)

Activation of filter 

cleaning system (online 

only)


- pressure controlled (threshold value: 

1000 Pa)


- manually by push button

Duration of filter cleaning 

cycle

60 seconds (6 pulses)

Fan

Fan type

radial

Extraction capacity

max. 1200 m�/h (700 CFM) (incl. 

extraction arm)

Fan speed:


- 50 Hz 


- 60 Hz


- 2900 rpm 


- 3390 rpm

Noise level

72 dB(A) according to ISO 3746

Electrical data

Power consumption

1,1 kW (1.5 HP)

Available connection 

voltages


- 115V/1ph/50Hz


- 115V/1ph/60Hz


- 230V/1ph/50Hz


- 400V/3ph/50Hz+N

Motor design

IEC

Energy efficiency:


- single phase motor


- three-phase motor


- n.a.


- IE3 / premium

Mains cord:


- type


- length


- SJOOW 3xAWG14 


- 4,5 m (14.8 ft) 

Plug:


- 115V/1ph/50Hz


- 115V/1ph/60Hz


- 230V/1ph/50Hz


- 400V/3ph/50Hz+N

Type:


- none


- NEMA 5-15P


- none


- none

Certification

IFA W3

pending

Refer to the available product data sheet for 

detailed product specifications.

1.5 

Dimensions

Refer to Fig. I on page 69.

1.6 

Working range

Refer to Fig. II on page 69.

1.7 

ambient conditions

Process temperature:


- min.


- nom.


- max.

5°C (41°F)

20°C (68°F)

70°C (158°F)

Max. relative humidity

90%

Suitable for outdoor use

no

1.8 

Transport of the unit

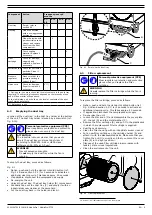
You cannot hold the manufacturer liable for any transportation 

damage after delivery of the product. Handle the machine and 

the accompanying extraction arm with care. Completely 

dismount the extraction arm before transport. Dismount the 

arm by executing the mounting procedure in reverse order. 

Subsequently the machine and the arm can be transported on 

a pallet in the original packing.

To prevent damage, make sure that the machine and the arm 

cannot shift on the pallet.

PRODUCT DESCRIPTION

2.1 

Components

The unit consists of the following main components and 

elements:

Fig. 2.1

A  deflector plate

B  filter cartridge

C  dust tray

D  handlebar

E  control panel

F  extraction fan

G  outlet grid (2x)

H  RamAir™ pulse amplifier (filter cleaning system)

Fig. 2.1 

C

D

E

F

G

H

B

A

Main components and elements

2.2 

Operation

The MobilePro works in accordance with the recirculation 

principle. Welding fume is extracted through the hood of the 

connected extraction arm by the built-in fan. The polluted air 

passes the deflector plate

1

 and is cleaned by the filter 

cartridge. The welding fume particles are collected at the 

outside of the filter cartridge. The cleaned air is returned in the 

workshop through the outlet grids on the sides of the unit. 

2.2.1  Filter cleaning system

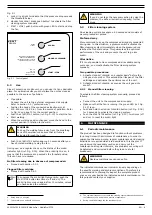
When the filter cartridge becomes saturated - and 

consequently the extraction capacity reduces -, a pressure 

switch activates the RamAir™ pulse amplifier, which thoroughly 

cleans the filter cartridge by compressed air pulses. This 

cleaning system can be activated manually as well. The dust 

and dirt particles fall into the dust tray. 

The cleaning system only operates when the fan is running, to 

prevent dust particles to escape through the hood of the 

extraction arm. 

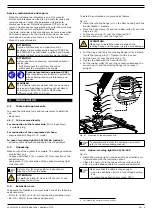
1.  To protect the filter cartridge and to distribute the air equally inside the unit.

Summary of Contents for MOBILEPRO

Page 1: ...de soldadura IT Estrattore mobile per fumi di saldatura PL Mobilny odci g dym w spawalniczych EN Installation and user manual NL Installatie en gebruikershandleiding DE Installations und Betriebsanle...

Page 2: ...l emploi l entretien et la r paration du produit figurant en premi re page de couverture de ce document Le pr sent manuel s applique au mod le standard du produit Par cons quent le fabricant n est pa...

Page 3: ...mbulo 40 Prefazione 50 1 Introduction 30 1 Introducci n 40 1 Introduzione 50 2 Description de produit 31 2 Descripci n del producto 41 2 Descrizione del prodotto 51 3 Instructions de s curit 32 3 Norm...

Page 4: ...f this manual applies to the MobilePro as well as the MobilePro PTFE 1 Introduction 1 1 Identification of the product The identification plate contains among other things the following data product na...

Page 5: ...the accompanying extraction arm with care Completely dismount the extraction arm before transport Dismount the arm by executing the mounting procedure in reverse order Subsequently the machine and th...

Page 6: ...les brochure In case of doubt it is the use which can be deduced from the construction the model and the function of the technical product which is considered normal use Operating the machine within t...

Page 7: ...ke sure that the product is complete The package contains mobile filter unit hexagon bolt M6x25 8 washer 8 for connection of the extraction arm cable gland 2 for connection of the optional working lig...

Page 8: ...tirely remove it Install the front cover of the unit instructions of Fig 4 3 and Fig 4 4 in reverse order Install the cover of the control panel Fig 4 5 A B C Connection of the working light cable 4 4...

Page 9: ...solve the problem the airflow extraction capacity further drops 5 3 Filter cleaning system One cleaning cycle takes approx 60 seconds and consists of six compressed air pulses Preferred way We recomm...

Page 10: ...6 1 Option push and hold the MANUAL CLEANING button ref Fig 5 1B and section 5 3 1 for 5 seconds to activate an additional cleaning cycle This takes approx 60 seconds If applicable disconnect the comp...

Page 11: ...ich indicates that the filter cartridge is clogged Symptom Problem Possible cause Solution The fan does not start cont The unit does not function Thermal relay is defective Replace the thermal relay T...

Page 12: ...ins disconnect it from the compressed air clean the outside During dismantling of the unit make sure that the area is sufficiently ventilated e g by a mobile ventilation unit After dismantling of the...

Page 13: ...eze handleiding vallen gelieve contact op te nemen met de leverancier van het product Deze is altijd bereid u te helpen Zorg ervoor dat u de volgende gegevens bij de hand heeft productnaam serienummer...

Page 14: ...sport van de unit De fabrikant kan op geen enkele wijze verantwoordelijk worden gesteld voor transportschade na aflevering Ga altijd voorzichtig met de machine en de bijbehorende afzuigarm om Voordat...

Page 15: ...roduct 2 Tijdens de ALARM fase blijft de ventilator draaien 3 Gebruik volgens bestemming zoals vastgelegd in de EN ISO 12100 1 is het gebruik waarvoor het technisch product volgens de opgave van de fa...

Page 16: ...en onderhoudswerkzaamheden moet voldoen aan stofklasse H volgens de norm EN 60335 2 69 4 Installatie 4 1 Gereedschappen en benodigdheden Om de unit te installeren zijn de volgende gereedschappen en be...

Page 17: ...4 Druk het voorpaneel A naar beneden en neem het uit 5 De moer is bevestigd aan het voorpaneel dus kan niet verwijderd worden Fig 4 4 25 mm 1 in A Demontage van het voorpaneel Fig 4 5 Demonteer de afd...

Page 18: ...houden Druk ca 20 seconden na het be indigen van de laswerkzaamheden op de AAN UIT knop om de ventilator uit te schakelen Controleer tijdens het gebruik regelmatig de status van de ALARM controlelamp...

Page 19: ...g controleren De frequentie voor het legen van de opvangbak is afhankelijk van de intensiteit van het gebruik en is een kwestie van ervaring Controleer de hoeveelheid vervuiling in de stofopvangbak in...

Page 20: ...atroon verstopt is WAARSCHUWING Respecteer bij het uitvoeren van onderstaande werkzaamheden de veiligheidsinstructies zoals beschreven in hoofdstuk 3 Signalering Probleem Mogelijke oorzaak Oplossing A...

Page 21: ...040900220 Thermisch relais 3 2 16 A MobilePro 230V 1ph 50Hz 0000104069 Ventilatorwiel 50Hz MobilePro 400V 3ph 50Hz N 0000104069 Ventilatorwiel 50Hz 9 Elektrisch schema Zie het separaat bijgevoegde ele...

Page 22: ...ll folgende Angaben bereit Produktname Seriennummer Diese Angaben finden Sie auf dem Typenschild Produktbezeichnungen Falls nicht anders spezifiziert gilt der Inhalt dieser Anleitung f r sowohl das Mo...

Page 23: ...orsichtig mit der Maschine und dem dazugeh rigen Absaugarm um Vor dem Transport mu der Absaugarm v llig entkoppelt werden Koppeln Sie den Absaugarm los durch das Ankopplungsverfahren in entgegengesetz...

Page 24: ...gsgem e Verwendung gem der EN ISO 12100 1 ist die Verwendung f r die das technische Produkt gem den Angaben des Herstellers einschlie lich seiner Anweisungen in der Verkaufsbrosch re geeignet ist In Z...

Page 25: ...ten verwendeter Industriestaubsauger muss der Staubklasse H gem EN 60335 2 69 entsprechen 4 Installation 4 1 Ben tigte Werkzeuge und Materialien Sie ben tigen folgende Werkzeuge und Materialien f r di...

Page 26: ...ung A herunterdr cken und entfernen 5 Die Mutter ist an der Frontblende befestigt was ein vollst ndiges Entfernen der Mutter unm glich macht Fig 4 4 25 mm 1 in A Abbau der Frontabdeckung Fig 4 5 Abdec...

Page 27: ...szuschalten W hrend des Betriebs regelm ig den Status der Alarmanzeige siehe Fig 5 1A berpr fen Bei leuchtender Alarmlampe hat der Druckabfall den Schwellenwert berschritten Hierf r kommen zwei m glic...

Page 28: ...nsit t ab und muss durch Erfahrung ermittelt werden Zu Beginn den F llstand der Staubschublade zwei Mal monatlich berpr fen Vor jedem Einsatz 6 2 Staubbeh lter leeren Einbauort des Staubbeh lters in d...

Page 29: ...Problem M gliche Ursache L sung ALARM Lampe ist ein Keine Filter reinigung Keine oder zu niedrige Druckluft Die Druckluft anschlie en bzw reparieren Anschlie end Taste MANUELLE FILTER REINIGUNG dr ck...

Page 30: ...ph 60Hz IEC 0040900220 Thermisches Relais 3 2 16 A MobilePro 230V 1ph 50Hz 0000104069 Ventilatorrad 50Hz MobilePro 400V 3ph 50Hz N 0000104069 Ventilatorrad 50Hz 9 Schaltplan Siehe den separat beigef g...

Page 31: ...t Ce fournisseur est toujours dispos vous aider Assurez vous que vous disposez des donn es suivantes nom du produit num ro de s rie Vous trouverez ces donn es sur la plaque d identification Indication...

Page 32: ...max 90 Apte l usage ext rieure non 1 8 Transport de la machine Le fabricant ne peut tre tenu pour responsable des dommages de transport apr s livraison du produit Manipulez toujours avec pr caution l...

Page 33: ...LARME le ventilateur continue tourner 3 Emploi conforme la destination tel arr t dans la norme EN ISO 12100 1 est l usage pour lequel le produit technique est appropri d apr s la sp cification du fabr...

Page 34: ...entretien et la maintenance doit tre con u pour la classe de poussi re H conform ment la norme EN 60335 2 69 ou pour la classe HEPA efficacit de 99 97 0 3 m 4 Installation 4 1 Outils et outillage Les...

Page 35: ...er le panneau avant Fig 4 4 Appuyez sur le panneau avant A et retirez le 5 L crou est solidaire du panneau avant si bien qu il n est pas possible de le retirer enti rement Fig 4 4 25 mm 1 in A D monta...

Page 36: ...ettre en marche le ventilateur Commencez souder En cas de changement de position de soudure dirigez la hotte correctement vers la soudure MISE EN GARDE Afin que la fum e de soudure soit loign e de la...

Page 37: ...che filtre V rifiez si elle n est pas endommag e encrass e ou satur e Remplacez la si n cessaire X Ventilateur Contr lez quant la pr sence de salet incrust e Nettoyez le si n cessaire X 9 En mode ALAR...

Page 38: ...usag e au rebut conform ment aux r glementations f d rales gouvernementales ou locales Nettoyez l environnement de l unit 10 L autocollant UP indique le haut de la plaque de couverture Fig 6 2 B A C D...

Page 39: ...bl me Cause possible Rem de Capacit d aspiration insuffisante Pas de d colmatage du filtre Connexion d air comprim desserr e R parez la connexion d air comprim Absence d air comprim pression trop faib...

Page 40: ...mobile Apr s le d montage de l unit nettoyez la zone de d montage 10 2 Mettre au rebut liminez les polluants et la poussi re avec la cartouche filtre usag e d une mani re professionnelle conform ment...

Page 41: ...la informaci n deseada Dado el caso se ruega tener preparados los siguientes datos denominaci n del producto n mero de serie Estos datos figuran en la placa de caracter sticas Indicaciones de producto...

Page 42: ...gina 69 1 6 Alcance de trabajo V ase Fig II en la p gina 69 1 7 Condiciones de entorno Temperatura del proceso min nom m x 5 C 41 F 20 C 68 F 70 C 158 F Humedad relativa del aire m xima 90 Apto para...

Page 43: ...instrucciones Los ni os deben ser supervisados para evitar que jueguen con la m quina 2 Durante la etapa de ALARMA el ventilador continuar funcionando Utilizaci n debida3 El producto se ha dise ado e...

Page 44: ...er realizadas exclusivamente seg n las directivas TRGS 560 y TRGS 528 por personas autorizadas cualificadas y preparadas capacitadas que usen las pr cticas de trabajo adecuadas ATENCI N Antes de proce...

Page 45: ...para girar el brazo de aspiraci n 359 m x Fig 4 2 A Montaje del cable de la l mpara de trabajo Fig 4 3 Afloje el tornillo M10 A de la parte inferior de la unidad Siga desatornillando el perno hasta q...

Page 46: ...ara ver la posici n correcta Pulse el bot n ARRANQUE PARO v ase Fig 5 1C para poner en marcha el ventilador Empiece a soldar Cuando cambie la posici n de soldadura mueva la campana a la posici n corre...

Page 47: ...trial y elimine el polvo del compartimento del filtro X Compruebe el material sellante y sustit yalo siempre y cuando sea necesario X Cartucho de filtro Compruebe respecto a da os ensuciamiento y satu...

Page 48: ...protecci n personal EPP Lleve protecci n respiratoria y guantes protectores cuando se lava el cartucho de filtro ATENCI N Maneje el cartucho de filtro con cuidado Aseg rese de que el cartucho de filtr...

Page 49: ...MANUAL DEL FILTRO est defectuoso Sustituya el bot n negro 8 Piezas de recambio Las piezas de recambio siguientes est n disponibles para el producto v ase la vista de despiece Fig V en la p gina 71 N...

Page 50: ...profesional conforme a la normativa nacional regional o local Declaraci n CE Declaraci n CE de Conformidad Los abajo firmantes Plymovent Manufacturing B V Koraalstraat 9 1812 RK Alkmaar Pa ses Bajos...

Page 51: ...odotto numero di serie Questi dati si trovano sulla targhetta di identificazione Indicazioni dei prodotti Se non diversamente specificato i contenuti di questo manuale valido per il MobilePro cos come...

Page 52: ...one Smontare completamente il braccio prima del trasporto Smontare il braccio eseguendo la procedura di montaggio nell ordine inverso Quindi la macchina e il tubo possono essere trasportati su un pall...

Page 53: ...o che pu essere dedotto dalla costruzione dal modello e dalla funzione del prodotto considerata quale uso normale L impiego del prodotto nei limiti della sua destinazione d uso comprende anche l osser...

Page 54: ...mpressa G 3 8 maschio In caso di una lampada alogena HL 20 24 160 opzione fissaggi adesivi e fascette o equivalenti 4 2 Disimballaggio Controllate se il prodotto completo L imballo dovrebbe contenere...

Page 55: ...posizioni B e C Inserire un pressacavo in entrambi i fori Inserire il cavo A attraverso i pressacavi Stringere i pressacavi Collegare il cavo al blocco di connessione all interno del pannello di coman...

Page 56: ...ione 5 3 1 La cartuccia filtrante ostruita Andare alla sezione 6 3 Per spegnere temporaneamente la luce ALARM premere il pulsante START STOP due volte off e on La luce ALARM si accender nuovamente dop...

Page 57: ...TTENZIONE L aspirapolvere industriale utilizzato per lo svuotamento della vaschetta di raccolta polvere deve rientrare nella classe H come da norma EN 60335 2 69 AVVERTIMENTO Evitare correnti d aria e...

Page 58: ...sa Successivamente tenere premuto il pulsante MANUAL CLEANING per 5 secondi premere il pulsante START STOP due volte per azzerare la luce ALARM La cartuccia filtrante ostruita Sostituire la cartuccia...

Page 59: ...Hz IEC 0040900220 Rel termico 3 2 16 A MobilePro 230V 1ph 50Hz 0000104069 Ruota ventilatore 50Hz MobilePro 400V 3ph 50Hz N 0000104069 Ruota ventilatore 50Hz 9 Diagramma elettrico Fare riferimento al d...

Page 60: ...e nazwa produktu numer seryjny Informacje te znajdziesz na tabliczce znamionowej urz dzenia Identyfikacja produktu Chyba e ustalono inaczej tre tej instrukcji odnosi si do MobilePro jak r wnie MobileP...

Page 61: ...cz Rys I na stronie 69 1 6 Zakres pracy Zobacz Rys II na stronie 69 1 7 Warunki pracy urz dzenia Temperatura pracy min normal maks 5 C 20 C 70 C Maksymalna wilgotno wzgl dna 90 Odpowiednie do stosowan...

Page 62: ...nie zgodne z przeznaczeniem3 Produkt zosta zaprojektowany wy cznie do odci gu i filtracji dym w i py w kt re s uwalniane podczas najcz stszych proces w spawalniczych Zastosowaniem produktu do innych c...

Page 63: ...rozpocz ciem obs ugi konserwacji i lub prac naprawczych nale y ca kowicie od czy urz dzenie od sieci energatycznej od czy zasilanie spr onym powietrzem Sprz t ochrony osobistej PPE Stosowa ochron dr g...

Page 64: ...tatowej Rys 4 3 Poluzowa rub M10 A na spodzie urz dzenia Kontynuowa odkr canie ruby a zrobi si ca kowicie lu na5 Rys 4 3 25 mm 1 in A A ruba do odblokowania przedniego panela Rys 4 4 Poci gnij pokryw...

Page 65: ...RO AAN UIT EIN AUS MARCHE ARR T ARRANQUE PARO ALARME ALARMA A B C Panel sterowania 5 2 U ytkowanie Poniewa dotyczy to jednostki mobilnej mo na j u y w dowolnym po danym miejscu Dla uzyskania optymalny...

Page 66: ...o unieruchomienia urz dzenia OSTRZE ENIE Przekraczanie termin w konserwacji mo e spowodowa po ar Podane interwa y konserwacyjne mog si r ni w zale no ci od konkretnych warunk w pracy i otoczenia Dlate...

Page 67: ...zy pomocy odkurzacza przemys owego W nowy wk ad A i zamontuj go przy u yciu zdemontowanych element w Upewnij si e poprawnie dokr ci e nakr tk D i zamontowa e pokryw E we w a ciwym po o eniu10 Zu yty w...

Page 68: ...zczenia przelatuj przez urz dzenie Dziurawy wk ad filtracyjny lub nieprawid owo zamontowany Wymie wk ad filtra lub popraw jego zamontowanie Brak oczyszczania wk adu Lu ne przy cze spr onego powietrza...

Page 69: ...ia 10 1 Demonta Aby bezpiecznie demontowa urz dzenia stosuj si do nast puj cych instrukcji bezpiecze stwa Zanim rozpoczniesz demonta urz dzenia od acz urz dzenie od zasilania od cz urz dzenie od spr o...

Page 70: ...bilePro with extraction arm NL Werkbereik MobilePro met afzuigarm DE Bereich MobilePro mit Absaugarm FR Port e MobilePro avec bras d aspiration ES Alcance de trabajo MobilePro con brazo de aspiraci n...

Page 71: ...owania urz dzenia z palety Fig IV Positioning of the extraction arm 400 800 mm 16 32 in 00 mm 2 in EN Positioning of the extraction arm NL Positionering van de afzuigarm DE Positionierung des Absaugar...

Page 72: ...w 0000101364 0000102584 0000104960 0805040010 0000102411 0040900220 0000101413 0000102218 0000101409 0000101440 0000101444 0000103068 0000104069 0040900010 0000104961 0000104768 0040900120 0040900130...

Page 73: ......

Page 74: ...www plymovent com 0000104750 210616 B MobilePro MobilePro PTFE...

Reviews: