www.playcraftsystems.com
For Customer Service Call
800.333.8519 (U.S.A.) or 541.955.9199 (International)
TRANSFER STATION WITH HALF WALLS
INSTALLATION INSTRUCTIONS
Rev F
6/3/2020
1209-HW
Page 5 of 7
3/8" x 1-1/4"
Button Head Bolt
3/8" x 1" O.D.
Washer
STEP DECK
3/8" x 1" O.D.
Washer
3/8" Lock Nut
STEP DECK
LEG
FIGURE 6
FIGURE 6
3/8" x 1-1/4"
Button Head Bolt
3/8" x 1" O.D.
Washer
3/8" x 1" O.D.
Washer
3/8" Lock Nut
FILLER
STEP DECK
TRANSFER DECK
FIGURE 7
3/8" x 1-1/2"
Button Head Bolt
3/8" x 1" O.D.
Washer
ADA STEPS
TRANSFER DECK
3/8" x 1" O.D.
Washer
3/8" Lock Nut
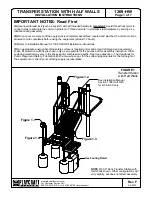
FIGURE 5
Step 11
Attach Step Deck Legs to Step Deck as
shown in Figure 6. (See Note A)
Step 12
Place Step Deck into footing hole and attach
Step Deck to Transfer Deck using Filler as
shown in Figure 7. (See Notes A & B)
Step 13
Fully tighten all fasteners according to the
"TIGHTENING TORQUE FOR HARDWARE"
section of the Installation Manual.
Step 14
Plumb and level entire component. Pour
concrete into footing holes. Allow at least 72
hours to cure before using this equipment.
(See Note B)
Step 15
Place required protective surfacing under and
around Transfer Station. (See Note D)
Step 10
Place Transfer Deck Supports into footing
holes and attach Transfer Deck to ADA Steps
as shown in Figure 5. (See Notes A & B)


