background image

www.playcraftsystems.com

For Customer Service Call

800.333.8519 (U.S.A.) or 541.955.9199 (International)

TRANSFER STATION WITH HALF WALLS

INSTALLATION INSTRUCTIONS

Rev F

6/3/2020

1209-HW

Page 3 of 7

1/4" x 3/4" Square Dr. 

Tek Screw

TRANSFER LEG 

TOP

TRANSFER DECK 

SUPPORT

Figure 1.1

3/8" x 5/8" 

Barrel Nut

3/8" x 1" Button 

Head Bolt

1/2" SAE 

Washer

STAIR RAIL 

BRACKET

3/8" x 1" O.D. 

Washer

R35 STAIR 

HALF WALL

3/8" x 5/8" 

Barrel Nut

3/8" x 3/4" 

Button Head Bolt

3/8" x 1" O.D. 

Washer

1/2" SAE 

Washer

TRANSFER RAIL

HALF WALL

Figure 1.2

Figure 1.3

3/8" x 2-1/2" 

Button Head Bolt

3/8" x 1" O.D. 

Washer

3/8" Lock Nut

TRANSFER RAIL

ADA STEPS

Step 2 

(Factory Assembled)


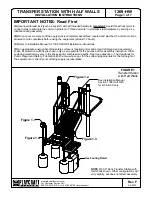
Drive Transfer Leg Tops onto Transfer Deck Supports 

approx. 1" and attach as shown in Figure 1.1.

Step 3


Attach Half Walls to Deck. (See Note C)

Step 4


For R3.5 Assembly Only


Attach Stair Rail Bracket to Half Wall as 

shown in Figure 2.  (See Note A) 

FIGURE 2

Step 5


Place Transfer Rails into footing holes and attach to 

Half Walls as shown in Figure 1.2. (See Notes A & B)

NOTE:

 R5 Half Wall shown.

Step 6


Attach ADA Steps to Transfer Rails as 

shown in Figure 1.3. (See Note A)

Summary of Contents for Transfer Station with Half Walls 1209-HW

Page 1: ...ed and plumbed Concrete must be allowed to cure completely before using the equipment at least 72 hours C Refer to Installation Manual for 1309 Half Wall installation instructions D An appropriate ene...

Page 2: ...16 427mm X See Table 3113 16 809mm 15 382mm 24 610mm Finish Grade Footing Detail Step 1 Refer to Footing Layout and mark footing hole locations Dig 4 12 footing holes and 1 12 x 24 oval footing hole...

Page 3: ...x 1 O D Washer 1 2 SAE Washer TRANSFER RAIL HALF WALL Figure 1 2 Figure 1 3 3 8 x 2 1 2 Button Head Bolt 3 8 x 1 O D Washer 3 8 Lock Nut TRANSFER RAIL ADA STEPS Step 2 Factory Assembled Drive Transfe...

Page 4: ...RANSFER DECK TRANSFER DECK SUPPORT 3 8 x 1 O D Washer 3 8 Lock Nut 3 8 x 1 O D Washer 3 8 x 1 1 4 Button Head Bolt FIGURE 4 3 8 Lock Nut 3 8 x 1 O D Washer TRANSFER RAIL 3 8 x 1 O D Washer 3 8 x 1 1 4...

Page 5: ...D Washer 3 8 Lock Nut FIGURE 5 Step 11 Attach Step Deck Legs to Step Deck as shown in Figure 6 See Note A Step 12 Place Step Deck into footing hole and attach Step Deck to Transfer Deck using Filler...

Page 6: ...lt Button Head 3 8 x 1 1 4 16 9103072 TR Bolt Button Head 3 8 x 1 1 2 8 9103112 TR Bolt Button Head 3 8 x 2 1 2 4 9333002 Washer Flat 3 8 x 1 O D x 100 thick 54 9345002 Washer Flat SAE 1 2 2 9413002 N...

Page 7: ...ed 1 660 O D 11 gauge steel support 1 029 O D 14 gauge steel rails and 1 4 thick steel mounting tab The Transfer Wall shall have a multi stage baked on powder coat finish TRANSFER LEG TOP Shall be pre...

Reviews: