background image

SPA CARE AND MAINTENANCE 

SPA CARE AND MAINTENANCE 

To clean and condition the vinyl cover:

!

Remove the cover from the spa and gently lean it up against a wall or fence.

!

Using a garden hose, spray the cover to loosen and rinse away any dirt or debris.

!

Using a sponge and/or a soft bristle brush, and using a very mild soap solution (one teaspoon dishwashing liquid with 
two gallons of water), or baking soda (sodium bicarbonate), scrub the vinyl top in a circular motion.  Do not let the vinyl 
dry with a soap film on it before it can be rinsed clean.

!

Scrub the cover’s perimeter and side flaps.  Rinse clean with water.

!

Rinse off the underside of the cover with water only (use no soap), and wipe it clean with a dry rag.

!

To condition the cover after cleaning, apply a thin film of vinyl cleaner to the surface and buff to a high luster.

!

DO NOT walk or stand on top of cover (unless you own a “walk-on-cover”.

!

DO remove snow buildup to avoid breakage of the foam core from the additional weight of the snow.

!

DO lock cover locking straps to secure the cover when the spa is not in use.

!

DO NOT drag or lift the spa cover using either of the flaps, or the cover lock straps.

Care Of Spa Cover

Important reminders:

Vacation Care Of Spa

Following these instructions to ensure that the water quality of your spa is maintained:

For Short Periods (3 to 5 days)

Adjust the pH 
Sanitize the water 
Lock cover for safety

For Long Periods (5 to 14 days)

0

Set temperature to its lowest level approximate water temperature of 80 F.
Adjust the pH 
Sanitize the water 
Lock cover for safety

Return Procedures

Sanitize the water following shock procedures
Return water temperature to original setting
Insure chlorine level had dropped below 5.0 ppm

NOTE:

  If you plan on not using your spa for periods exceeding 14 days, you may ask a family member or neighbor to assist with 

your spa maintenance, and if not available you will need to drain or winterize spa.

Winterizing Your Spa

During the cold weather you may not wish to use your spa outside.   In this case you may move it to a heated area, or leave it until the 
weather warms up.

WARNING:

  Allowing your spa water to freeze will cause severe damage to the spa shell, equipment, and plumbing and 

WILL

VOID WARRANTY.

The following steps should protect your spa from freezing:

!

Disconnect the spa from the power supply.

!

Remove the screws holding your spa excess panel door.

!

Open the valve, open the pumps plugs, and the spa will drain by gravity flow.

!

Remove the filter cartridge, then clean and store in a dry place.

!

Attach a wet/dry shop vac (capable of blowing air as well as vacuuming) into the filter housing.

!

Turn blower on and allow it to blow out any water remaining in the plumbing lines. (Should take no more than 5 
minutes).

!

Reinstall the filter housing.

!

Use the shop vac to remove water inside spa blown through jets.

!

Use a shop vac and clean towel and remove any remaining water from bottom of spa until dry.

!

Leave the drain open.

!

Close the spa cover and fasten with tie down safety locks.

13

Summary of Contents for Platinum II

Page 1: ...Owners Manual C ...

Page 2: ...ree to call manufacturer WARNING This manual was written to ensure the proper use and installation your spa Any modifications to the procedures outlined in this manual may result in your warranty being voided Please take the time to read this manual to avoid any unnecessary problems with your brand new spa and equipment THIS MANUALAND ITS CONTENTS ARE SUBJECT TO CHANGE WITHOUT NOTICE ALTHOUGH WE H...

Page 3: ...ng Diagram Specifications Drawing Audio Connection Diagram Electrical Wiring Instructions Start Up Instructions Operation Instructions Display Messages Spa Care and Maintenance Water Quality and Maintenance Spa Care and Maintenance Record Warranty i 1 2 2 3 4 5 5a 5b 5c 6 7 8 8 10 11 12 13 14 17 18 19 Page 1 8 0 0 7 4 9 8 0 0 3 ...

Page 4: ...ative a spa may be installed within 5 feet 1 5m of metal surfaces if each metal surface is permanently connected by a minimum No 8 AWG 8 4mm2 solid copper conductor to the wire connector on the terminal box that is proved for this purpose Do not permit any electrical appliance such as a light telephone radio or television within 5 feet 1 5m of the spa unless factory installed Position spa to provi...

Page 5: ...ll may result Damage caused by improper support is not covered under warranty It is the responsibility of the spa owner to assure the integrity of the support at all times It is strongly recommended that a qualified licenced contractor prepare foundation for your spa Manufacturer recommends a poured reinforced concrete slab with a minimum thickness of 4 inches 10cm Wood decking is also acceptable ...

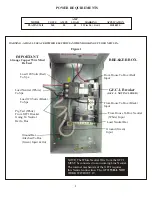
Page 6: ...x Ground Bar Attached To Box Green Input Out From House To Box Red Input From House To Box Black Input Load Neutral Bar From House To Box Neutral White Input Ground Green Input BREAKER BOX G F C I Breaker NOTE The White Neutral Wire from the GFCI MUST be connected to an incoming Line Neutral The internal mechanism of the GFCI requires this Neutral connection The GFCI WILL NOT WORK WITHOUT IT WARNI...

Page 7: ...ay result in damage to equipment and may void the warranty IF THE SPA IS WIRED INCORRECTLY YOUR WARRANTY WILLBE VOID ON ANY BURNED OUT ELECTRICAL EQUIPMENT G F C I Ground Fault Circuit Interrupter IMPORTANT This service must be single phase High voltage can seriously injure or kill Always use a certified electrician when hooking up your new spa The National Electrical Code states that a service di...

Page 8: ...5 CONTROLER HS200 M7 INSIDE VIEW Wiring Connections Ground Lug Heater Tube Heater Element Inside Tube Figure 3 Fuses White Neutral Black Red Green Ground Lug Control Box Wiring HS200VS Figure 4 ...

Page 9: ...5a ...

Page 10: ...5b ...

Page 11: ...AUDIO SYSTEM CONNECTON DIAGRAM 5c ...

Page 12: ...block remove the screws and cabinet panel on the side of the spa under control panel then remove the two screws from the control pack 7 Acable inlet grommet is located on the left and right sides of the spa cabinet approximately 4 6 from the front of the spa Feed the power supply cable through a cable inlet and conduit on the left side of the control box 8 Connect wires color to color on terminal ...

Page 13: ...ume of water so adjust water level to number of people who will be entering spa If your water is extremely hard it is preferable to fill halfway with hard water and the rest of the way with softened water Or you may fill the entire spa with hard water if you use a special water additive available by phone 1 800 749 8803 Always refill spa through one filter housing to purge any trapped air from pum...

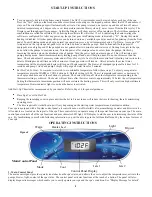
Page 14: ...econds and pump 1 low and pump 2 high will purge all water lines for 5 minutes Set Hot Tub To Heat To warm hot water tub to a comfortable temperature follow these steps To adjust your spa water temperature press the WARM or COOL button pad Default setting is 100F The set temperature advances or decreases by one degree each time one of these buttons is pressed The heater will turn off when the temp...

Page 15: ...mood is light preprogrammed with assortment of lighting effects When you turn the Light off and turn on within 5 seconds it advances to the next effect When you turn the Light off for more than 5 seconds it remembers that last effect you selected The next time you turn on the Light it will display the sameeffect The Light will automatically turn off after approximately 4 hours For Standard Light a...

Page 16: ...massage providing an ultimate massage Each jet has its own water volume and directional or oscillating flow adjustment To adjust jets Turn outer dial counterclockwise to increase water volume Turn outer dial clockwise to decrease water volume or to shut jet off For adjustment of the directional jets move the nozzle of jet to any angle 5 Aromatherapy Simply remove the Aromatherapy injector cap drop...

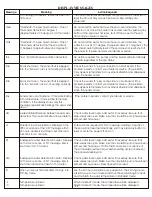
Page 17: ...pa cover and allow the water to cool At 107 degree F approximately 41 7 degree F the spa should automatically reset If the spa does not reset shut off the power to the spa and call your dealer or sevice No action required The pumps and the blower will automatically activate regardless of the spa status Check the sensor A plug connection to circuit board If the problem persists contact your dealer ...

Page 18: ...purchased by phone 1 800 749 8003 Part 6136 Filter Elements Care Of The Exterior Spa Shell Your spa shell is made of acrylic Stains and dirt generally will not adhere to the surface Using a soft rag or a nylon scrubber should easily remove most dirt Most household chemicals are harmful to your spa s shell See your dealer for the best product to use The only products which have passed the manufactu...

Page 19: ...eriods 5 to 14 days 0 Set temperature to its lowest level approximate water temperature of 80 F Adjust the pH Sanitize the water Lock cover for safety Return Procedures Sanitize the water following shock procedures Return water temperature to original setting Insure chlorine level had dropped below 5 0 ppm NOTE If you plan on not using your spa for periods exceeding 14 days you may ask a family me...

Page 20: ...irections Though chemicals protect you and your spa when used correctly they can be hazardous in concentrated form Observe the following guidelines Allow only a responsible person to handle spa chemicals KEEP OUT OFTHE REACH OF CHILDREN Accurately measure the exact quantities specified never more Do not overdose your spa Handle all containers with care Store in a cool dry well ventilated place Alw...

Page 21: ...tion a mixture of 75 hard and 25 soft water will be a good starting point If soft water is not available or practical for you a stain and scale control such as Scale Defense should be added to the spa water according to instructions on its label Once the CH is balanced it normally remains stable although the addition of more water with a high or low calcium content will raise or lower the CH readi...

Page 22: ...spiration etc Chloramines can cause eye irritation as well as having a strong odor Unlike bromamines chloramines are weaker slower sanitizers Chlorine An efficient sanitizing chemical for spas Chlorine or Bromine Residual The amount of chlorine or bromine remaining after chlorine or bromine demand has been satisfied The residual is therefore the amount of sanitizer which is chemically available to...

Page 23: ...er level Low pH Low sanitizer level Unsanitary water Free chlorine level above 5 ppm Total alkalinity and or pH too low High iron or copper in source water High calcium content in water total alkalinity and pH too high Solutions Clean filter or replace Shock spa with sanitizer Add sanitizer Adjust pH and or alkalinity Run jet pump s and clean filter Drain and refill spa Shock spa with sanitizer Ad...

Page 24: ...i F e c a l p e R a p S e z i r e t n i W a p S e z i r e t n i W r e v o C l y n i V n o i t i d n o C n a e l C r e v o C l y n i V n o i t i d n o C n a e l C e c i v r e S e c i v r e S t n e m e l E r e t l i F k a o S r o n a e l C y a r p S t n e m e l E r e t l i F k a o S r o n a e l C y a r p S t e n i b a C n a e l C t e n i b a C n a e l C Notes 18 ...

Page 25: ...e United States The purchaser must establish the date of purchase by dated sales invoice or delivery receipt This limited warranty does not cover damage resulting from abuse misuse or neglect including any installation operation maintenance or use of spa other than in accordance with the Owner s Manual of the spa Damage caused by operation of the spa at water temperatures outside the range of 32 d...

Page 26: ...1 8 0 0 7 4 9 8 0 0 3 6101 N 45th Street St Petersburg Florida 33714 STAMP ...

Reviews: