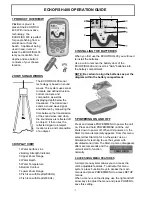
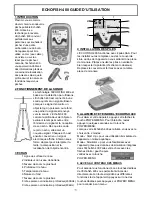


7.3
Your ECHOFISH 400 includes a combination
adapter, mounting bracket for the sonar sensor.
The adapter includes mounting taps so that you can
attach it to any flat surface, boat hull or appropriate
rod. The Adapter is removable and adjustable up to
180 Degrees.
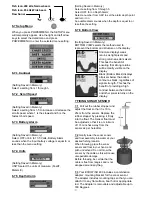
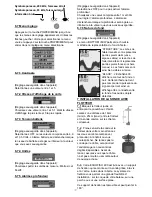
6.7.3 Battery Alarm
(Setting Saved in Memory)
Select a setting from 1-5 to increase or decrease the
scroll speed, where 1 is the slowest and 5 is the
fastest chart speed.
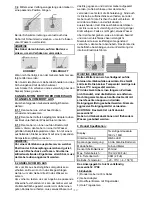
Fish Icon,200 kHz,Narrow beam
Fish Icon,83 kHz,Wide beam
Raw Sonar
(Setting Saved in Memory)
Select a setting from 1through 5.
Select OFF for no Depth Alarm;
Select a number from 3-99' to set the alarm depth point
and turn it on.
An audible alarm sounds when the depth is equal to or
less than the setting.
6.7 Setup Menu
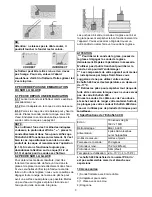
6.7.6 Bottom View
When you press POWER/MENU, the SETUP menu
will temporarily appear. Use the right and left arrow
keys to select the detail menu and press
POWER/MENU to enter the selected menu setting.
6.7.1 Contrast
(Setting Saved in Memory)
Select a setting from 1 through 5.
6.7.2 Scroll Speed
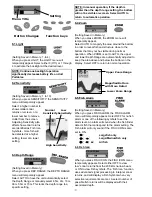
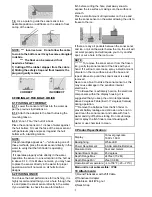
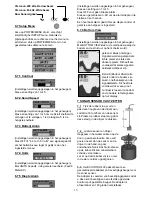
7.1
Pull out the rubber stopper and
adjust the float so that it is 18 to
25cm from the sensor. Replace the
rubber stopper by pressing it firmly
into the float. The Sensor float must
be adjusted so that it is a minimum
of 17cm inches away from the
sensor as per hereafter.
(Setting Saved in Memory)
BOTTOM VIEW selects the method used to
represent the bottom and structure on the display.
Structure displays weak
returns as light pixels and
strong returns as dark pixels.
This has the benefit of
ensuring that strong returns
will be clearly visible on the
display.
7.2
Gently lower the sonar sensor
and float assembly into water at your
desired fishing location.
When throwing, place the sonar
sensor and float in your hand, and
pitch underhand. Do not throw the
sensor by the cable as this will cause
unrepairable damage.
Before throwing, be certain that the
cable is free from tangles and is not
wrapped around anything.
Black (Bottom Black) displays
all pixels below the bottom
contour as black, regardless of
signal strength. This has the
benefit of providing a high
contrast between the bottom
and other sonar returns on the
display.
7 FIXING SONAR SENSOR
(Setting Saved in Memory)
Select OFF or 4.6 to 13.5 Volts. Battery Alarm
sounds when the input battery voltage is equal to or
less than the menu setting.
6.7.4 Units
6.7.5 Depth Alarm
(Setting Saved in Memory)
UNITS select the units of measure. (Feet/F,
Meters/C)
-3-