background image

2

1

4

3

5

8
9

6

7


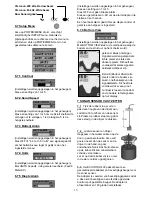
1 Superficie del agua
2 Indicador de carga de batería
3 Nivel de zoom max   
4 Profundidad
5 Temperatura del agua
6 Naturaleza del fondo
7 Nivel de zoom mínimo
8

Indicador de presa y de profundidad (200KHz)

9

Indicador de presa y de profundidad (83KHz)

4 INSTALACIÓN DE LAS PILAS

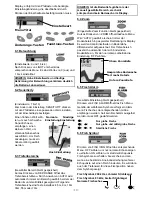
Para encender el equipo, pulse y suelte la tecla

POWER-MENU. Para apagarla, mantenga pulsada

algunos segundos la tecla POWER/MENU.

Cuando su Echofish 400 esté encendida, tiene la

posibilidad de elegir entre 2 modos :

Modo « Start Up » para una utilización inmediata del

equipo.

Modo « Simulator » para familiarizarse  con el

equipo gracias a los datos de simulación integrados

en la Echofish 400. Elija la opción mediante las

6 ACCESO AL CONTENIDO DE LOS MENUS

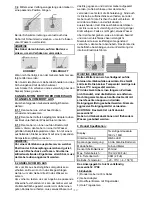
Para acceder a las funciones principales

Las Teclas específicas de la Echofish 400 le

permiten acceder directamente con toda simplicidad

a las diferentes funciones principales del equipo.

Pulse sobre la tecla de función principal  y sobre

POWER/ MENU para acceder a su menú.
Cuando el menú elegido aparece en pantalla, utilice

las fechas derecha / izquierda para hacer los ajustes

deseados y confirme pulsando sobre

POWER/MENU.

teclas “flecha”  a la derecha /

izquierda y confirmar con la

tecla POWER-MENU.

5 ENCENDER Y APAGAR EL INSTRUMENTO

ECHOFISH 400

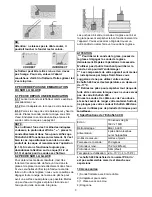
La ECHOFISH 400 funciona con 4 pilas tipo AAA.

Para instalar las pilas o reemplazarlas, abra la tapa

situada detrás del aparato con la ayuda de una

moneda. Coloque las pilas respetando la polaridad

(ver esquema a continuación). Volver a colocar la

tapa y cerrarla con una moneda.

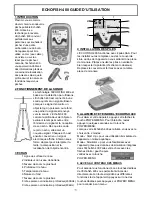
1 INTRODUCCIÓN

Plastimo le da las gracias por

haber elegido la sonda de

pesca portátil Echofish 400.

Gracias a su tecnología

innovadora, La Echofish 400

es una sonda perfecta tanto

para pescadores o abordo

de una embarcación pequeña

como a pescadores en la

orilla.. Este aparato puede

usarse en el mar ( agua en

calma),  en ríos o lagos.

El equipo más adecuado

para el pescador nómada;

la Echofish 400 le permitirá

localizar peces,  conocer la

profundidad y la naturaleza

del fondo.

La tecnología de la ECHOFISH 400 se basa en la

detección mediante ultrasonidos.

 ECHOFISH 400 GUIA DEL USUARIO

2 ¿CÓMO FUNCIONA?

3 PANTALLA

La Echofish 400 conectada a un transductor emite

una señal ultrasónica, cuando la señal encuentra un

objeto como un pez o el fondo, una parte de la señal

se reenvía de vuelta hacia el transductor de sonda.

La  Echofish 400 calcula la

profundidad del objeto evaluando el

tiempo transcurrido entre la emisión

de la señal y la recepción de su

eco. El sistema usa entonces la

señal de detección para devolver

información de localización, de

tamaño y de la naturaleza del

objeto. Cada eco se convierte en

una señal electrónica que aparece

en pantalla bajo la forma de píxel

para interpretar el tamaño, la

composición y la localización del

objeto encontrado.

-17-

Summary of Contents for ECHOFISH 400

Page 1: ...I P25 GR P29 NOTICE D UTILISATION NL P13 E P17 S P21 USER GUIDE ECHOFISH 400 Floating Transducer WWW PLASTIMO COM ECHOFISH 400 Sonde Flottante GB P1 F P5 D P9 languages available...

Page 2: ...e and composition of an object 3 DISPLAY VIEW 4 INSTALLING THE BATTERIES When you first use the ECHOFISH 400 you will need to install the batteries Use a coin to remove the battery door of the ECHOFIS...

Page 3: ...OOM is set to AUTO the upper and lower Depth Range are automatically adjusted to keep the area above and below the bottom on the display Select OFF to return to normal operation Setting Saved in Memor...

Page 4: ...the sensor Replace the rubber stopper by pressing it firmly into the float The Sensor float must be adjusted so that it is a minimum of 17cm inches away from the sensor as per hereafter Setting Saved...

Page 5: ...erly while directly in the water reposition the sensor in a new location in the hull as in above 8 1 3 If it still does not work you may have to place the sensor directly in the water for proper opera...

Page 6: ...n menu ECHOFISH 400 GUIDE D UTILISATION 2 FONCTIONNEMENT DE LA SONDE 1 INTRODUCTION Plastimo vous remercie d avoir choisi le sondeur de p che portable Echofish 400 Gr ce sa technologie innovante L Ech...

Page 7: ...sibilit apparaisse est accrue R gler la sensibilit impacte galement sur la fa on dont les retours d ondes sont identifi s Pour la d tection de poissons par exemple plus de poissons seront d tect s un...

Page 8: ...de la carte 7 INSTALLATION DE LA SONDE AVEC FLOTTEUR BLACK L Echofish 400 affiche le contour du fond en noir Cette m thode ne tient pas compte de la puissance du signal et permet ainsi un affichage t...

Page 9: ...es pour emp cher tout risque de fuite et de corrosion lorsque vous ne vous servez pas de votre Echofish 400 Rincez la sonde et le c ble avec de l eau douce et s chez avant de ranger votre mat riel Sur...

Page 10: ...and von der Null Linie als aufeinander folgende Bildpunkte aufgezeichnet 5 GER T EIN AUSSCHALTEN Um das Ger t einzuschalten die Ein Ausschalttaste dr cken und wieder loslassen Zum Ausschalten die Ein...

Page 11: ...Menu Es sind Werte von 0 aus und 1 bis 4 einstellbar Gew hlter Bereich bleibt gespeichert Kurzes Dr cken von DEP RANGE ffnet das Tiefenbereich Menu Durch Anwahl von AUTO wird automatisch immer ein Ber...

Page 12: ...terschiedlichsten Montagebedingungen anpassen zu k nnen Es kann an eine Bootswand montiert oder mit der Hand gehalten werden Der Adapter ist abnehmbar und kann in jedem Abstrahlwinkel zwischen 0 und 1...

Page 13: ...stfreier Bolzen mit Fl gelmutter 2 Geber Adapter 4 Hals Trageriemen 7 4 Mittels einer Verl ngerungsstange den Geber in eine passende Position bringen HINWEISE Das Kabel daran hindern auf den Boden zu...

Page 14: ...de ECHOFISH 400 kunt gebruiken moet u eerst de batterijen installeren Gebruik een munt om het batterijendekseltje te openen en doe 4x AAA in het batterijcompartiment 4 BATTERIJEN INSTALLEREN 5 AAN EN...

Page 15: ...getal om van l Instellingen worden opgeslagen in het geheugen Als u op DEP RANGE drukt verschijnt kortstondig het DEPTH RANGE menu Kies AUTO om de Diepte Range automatisch aan te passen of kies handma...

Page 16: ...getoond Zwak ontvangen signalen worden getoond als lichte pixels en sterke als donkere pixels Dit heeft als voordeel dat sterke signalen duidelijk zichtbaar zijn BLACK Bodem Zwart alle pixels onder d...

Page 17: ...endhoek 45 Backlighting Wit LED Voeding 8 1 3 schiet door de romp van de boot Plaats de sensor in ca 3 cm water tegen de romp van de boot of smeer de sensor in met vet en druk deze al draaiende tegen...

Page 18: ...on 4 pilas tipo AAA Para instalar las pilas o reemplazarlas abra la tapa situada detr s del aparato con la ayuda de una moneda Coloque las pilas respetando la polaridad ver esquema a continuaci n Volv...

Page 19: ...eces a un nivel alto y menos a un nivel bajo El ajuste de f brica de esta funci n es de 5 Pulsar sobre la tecla FISH ICON hasta que el men s mbolo de peces aparezca Seleccionar OFF para obtener las in...

Page 20: ...or al valor programado 6 7 Men ajuste Ajuste memorizado en el equipo El men BOTTOM VIEW permite elegir el m todo de representaci n del fondo en la pantalla Pulsar sobre la tecla POWER MENU hasta que l...

Page 21: ...bajo de la l nea de flotaci n Untar el transductor de sonda con vaselina y col quela contra el casco NOTA Si utilizando uno de los 3 m todos mencionados anteriormente la profundidad indica coloque el...

Page 22: ...i sj n Tack vare Echofish 400 kommer du att hitta fisken samt se djup och bottenkonturerna under vattnet 3 Display Vy 2 Hur givaren fungerar OBS Var noga med att s tta i batterierna t samma h ll som...

Page 23: ...r att endast se r a ekon fr n givaren V lj On f r att utnyttja ekolodets kapacitet att urskilja fisk i det reflekterande ekot fisksymboler kommer nu att visas p displayen tillsammans med deras uppska...

Page 24: ...G AV GIVARE Inst llningar sparas i minnet H r v ljer man med vilken metod som botten skall visas p displayen STRUCTUR visar svaga ekon med ljusa pixlar och starka ekon med m rka pixlar Detta har f rde...

Page 25: ...Ta ur batterierna fr n fishfinder n r den inte anv nds f r att f rhindra batteril ckage och korrosion Reng r givare och kabel efteranv ndning med f rskvatten och torka torrt Anv nd aldrig kemikalier...

Page 26: ...alle caratteristiche regolabili dell unit Per attivare il sistema menu premere POWER MENU e questo comparir Premere i tasti di funzione per accedere al menu principale e premere POWER MENU per accede...

Page 27: ...PESCE comparir temporaneamente Scegliere OFF per disattivare l allarme pesce o uno dei seguenti simboli per impostare il livello dell allarme Un segnale di allarme viene emesso quando l ecoscandaglio...

Page 28: ...rimento 6 7 3 Allarme Batteria 6 7 4 Unit 6 7 5 Allarme Profondit Impostazione salvata in memoria Selezionare un impostazione da 1 a 5 Selezionare OFF per disattivare l Allarme Profondit Selezionare u...

Page 29: ...non lo si usa per evitare la fuoriuscita di liquido e la corrosione Pulire il sensore sonar e il cavo con acqua pulita e asciugare prima di riporlo Non immergere n spruzzare acqua sullo schermo dell...

Page 30: ...fish 400 POWER MENU POWER MENU POWER MENU Echofish 400 2 Start Up Simulator Echofish 400 POWER MENU 2 3 4 ECHOFISH 400 Echofish 400 Echofish 400 pixel Plastimo Echofish 400 X u Echofish 400 Echofish 4...

Page 31: ...4 6 3 POWER MENU 5 6 4 Zoom AUTO 6 6 FISH ALARM FISH ALARM OFF 3 Echofish 400 3 ON ZOOM ZOOM AUTO ZOOM OFF DEP RANGE Depth AUTO 4 5m 9m 18m 36m 55m 73m SENSITIVITY Sensitivity FISH ICON FISH ICON OFF...

Page 32: ...FF 1m 30m c F 7 2 200 kHz 83 kHz 6 7 6 7 3 ECHOFISH 400 6 7 POWER MENU POWER MENU 6 7 1 6 7 2 1 5 1 5 180 6 7 3 31 1 5 BOTTOM VIEW STRUCTURE pixels pixels 7 18 25 max BLACK Echofish 400 OFF 4 6 13 5 V...

Page 33: ...fish 400 8 1 3 8 1 2 8 1 3 9 Echofish 400 17 C Echofish 400 Echofish 400 16 160V x 160H 45 LED 8 8 1 8 1 1 8 1 2 8 2 8 1 3 3cm 0 6m 2 To Echofish 400 IPX4 T 10 4 AAA 73 2m 240 20 70 C 4 158 F 1 8m 3 B...

Page 34: ...USER GUIDE ECHOFISH 400 WWW PLASTIMO COM...

Reviews: