background image

15 

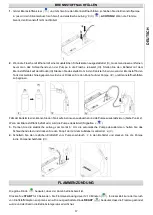
FUEL FILLING 

1. 

If the tank is empty (

) or you want to fill the fuel, firmly connect the 

pump hose ‘a’ (click!) and power cable ‘b’ (I) 

(

). 

ATTENTION! 

Do not refuel when the flame is ignited! 


2. 

If the fuel bottle is secured with the flame restrictor (cap on the bottles’ neck) (II) please remove it before inserting 

the fuel pump inlet (III) Place the fuel container stably on the floor and insert the pump 

hose ‘c’ (III). Press and hold 

the button on the pump to start refuelling (IV).  


Once the fuel container has been emptied, replace it with a full one and start the pump again (see point 2). 

The pump will stop when the tank is full (sound + 

). 

3. 

Disconnect the power cable ‘b’. To disconnect the pump, hold the end of the hose and firmly press the button in the 
place marked with a sticker 

‘a’ (V).  

4. 

Shake the remaining fuel from the hose ‘c’ to the container and place the pump in the bag (VI). 


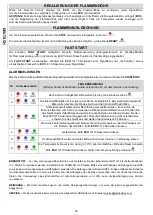
FLAME IGNITION 

The green diode 


indicates that the device is ready to ignite the flame.  

Press and hold 

START

 for 3 seconds. Flame ignition will take 2-10 minutes (

). The smell of ethanol vapours 

can be present during the ignition. The diode 

READY 

off (

) indicates that

 the flame has been ignited 

and the device reached the working temperature 

EN

GL

ISH


Summary of Contents for Senso

Page 1: ...ANLEITUNG 2 ES MANUAL DE MONTAJE 2 FR NOTICE DE MONTAGE 2 IT ISTRUZIONI DI MONTAGGIO 2 PL INSTRUKCJA MONTAŻU 2 RU ИНСТРУКЦИЯ ПО МОНТАЖУ 2 EN INSTRUCTION MANUAL 15 DE BEDIENUNGSANLEITUNG 17 ES MANUAL DE USUARIO 19 FR NOTICE D UTILISATION 21 IT MANUALE D USO 23 PL INSTRUKCJA OBSŁUGI 25 RU ИНСТРУКЦИЯ ПО ЭКСПЛУАТАЦИИ 27 ...

Page 2: ...ve the device 7 Do not place any objects on the top of the device 8 We recommend placing a CO2 or dry powder fire extinguisher nearby the device 9 For service purposes the surrounding must allow for easy removal of the device 10 Keep children animals and unauthorized persons away from the device 11 Keep the packaging and manuals for future use 12 Do not turn on the device in case of fuel spill 13 ...

Page 3: ...mit Brennstoff nachgefüllten Kamin nicht transportieren 17 Das Gerät im Betrieb nicht ohne Aufsicht lassen El producto es un dispositivo decorativo que produce fuego real Familiarícese con la documentación adjunta antes de instalar e iniciar el dispositivo Familiarícese con las regulaciones locales sobre chimeneas 1 Producto para uso interno y solamente encajado Usar a una temperatura min de 10 C ...

Page 4: ...vec du carburant 17 Ne laissez pas l appareil fonctionner sans surveillance Prodotto è un dispositivo decorativo che produce un vero fuoco Familiarizzare con il manuale allegato prima di installare e avviare il dispositivo Familiarizzare con le normative locali relative ai camini 1 Dispositivo solo per uso interno e nella struttura ad incasso Utilizzare a una temperatura min di 10 C 2 Cubatura min...

Page 5: ...nadzoru Продукт является декоративным изделием производящим настоящий огонь Ознакомьтесь с приложенной документацией перед монтажом и запуском устройства Ознакомьтесь с местными правилами касающимися каминов 1 Устройство предназначено только для использования внутри помещений и после установки Используйте в температуре 10 C 2 Кубатура помещения для одного устройства составляет мин 19 м3 3 Обмен во...

Page 6: ...x incombustibles isolé de tous les éléments inflammables de la construction Les raccordement et liants doivent être résistants aux hautes températures IT La struttura ad incasso deve essere fatta di materiali non combustibili isolati da tutti gli elementi infiammabili della struttura Collegamenti e leganti devo essere resistenti alle alte temperature PL Zabudowa wykonana z materiałów niepalnych od...

Page 7: ...DE Die Konstruktion unter dem Kamin muss geschlossen sein ES El espacio debajo del dispositivo debe ser cerrado FR L espace sous le dispositif doit être fermé IT Lo spazio al di sotto del camino deve essere chiuso PL Przestrzeń pod urządzeniem musi być zamknięta RU Конструкция под тело устройства должна быть закрытой ...

Page 8: ...8 Element B Element D Element C Element B Element D Element C Element B Element D Element C lement B lement D lement C Element B Element D Element C ...

Page 9: ...9 TV AC TV ...

Page 10: ...e de que los gránulos no toquen el filamento FR Répartir les granulés H uniformément sur l endroit marqué sans laisser d espace Assurez vous que les granulés ne touchent pas le filament IT Distribuire i granuli H in modo uniforme nel punto segnato senza lasciare spazi vuoti Assicurarsi che i granuli non tocchino il filamento PL Rozłóż równomiernie granulat H w oznaczonym miejscu nie zostawiając wo...

Page 11: ...11 OPTIONAL NOT INCLUDED AS STANDARD EQUIPMENT Element A Element B Element D Element C Element D Element J Element H Element I ...

Page 12: ... se muestra en la foto I FR Répartir les granulés H uniformément sur l endroit marqué sans laisser d espace Assurez vous que les granulés ne touchent pas le filament Placez les bûches céramiques comme indiqué sur la photo I IT Distribuire i granuli H in modo uniforme nel punto segnato senza lasciare spazi vuoti Assicurarsi che i granuli non tocchino il filamento Posizionare i ceppi di ceramica com...

Page 13: ...control 5 Llenado de combustible 6 Bomba a b c 1 Filament 2 Foyer 3 Brûleur 4 Panneau de commande 5 Remplissage 6 Pompe a b c IT PL RU 1 Resistenza 2 Focolare 3 Bruciatore 4 Pannello di controllo 5 Bocchettone di riempimento 6 Pompa di rifornimento a b c 1 Żarnik 2 Palenisko 3 Ruszt 4 Panel sterowania 5 Wlew paliwa 6 Pompa paliwa a b c 1 Нить накаливания 2 Желоб пламени 3 Верхняя плита 4 Панель уп...

Page 14: ... мигают EN DE ES FR 1 ECO mode 2 Flame ignition flame extinguishing 3 Service socket 4 Control diodes 1 ECO Modus 2 Schaltet den Kamin ein aus 3 Servicesteckdose 4 Kontroll Dioden 1 Modo Eco 2 Encendido extinción de fuego 3 Toma de servicio 4 Diodos de control 1 Mode ECO 2 Allumage extinction de la flamme 3 Fente de service 4 Diodes de contrôle IT PL RU 1 Modalità ECO 2 Accensione Spegnimento dell...

Page 15: ...ied replace it with a full one and start the pump again see point 2 The pump will stop when the tank is full sound 3 Disconnect the power cable b To disconnect the pump hold the end of the hose and firmly press the button in the place marked with a sticker a V 4 Shake the remaining fuel from the hose c to the container and place the pump in the bag VI FLAME IGNITION The green diode indicates that ...

Page 16: ...ed diode to turn off Refill the tank 3 If spillage occurred while pouring the fuel disconnect the fuel pump and wipe off the visible liquid Mute the device START STOP button and wait for at least one hour Press and hold ECO for 10 seconds If the message does not disappear turn off the device and wait for a minimum of 24 hours If the error occurred during flame ignition it means that the ignition t...

Page 17: ...ffnachfüllen zu beginnen Falls der Kanister leer ist können Sie den Tank auf einen neuen austauschen und die Pumpe wieder aktivieren Siehe Punkt 2 Wenn der Brannstofftank befüllt wird wird die Pumpe deaktiviert Signalton 3 Trennen Sie die elektrische Leitung vom Gerät b Um die automatische Pumpe abzuklemmen halten Sie das Schlauchende fest und drücken Sie den Knopf der mit dem Aufkleber markiert i...

Page 18: ...nstoff nachfüllen 3 Sollte Brennstoff während der Nachfüllung verschüttet werden trennen Sie die Brennstoffpumpe vom Kamin und wischen sichtbare Brennstoffspuren ab Schalten Sie das Gerät stumm Start Stop und warten Sie mindestens eine Stunde Halten Sie den Knopf ECO 10 Sekunden lang gedrückt Falls die Fehlermeldung nicht verschwindet schalten Sie das Gerät aus und warten Sie mindestens 24 Stunden...

Page 19: ...a bomba IV para comenzar a verter La bomba se apagará cuando el tanque de combustible esté lleno señal de sonido 3 Desenchufe el cable de alimentación b Para desconectar la bomba sostenga el fin de la manguera y presione firmemente el botón marcado con la etiqueta a V 4 Agite el combustible residual de la manguera c en la botella y coloque la bomba en la cubierta VI ENCENDIDO DE LA LLAMA Diodo ver...

Page 20: ...tible 3 Si se produce un derrame durante el relleno desconecte la bomba de combustible y limpie el líquido Silencie el dispositivo botón START STOP y espere un mínimo de 1 hora Presione el botón Eco durante 10 segundos Si el mensaje no desaparece apague el dispositivo y espere un mínimo de 24 horas El mensaje que se muestra durante la activación de la llama significa que se ha excedido el tiempo d...

Page 21: ...le réservoir de carburant est vide remplacez le par un plein et redémarrer la pompe voir point 2 La pompe s éteint lorsque le réservoir de carburant est plein signal sonore 3 Débranchez le câble d alimentation b Pour déconnecter la pompe maintenez l extrémité du tuyau et appuyez fermement sur le bouton marqué de l autocollant a V 4 Secouez le reste du carburant du fil c dans la bouteille et placez...

Page 22: ...ersement se produit pendant le processus de remplissage débranchez la pompe à carburant et essuyez tout liquide visible Coupez le son de l appareil bouton START STOP et attendez au moins 1 heure Appuyez sur le bouton Eco pendant 10 secondes Si le message ne disparaît pas éteignez l appareil et attendez min 24 heures Le message affiché pendant le démarrage de la flamme signifie que le temps d atten...

Page 23: ... IV Quando il serbatoio del combustibile è vuoto sostituirlo con uno pieno e avviare nuovamente la pompa punto 2 La pompa si spegne quando il serbatoio del combustibile è pieno segnale sonoro 3 Scollegare il cavo di alimentazione b Per scollegare la pompa mantenere l estremità del tubo flessibile e premere saldamente il pulsante contrassegnato con l adesivo a V 4 Scuotere il carburante rimanente d...

Page 24: ...osso si spenga Aggiungere il combustibile 3 In caso la fuoriuscita è accaduta durante il rifornimento scollegare la pompa del combustibile e rimuovere il liquido visibile Disattivare il dispositivo pulsante START STOP e attendere almeno 1 ora Premere il pulsante Eco per 10 secondi se il messaggio non scompare spegnere il dispositivo e attendere min 24 ore Il messaggio visualizzato durante l avvio ...

Page 25: ...alewanie Gdy pojemnik z paliwem zostanie opróżniony wymień go na pełny i uruchom pompę ponownie patrz pkt 2 Pompa wyłączy się gdy zbiornik paliwa zostanie zapełniony sygnał dźwiękowy 3 Odłącz przewód zasilający b Aby wypiąć pompę przytrzymaj koniec węża i mocno naciśnij przycisk oznaczony naklejką a V 4 Strząśnij resztkę paliwa z przewodu c do butelki i umieść pompę w pokrowcu VI ODPALANIE PŁOMIEN...

Page 26: ...ło paliwa w trakcie pracy urządzenia Urządzenie jest schładzane Poczekaj aż czerwona dioda zgaśnie Uzupełnij paliwo 3 Jeżeli rozlanie wystąpiło w trakcie nalewania odłącz pompę paliwa i wytrzyj widoczną ciecz Wycisz urządzenie przycisk START STOP i odczekaj minimum 1 h Wciśnij przycisk Eco przez 10 sekund Jeżeli komunikat nie zniknie wyłącz urządzenie i odczekaj min 24 godziny Komunikat wyświetlon...

Page 27: ...полнения топливом Когда бак с топливом будет пустой надо его поменять на полный и повторно запустить автоматический насос см п 2 Насос выключится когда топливный бак камина будет полный звуковой сигнал 3 Отключить электрический провод b Чтобы отключить насос надо придержать конец шланга и сильно нажать кнопку с наклейкой a V 4 Стряхнуть остаток топлива c провода c в бутылку и поместить насос в чех...

Page 28: ...во Устройство охлаждается Подождать погашения красного диода Наполнить бак топливом 3 Если разлив произошел во время подачи топлива отключите насос и протрите видимую жидкость Выключить устройство кнопка START STOP и подождать мин 1 час Нажимать кнопку Eco 10 секунд Если сообщение не погаснет надо выключить изделие и подождать мин 24 часа Если сообщение появляется во время запуска камина то это об...

Reviews: